How to read tatting patterns, or how I write my tatting tutorials
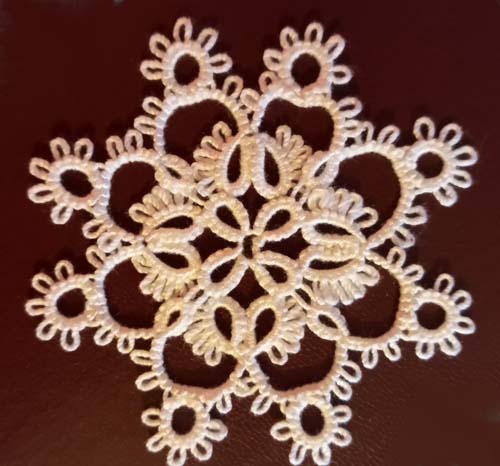
Hello everyone! I recently received an email asking me to help my FB friend learn to read tatting patterns. Oh, this is a very broad topic! Of course, I’ll try not to tire you too much! But I have prepared several versions of instructions that are in the books on tatting by different authors. So, the diagram we are going to look at today is very simple. I created this snowflake specifically for this post.
Before we start weaving, let’s take a look at a few example instructions. Of course, before starting work, you must carefully learn the Abbreviation. Some terms may differ from another author, but the basic elements are always the same. These are Ring, Chain and Picot. I am not covering more complex elements in this pattern. I will not name the authors who I took as templates for writing instructions for ethical reasons. You will need: two shuttles or a tatting needle, white thread # 10, a crochet hook, scissors and a good mood!
Example 1.
Abbreviation: Number = number of double stitches between the picots, R = ring, C = chain, + = joining, 1 X 4 = 1 – 1 – 1 – 1, 2 X 6 = 2 – 2 – 2 – 2 – 2 – 2, – = picot
Number of shuttles: One, and second thread
Row 1
Shuttle 1: R: 5 – 2 – 2 – 2 – 5. Repeat 3 times.
Row 2
Shuttle 1:R: 2 – 1 X 4 – 2 + 6 – 2. R: 2 + 6 + 2 – 1 X 4 – 2.
Shuttle 2: C: 3 – 2 – 2 – 2. R: 2 + 2 X 6 – 2. C: 2 + 2 – 2 – 3.
Shuttle 1: R: 5 + 5.
Shuttle 2: C: 3 – 2 – 2 – 2. R: 2 + 2 X 6 – 2. C: 2 + 2 – 2 – 3.
Repeat 3 times.
I really like these instructions for their brevity. But I think you will agree with me that it is too difficult for beginner tatters. You may ask: where does the work start, when to turn the work? This is where the difficulty lies.
Example 2.
Abbreviations: R = ring, cl = close, Ch = chain, – = picot, rv = reverse work, DNR = do not reverse, + = join
Row One:
R: 5 – 2 – 2 – 2 – 5 cl DNR
Repeat 3 times.
Row Two:
✼ R: 2 – 1 – 1 – 1 – 1 – 2 + ( to Ring of Row 1) 6 – 2 cl DNR
R: 2 + ( to previous Ring) 6 + ( to next Ring of Row 1 ) 2 – 1 – 1 – 1 – 1 – 2 cl rv
Ch: 3 – 2 – 2 – 2 DNR
R: 2 + ( to previous Chain ) 2 – 2 – 2 – 2 – 2 – 2 – 2 cl DNR
Ch: 2 + ( to previous Ring ) 2 – 2 – 3 rv
R: 5 + ( to Ring of Row 1 )5 cl rv
Ch: 3 – 2 – 2 – 2 DNR
R: 2 + ( to previous Chain ) 2 – 2 – 2 – 2 – 2 – 2 – 2 cl DNR
Ch: 2 + ( to previous Ring ) 2 – 2 – 3 rv
Repeat from ✼ 3 times.
In my opinion, there is no need to write “close” at the end of each Ring. After all, we see at the beginning of the combination that we need to make a ring. Thus, this Ring will be closed anyway. Perhaps you know of any cases where the ring is not closed? But will this element then be called a ring? However, these instructions indicate at the end of each element whether or not to reverse the work. This is a plus, no doubt.
Example 3.
Abbreviations: Ds – double stitch, R – ring, cl – close, Ch – chain, p – picot, jp = join
Row One:
R: 5ds, 2ds, p, 2ds, p, 2ds, p, 5, cl
Repeat 3 times.
Row Two:
✼ R: 2 ds, p, [1ds, p] 4 times, 2ds, jp to Ring of Row 1, 6 ds, p, 2ds, cl
R: 2ds, jp to previous Ring, 6ds, jp to next Ring of Row 1, 2 ds, p, [1ds, p] 4 times, 2ds, cl
C: 3ds, p, [2 ds, p] 2 times, 2ds
R: 2ds, jp to previous Chain, [2ds, p] 6 times, 2ds, cl
C: 2ds, jp to previous Ring , 2ds, p, 2ds, p, 3ds, rv
R: 5ds, jp to Ring of Row 1, 5ds, cl
C: 3ds, p, [2 ds, p] 2 times, 2ds
R: 2ds, jp to previous Chain, [2ds, p] 6 times, 2ds, cl
C: 2ds, jp to previous Ring , 2ds, p, 2ds, p, 3ds, rv
Repeat from ✼ 3 times.
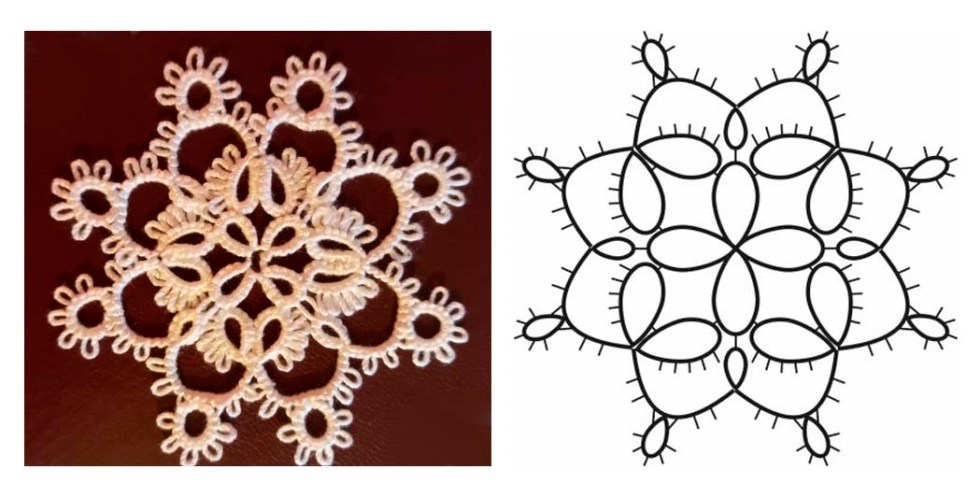
This tutorial is good too, no doubt! Have you noticed that the instructions we reviewed were NOT accompanied by graphical diagrams? Of course, you can look at the photo of the finished snowflake and follow the instructions. But I prefer to combine instruction and graphical diagram in my tutorials.
Aren’t you tired yet? Be patient, because now the fun begins (because this will be my instruction, haha!)
Example 4.
So, I am showing you what my tutorials look like. Also, don’t forget to check out my store. Because I added some new patterns. https://fairylace.kozinenko.com/product-category/patterns-tutorials/
Abbreviation:
R – Ring;
PVR – previous Ring;
C – Chain;
PVC – previous Chain;
p – picot about 4 mm;
sp – picot about 1 mm;
jp – join picot;
1S – first shuttle;
2S – second shuttle;
TS – two shuttles;
tw – turn work.

Row 1
⚫ – beginning row
1S
1, 2, 3. R: 5, sp, 2, p, 2, sp, 5;
4. R: 5, sp, 2, p, 2, sp, 5, tie and cut.
This row consists of four identical rings. Pay attention to the different lengths of the picots. As a result, you should have a flower like in the photo.


Row 2
⚫ – beginning row
1S
- R: 2, p, 1, p, 1, p, 1, p, 1, p, 2, jp to second sp of R2 (Row1), 6, sp, 2;
- R: 2. jp to sp of PVR, 6, jp to first sp of R1 (Row1), 2, p, 1, p, 1, p, 1, p, 1, p, 2, tw;
TS - C ( R ) C: 3, p, 2, p, 2, sp, 2 ( 2S: 2, jp to PVC, 2, p, 2, p, 2, p, 2, p, 2, p, 2, sp, 2 ) 2, jp to PVR, 2, p, 2, p, 3, tw;
1S - 5, jp to p of R1 (Row1), 5, tw;
TS - C ( R ) C: 3, p, 2, p, 2, sp, 2 ( 2S: 2, jp to PVC, 2, p, 2, p, 2, p, 2, p, 2, p, 2, sp, 2 ) 2, jp to PVR, 2, p, 2, p, 3, tw;
This part of the pattern looks like this:


Repeat from 1 to 5 3 times, connecting the elements according to the graphic diagram.
Attention! Attach last Chain to beginning Row, tie and cut.
Congratulations! Your Snowflake is ready!
You can take screenshots and save this pattern to your collection. Or you can also download the PDF file from the link. In this file on page 3 there is a graphic chart showing the number of double stitches for more advanced tatters or for those who don’t like to type a lot! 🙂 https://drive.google.com/file/d/1OihtIvhBgnU7ecCThETRcDmefzX_HMa6/view?usp=sharing
So, we looked at several options for How to read tatting patterns. Write to me in the comments which option you like more. Perhaps you would suggest making changes or additions to my instructions. I would be grateful for any comments. Thank you for your support!
Please subscribe to my blog and my YouTube channel: https://www.youtube.com/watch?v=5nOMsstL15w&list=UU3dn4_9pp7tIKA2k564wLBQ
FAQ
Q: How do you read numbers in tatting instructions?
A: Numbers usually show the number of double stitches between picots or joins. For example, “R 5–5–5–5 cl” means three picots separated by 5 double stitches each.
Q: What do lines mean in tatting diagrams?
A: Lines usually represent chains, while circles show rings. The direction of the line helps you follow the working order of the lace.


The tutorial is lovely and thank you for sharing. One thing that I struggle with is how much thread to pull after threading the needle. Unlike shuttles that can have a lot of thread on them, needle tatting uses a definitive amount of thread. Knowing if I need 12” or 24” on the needle before starting the pattern would be helpful to make sure I don’t’ run out of thread to finish the item. Thank you.
Thank you for your kind words and for the interesting question, Anita!
There’s no fixed length for the thread — it really depends on the size of the project you’re making.
If you’re making small earrings, about 10 inches of thread might be enough. For a small doily, it could be around 1 yard.
It may feel a bit awkward to work with a long thread at the beginning, but it will quickly get shorter as you work.
I’m planning to write an article on how to calculate the amount of thread for both shuttle and needle tatting.
Now I just need to find the time for it! 😊
Thank you for sharing! I personally need a diagram beside the photo and the text. I’m a beginner so I need all tree ways to understand a pattern… 🙂
Thanks for the comment, Karin! I think the combination of graphic design, step-by-step process photos and explanatory instructions is a perfect way, especially for beginners.
Hallo Elena
Ich bin Anfängerin und auf der Suche nach Anleitungen. Die Kombination von Text und Grafik sagt mir sehr zu. So kann ich mir ein Bild machen. Hab mir die Handhabung des Schiffchens selber angeeignet. Bin fleissig am Üben.
Vielen Dank und freundliche Grüsse
Danke für deinen Kommentar, Astrid! Ich freue mich, dass dir mein Blog gefällt. Ich versuche, meine Artikel interessant und nützlich zu gestalten.
Thanks for sharing this pattern and your help with reading them!! New at tatting so this is great! I like Example 2 as do needle tatting.. only thing I wish it would say if large or small picot.
Thanks again!
Thank you very much for your comment and kind words, Cindy! In fact, picots are not only long and small. There are connecting picots, double, twisted… And I think it is logical to indicate a specific type of picot in the instructions. This is especially necessary for beginners.
Thank you, you’re so generous with all these instructions! It’s very appreciated.
My pleasure always, Cindy!
Thank Elena this is very helpful. You are kind to share with us.
Thanks so much, Teresa! I’m glad you liked the pattern!
Hi Elena, I am checking out all your videos. I will learn so many new things. I wanted to thank you for all the videos and your willing kindness to share with us out in this wild world.
All the best and prayers in these uncertain times !!!
Many thanks to Esther for the kind words and support! It is very important for me to feel that we are not alone in this difficult time.
i have not tatted for a few years. I think this will help me start again. Thank You
Thanks Laura! I’m glad my blog has inspired you!
How does this translate to a needle tattong pattern?
Jacki, You can read my post on this subject here, welcome: https://fairylace.kozinenko.com/shuttle-tatting-for-needle/
I like example four, fir me this is a better way for a pattern.
Thank You, Margaret! I am very glad that you liked my version of the instruction. I try to make all my pattern descriptions as detailed and understandable as possible. In addition, I do not use the services of testers, and I personally test all my patterns.