Posted on Leave a comment

How to adapt tatting pattern

How to adapt tatting pattern

How to adapt tatting pattern, or how to make a flat doily from a ball.

Hello everyone! Today’s article will be very useful not only for beginner tatterers, but also for experienced lace makers, I’m sure!
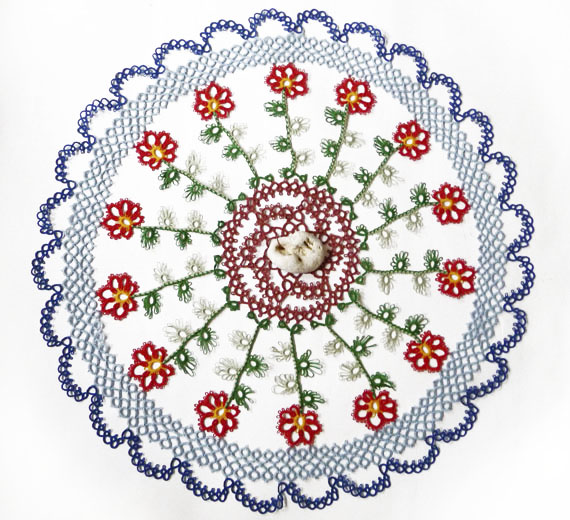
In a comment to one of my previous articles, Debra asked if it was possible to make a round Doily from Christmas Clover by Kendra Goodnow.

How to adapt tatting pattern 1

I found Kendra’s pattern on Handy Hands’ website. You can download this file by clicking on the link: https://hhtatting.com/wp-content/uploads/2021/07/Tatted-Christmas-CloverB.pdf

This is a wonderful decoration for your Christmas tree ball!

Debra, I apologize for my inattention! But I made an adaptive pattern for 15 cm in diameter (I forgot, you asked for 4 inches). But I hope this method will help you make any size yourself!

How to adapt tatting pattern 2

By the way, Kendra’s pattern is free, so we are not violating anyone’s copyright. So, we take the graphic diagram from the downloaded file. Using a computer program, I made a diagram measuring 15 cm in diameter. And now we need to print it out. By the way, if you are not sure about your computer program, you can check the size of the printed template with a ruler. Mine was exactly 15 cm!

And now we have some painstaking but very useful work ahead of us. This way you will avoid big mistakes in the finished product. We need to make test elements for all the Rings and Chains of the pattern. Of course, we do not take into account the repeating elements!

In the video you will see that the first row turned out to be unchangeable.

But in the second row we had to change some Rings and all the chains. Of course, because we need to get an even doily from the ball.

I changed the number of double stitches and added some picots.

How to adapt tatting pattern

As a result, I got this adapted scheme. You can download this file for free by following the link: https://drive.google.com/file/d/1xexJNGF8tQWLt5UXAkGMwxJuUwQs-cLY/view?usp=sharing

I suggest you make a round doily size 15 cm in diameter, threads No. 20!

So now, when you are asked how to adapt tatting pattern, you can confidently answer: easy! And of course, you can watch a video illustrating the process described: https://youtu.be/k3l88qw_Yc4

You can read more articles on my blog, welcome: https://fairylace.kozinenko.com/blog/

Thanks for your support, happy tatting!

Posted on 2 Comments

Some tricks for needle tatting

Round doily in tatting technique

Some tricks for needle tatting, or whether it is necessary to strive for perfection.

Hello everyone! I love receiving comments, advice, requests and kind words from you! This article was the result of my new very pleasant online acquaintance with Luisa. Perhaps, we are kindred spirits! Because she is also a perfectionist and is always looking for new ways to improve the appearance of her work and bring it to perfection.

I have already made a video on the topic of Self-closing mock ring and floating ring . But today I decided to tell you more about working with a needle on this element. It was Luisa who inspired me to search for a new way. So, now I have 4 ways how you can make this interesting element with a needle. The link to the video, as usual, is at the end of the article.

Chains and Rings

Some tricks for needle tatting 1

This is the easiest method that even a beginner can use. The secret is that you do not make Floating Rings. We simply divide the Self-Closing Ring into Chains and alternate Rings and Chains as needed according to the pattern. The disadvantage of this method is that you do not get an even Ring on which the Floating Rings are located. You can make a turn of the loop before tightening the Ring, this will smooth out the silhouette a little (watch the video!).

Extra stitch

Some tricks for needle tatting 2

This method is similar to the previous one. But you don’t do any securing after the Ring. And also to align the Chains, make one “seam” with the needle into the second half of the last double stitch of the previous sector of the Chain. Cool, did I say? LOL! It’s actually easy to do, you’ll see after watching the video.

Back of the needle

Some tricks for needle tatting 3

This method is often used when making a Floating Ring. You will need a second needle. And you will also have to cut off the ball thread (and not just once!) during the process. Naturally, you then have to attach the ball thread. These are additional tails, pieces of thread… But this method looks perfect!

Extra thread

This method is for very diligent and demanding tutters. You will need a second needle (take a needle slightly thinner than the main one) with a small piece of thread. Inside the Chain for the Self-closing Ring you will have two threads. And you will make Floating Rings with the thread from the ball with the main needle, like regular Rings. It looks beautiful! Thanks to the double inner thread, the fake ring turns out dense. But are you ready to hide the tails of the extra thread in each Self-closing Ring?

I hope you enjoyed Some tricks for needle tatting. After all, we are engaged in creativity and self-development, right? More knowledge – more opportunities! The link to today’s video is here, you are welcome: https://youtu.be/CnUjY08HJF8

Please write comments on the blog and on YouTube, support me by subscribing, liking and sharing. In my blog you will find interesting articles about tatting: https://fairylace.kozinenko.com/blog/

Thank you!

Posted on 2 Comments

Tatting Join Picot and More, part 2

Tatting round doily with stone

Tatting Join Picot and More, part 2, or continuation of the topic how many types of tatting connections do you know.

Hello everyone! This is second part of seventeenth lesson in the series “Perfect Tatting”. You can read first part here:
https://fairylace.kozinenko.com/join-picot-and-more/

My articles are also accompanied by video tutorials. Along with the article, I add them to my YouTube channel. ( Link to the video at the end of the article)

Please write in the comments what subtleties you would like to learn. Then it will be easier for me to make a lessons plan.

Alligator Join

Tatting Join Picot and More, part 2 -1

This is a very interesting and simple connection. I like the name (although there is another one) because your knot is like “capturing the element in the mouth of an alligator”! By the way, please write another name for this element in the comments to the post.

Folded join

Oh, I’ve already made several videos and written detailed posts about this. So I’ll save my time (and yours, too, of course!) and not go into detail about it. But just in case, here’s the link to the article: https://fairylace.kozinenko.com/closed-tatting-motif/

Lark’s Head Join

Tatting Join Picot and More, part 2-2

This method allows us to make an invisible connection, imitating a double stitch. You will certainly agree with me that this is especially useful when connecting different colors. In the video you will find two ways to tat this join.

Tapestry needle instead of shuttle

This is the easiest way to “knotless” connection. But you will be limited in the length of the thread. We can’t work with a free thread 3 meters long, for example. Although, who knows! LOL

Joining to twisted picots

Tatting Join Picot and More 3

It’s hardly a separate method. After all, here we use a regular connecting picot. But I still decided to add this type of connection. There is no such thing as too much knowledge, right?

Joining with Curled Ring

The Curled Ring is a very interesting element. I suggest you use it as a connection between rows. You will get beautiful volumetric elements.

Reverce join

You will be surprised how easy it is to change the direction of the Chain with this join.

Lock Join Plus

This technique is best used to change the color of the threads. And also with this knot you can simply swap the shuttle and ball threads. You can read about several ways of this join in Muskaan’s blog. I really like her blog. There are so many new ideas, different useful techniques and interesting patterns! https://tipsaroundthehome.blogspot.com/2020/07/lock-join-plus.html

Tatting Loop Join

Again, I need your comments because I don’t know if this knot has a name. I like to use this knot over at the beginning of the next row. And depending on which side you insert the hook into the join picot, you’ll get a “cap” on the front or back.

I think I’ve listed all the join methods I know. Thanks for reading to the end “Tatting Join Picot and More, part 2”! I hope you have the strength to watch the additional video to this article: https://youtu.be/E6WlFUGnj2g

Support my blog and my YouTube channel with your likes, comments and shares, please! Thank you!