Posted on 2 Comments

Helpful advice for Cro-tatters

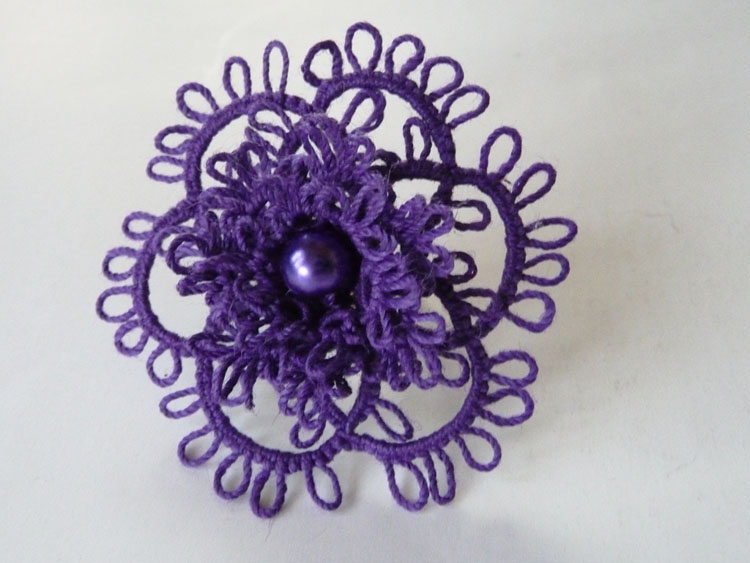
Helpful advice for cro-tatters — or how to make your tatting life easier!

Hello everyone!🌸Sometimes it happens like this: you see someone online creating something beautiful, trying a new technique, or using an unfamiliar tool — and you think, “Oh, that looks easy! I can do that too!”
Well… this happens to me all the time! 😄 I truly enjoy learning new things!

And that’s exactly when any helpful advice from those who have already practiced these methods can become so valuable. Right? 😉

Today I’d love to share a few tips for all cro-tatting enthusiasts — for those who already feel confident with the hook, and for those who are just beginning this wonderful journey. ✨

For those who haven’t seen this new hook yet — let me introduce this little beauty!
It’s a creative “hybrid” of a tatting needle and a crochet hook. 🌿💕

Helpful advice for Cro-tatters 1

If this technique catches your interest, you can explore the basics of cro-tatting in my articles on this topic — or visit my YouTube channel to watch the introductory lessons: https://www.youtube.com/watch?v=2k6a6q5jNvY&list=PLmUVrN61lH3z9TNNsku9TeC5fKaZWZvUq

Helpful advice for Cro-tatters 2

I hope I’ve sparked your curiosity! Ah, it seems you did everything right…
And yet the hook still refuses to slide through the stitches!
What should you do then? 😄


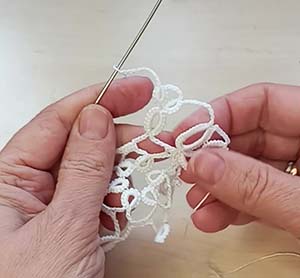
So here comes my first tip: when you make double stitches on the hook, don’t tighten them too much. Keep them slightly relaxed so the hook can easily pull the loop through. 😊

Helpful advice for Cro-tatters 3
Helpful advice for Cro-tatters 4

The second important point: when you slide the stitches closer to the tip of the hook, make sure they don’t tilt or twist.
They should stay perfectly perpendicular to the shaft. 😊


When pulling the hook through the double stitches, gently press the stitches toward the hook’s shaft from the back of your work, just like in the photo.
This helps secure the stitches and creates a little “extra space” inside them.

Watch my video — it looks so simple!
With a little practice, I’m sure you’ll master this technique in no time. 😊

The trickiest tip!

Please let me know in the comments — do you enjoy cro-tatting? Or is this your first time hearing about it? Will you try my ring-forming method? ✨

By the way, I’m using my new hook in the red case — it’s a little gem for cro-tatting! 💖 https://fairylace.kozinenko.com/product/crotatting-hook-with-red-case-2/

You can watch a short demo video Helpful advice for Cro-tatters here: https://www.youtube.com/shorts/DbSQwz6POWo

Don’t forget to subscribe to my channel so you won’t miss any helpful tips!
Happy tatting! 🌿😊

Posted on 6 Comments

Heirloom Hanky with Tatting

Heirloom Hanky with Tatting, or a combination of two of my favorite handicraft techniques.

🌸 Hello everyone!

I’m so happy to share one of my favorite projects with you today — a delicate handkerchief that combines machine embroidery and tatted lace 🧵✨
This timeless piece was crafted with love, patience, and a deep admiration for heirloom techniques. I adore blending different styles, and this hanky is a perfect example of how tatting and embroidery can work in harmony 💖

📽️ Watch the full making-of video here:
https://www.youtube.com/watch?v=tuHVlRgyMWo&t=1s

Close-up of tatting lace with shuttle and blue thread. Delicate tatted lace edging in progress using a shuttle and fine polyester thread – a close-up look at a handmade heirloom hanky

✨ The Lace Edging Comes First

Before assembling the hanky, I needed to create a long piece of tatted lace edging. Sounds simple, right? 😅 But this pattern includes four rows of delicate stitches and picots, all worked with thin polyester thread — just as my client and I agreed. Because of the thread’s fineness and the required length of 1.2 meters, this step was incredibly meticulous 🪡💠

Despite the challenge, the result was absolutely worth it. The lace looks light, elegant, and strong at the same time — exactly what I needed for an heirloom-quality piece.

📐 Preparing the Base for the Heirloom Handkerchief

The next step in making this heirloom handkerchief was all about precision! 🧵 First, I cut out a square of paper matching the final size of the hanky. Then, I covered the paper with a piece of transparent plastic. This step might seem simple, but it’s absolutely essential — it helps me pin the lace evenly and accurately 🔍

To make sure the lace edging fits perfectly, I gently arranged and pinned it around the square. As a result, the shape and proportions of the future lace hanky are fixed exactly. No guessing, no distortion — just perfect symmetry for a truly vintage handkerchief 💫

 Applying stiffening solution to tatting lace

🧴 Stiffening the Lace for the Heirloom Hanky with Tatting

To keep the lace edging in perfect shape, the next step is stiffening it with a special solution. ✨ This stage is truly important because it gives the heirloom handkerchief a clean, elegant look that will last for years.

I use a homemade stiffening solution made from leftover embroidery stabilizer — nothing goes to waste in my workshop! 🌿 If you’re curious how I make it, you can read the detailed tutorial on my blog here:
👉 https://fairylace.kozinenko.com/how-to-stiffen-tatting-lace/

So, after applying the solution, I leave the lace to dry naturally. This ensures it stays crisp and beautifully shaped, ready to be sewn onto the fabric square later on. 💫

💻 Preparing the Embroidery Design for the Heirloom Handkerchief

While the lace was drying, I turned my attention to the embroidery 🌼 This step required adapting the design to fit the heirloom handkerchief and meeting the exact wishes of my client. So, I opened my embroidery software and began fine-tuning every little detail.

Believe it or not, to work with my sewing-and-embroidery machine, I had to dive into a whole new world of digital skills! 🧠✂️ It’s amazing how traditional craftsmanship and modern technology can come together in one project. Learning how to digitize and modify embroidery patterns was challenging — but also exciting. Every project teaches me something new, and that’s what I love most about handmade work 💖

🧺 Preparing the Fabric for the Heirloom Handkerchief

Now it was time to prepare the fabric for embroidery — a delicate and important stage. To start, I carefully smoothed the cotton base to remove every wrinkle 🧼 Then, I applied a piece of sticky water-soluble stabilizer to the wrong side of the fabric. This type of stabilizer is incredibly helpful, especially when working on a Heirloom Hanky with Tatting project like this one!

Because the lace and embroidery must align perfectly, every step here must be precise. The sticky stabilizer keeps the fabric steady while I embroider, so there’s no puckering or shifting during the stitching process. As a result, the final piece turns out both beautiful and professional ✨

🪡 Hooping the Fabric for the Heirloom Handkerchief

Next, I carefully placed the fabric into the embroidery hoop. This step might seem simple, but it’s actually one of the most crucial! 🧐 In order to keep the design crisp and aligned, the fabric must be inserted without pulling, stretching, or twisting it.

To ensure the embroidery lines are perfectly placed, I double-checked the printed guidelines and adjusted the hoop gently. That way, when the embroidery machine starts its dance, every stitch lands exactly where it should. 🧚‍♀️ Proper hooping is what gives the heirloom handkerchief its polished, symmetrical look — just like a fine vintage piece!

 Romantic embroidery with two hearts on heirloom handkerchief

🧵 Embroidering the Heart of the Heirloom Handkerchief

Now comes the most exciting part — embroidery! ✨ It’s always a delight to watch how, stitch by stitch, the design appears on the once-empty fabric. Like a slow bloom, the gentle lines take shape, forming a romantic pattern with two tiny hearts at its center 💕.

This stage always feels like magic. For a heirloom handkerchief, every thread carries meaning — especially when created with love and care. The embroidery machine hums softly, and I can’t take my eyes off it. It’s a process I could watch endlessly. Just like in fairy tales, the invisible becomes visible — and beauty is born. 🌹

Once the embroidery was finished, I gently rinsed the stabilizer in warm water and allowed the fabric to dry completely ☀️ This step is essential — it ensures the fabric returns to its natural softness and shape. Then the true magic begins!

With a fine needle and a thimble, I slowly and carefully hand-stitched the tatted lace onto the fabric, following the marked lines with precision and love. 🪡 Of course, you could use a sewing machine to do this. In fact, I have a helpful video tutorial showing how to attach tatting lace to fabric here: https://www.youtube.com/watch?v=akpnypHDdW8&t=125s

However, for this heirloom handkerchief, I chose the old-fashioned way — slow, mindful stitching by hand. It brings a sense of connection and authenticity that no machine can replace. 💫

🪮 Finishing Touches for the Heirloom Hanky with Tatting


To complete the heirloom handkerchief, I carefully folded the fabric edges and shaped the corners neatly. Using pins, I fixed the folds in place, making sure every side was straight and precise. This process requires a gentle hand and a keen eye for detail 🔍

Then, I used my sewing machine Bernina to stitch the hem, securing the edges with clean, even lines. ✂️ Once the sewing was done, I gave the handkerchief a final press with the iron — a satisfying step that brings out its crisp, elegant look. Finally, I wrapped the piece carefully, ready for delivery and joyful unboxing! 🎁

Every heirloom carries a story, and I’m thrilled to pass this one on to its new owner — with all my heart in every stitch. 💗

💌 Your Custom Heirloom Hanky with Tatting Awaits

Would you like to have a unique heirloom handkerchief designed just for you? I’d be delighted to bring your vision to life! 💫 You can choose the lace pattern, thread color, and embroidery design — everything can be personalized to your taste.

Whether it’s a special keepsake, a wedding gift, or a memory stitched with love, I’m here to create something truly meaningful for you. 🧵

📩 Please feel free to contact me via:

💌 Email Me: fish20085@gmail.com

Click below to follow me into the world of lace dreams!

Let’s make something unforgettable together! 💖

Posted on 2 Comments

Some tricks for needle tatting

Round doily in tatting technique

Some tricks for needle tatting, or whether it is necessary to strive for perfection.

Hello everyone! I love receiving comments, advice, requests and kind words from you! This article was the result of my new very pleasant online acquaintance with Luisa. Perhaps, we are kindred spirits! Because she is also a perfectionist and is always looking for new ways to improve the appearance of her work and bring it to perfection.

I have already made a video on the topic of Self-closing mock ring and floating ring . But today I decided to tell you more about working with a needle on this element. It was Luisa who inspired me to search for a new way. So, now I have 4 ways how you can make this interesting element with a needle. The link to the video, as usual, is at the end of the article.

Chains and Rings

Some tricks for needle tatting 1

This is the easiest method that even a beginner can use. The secret is that you do not make Floating Rings. We simply divide the Self-Closing Ring into Chains and alternate Rings and Chains as needed according to the pattern. The disadvantage of this method is that you do not get an even Ring on which the Floating Rings are located. You can make a turn of the loop before tightening the Ring, this will smooth out the silhouette a little (watch the video!).

Extra stitch

Some tricks for needle tatting 2

This method is similar to the previous one. But you don’t do any securing after the Ring. And also to align the Chains, make one “seam” with the needle into the second half of the last double stitch of the previous sector of the Chain. Cool, did I say? LOL! It’s actually easy to do, you’ll see after watching the video.

Back of the needle

Some tricks for needle tatting 3

This method is often used when making a Floating Ring. You will need a second needle. And you will also have to cut off the ball thread (and not just once!) during the process. Naturally, you then have to attach the ball thread. These are additional tails, pieces of thread… But this method looks perfect!

Extra thread

This method is for very diligent and demanding tutters. You will need a second needle (take a needle slightly thinner than the main one) with a small piece of thread. Inside the Chain for the Self-closing Ring you will have two threads. And you will make Floating Rings with the thread from the ball with the main needle, like regular Rings. It looks beautiful! Thanks to the double inner thread, the fake ring turns out dense. But are you ready to hide the tails of the extra thread in each Self-closing Ring?

I hope you enjoyed Some tricks for needle tatting. After all, we are engaged in creativity and self-development, right? More knowledge – more opportunities! The link to today’s video is here, you are welcome: https://youtu.be/CnUjY08HJF8

Please write comments on the blog and on YouTube, support me by subscribing, liking and sharing. In my blog you will find interesting articles about tatting: https://fairylace.kozinenko.com/blog/

Thank you!

Posted on Leave a comment

Closed Tatting Motif

Red tatting earrings with beads

Closed Tatting Motif, or how to make the last join.

Hello everyone! This is the fifteenth lesson in the series “Perfect Tatting”. You can read the previous part here: https://fairylace.kozinenko.com/beginning-of-work-in-graphical-diagram/

My articles are also accompanied by video tutorials. Along with the article, I add them to my YouTube channel.

Please write in the comments what subtleties you would like to learn. Then it will be easier for me to make a lessons plan.

Today I wrote a very short article. Because there is no point in describing what is better to watch! Do you agree?

Closed Tatting Motif

In the video I showed 4 ways to connect the last and first rings in the motif. So let me say a few words about each method.

Method 1 is good because when connecting you can use up join or down join (as you like).

The second method is called folded join (if I’m wrong, please write to me in the comments).

Method 3 I saw in Marilee Rockley’s video. She uses this method of joining because it is convenient for her. By the way, you can come up with and use your own method. And this proves once again that tatting is not a dogma, but an art!

Ah, I would like to name the fourth method after myself (LOL). Because I came up with it myself. And I watched a lot of videos on the Internet, but I did not find such a way of connecting. Maybe I did not search well? But I like this method. For me it is the most understandable and easy. And also when doing it you can use up join or down join.

You can watch the video “Closed Tatting Motif” here: https://www.youtube.com/watch?v=wwwl9NK33i8&list=PLmUVrN61lH3yT7k0vrL0PosljWkYTjM3a&index=15

Don’t forget to comment, like and share my videos and articles on social media, please! Also I thank all my friends, subscribers and followers for their support! Happy tatting!

Posted on Leave a comment

Beginning of work in graphical diagram

Hexagonal tatting doily made of white and red threads

How to find the beginning of work in graphical diagram, or continue learning how to read a tatting pattern.

Hello everyone! This is the fourteenth lesson in the series “Perfect Tatting”. You can read the previous part here: https://fairylace.kozinenko.com/perfect-tatting-part-13/

My articles are also accompanied by video tutorials. Along with the article, I add them to my YouTube channel.

Please write in the comments what subtleties you would like to learn. Then it will be easier for me to make a lessons plan.

You can also read the article (and download the pattern for free) on the topic How to read tatting patterns, where I talk about different options for instructions for tatting patterns. https://fairylace.kozinenko.com/how-to-read-tatting-patterns/

But today I would like to show you a graphic diagram and tell you about a little trick. I am sure it will be especially useful and interesting for beginners.

Often beginners ask the question: where to find the beginning of the work on the graphic diagram?

You will be surprised, but you can start anywhere! Although usually designers indicate where the beginning of the work is. For example, I put a small red circle on the drawing to indicate the start.

Option 1 beginning of work in graphical diagram

 Beginning of work in graphical diagram-1

Most often we start working with the Ring. Look at this pattern. We start working with the first of three rings in the trefoil. In the video, you can see that I used one shuttle and a ball. Therefore, I had to make one simple knot in places where it was necessary to swap the shuttle and ball threads. The link to the video is at the end of the article.

 Beginning of work in graphical diagram-2

And so we make 6 identical elements: trefoil, chain, ring, chain. We attach each first ring to the third ring of the previous trefoil. And we attach the seventh trefoil to the previous and first trefoil. What do we get? We already have a closed motif. But we need to complete the seventh time Chain – Ring – Chain. And since my motto is “nothing is impossible”, I showed on video how it works. This is the motif I got.

Option 2 beginning of work in graphical diagram

But let’s change the picture just a little bit. Look, I moved the beginning of the work, and now our pattern starts with the combination Chain – Ring – Chain. You will see in the video, I used a paper clip to start. But you can take a short thick thread, for example.

Oh, how I love this way of finishing the work! I attached the last chain to the first one, removing the paper clip. And I just have to make the last trefoil. Believe me, this option is much more convenient. Voila, it’s done!

By the way, this pattern can be made with a needle too. And use this option to start the work. I’m sure you’ll like it!

You can watch the video here: https://www.youtube.com/watch?v=sukHCw-IyCI&list=PLmUVrN61lH3yT7k0vrL0PosljWkYTjM3a&index=14

Don’t forget to comment, like and share my videos and articles on social media, please! Also I thank all my friends, subscribers and followers for their support!

Merry Christmas and Happy New Year!

Posted on 4 Comments

Perfect tatting – Part 13

Two blue bracelet

Perfect tatting – Part 13, or how to attach a Split Ring to the previous element.

Hello everyone! This is the thirteenth lesson in the series “Perfect Tatting”. You can read the previous part here: https://fairylace.kozinenko.com/perfect-tatting-part-12/

My articles are also accompanied by video tutorials. Along with the article, I add them to my YouTube channel.

Please write in the comments what subtleties you would like to learn. Then it will be easier for me to make a lesson plan.

Perfect tatting – Part 13-1

You can also ask me questions in the comments, I am ready to help!

Today is a very short article. But I added a lot of links to video tutorials.
And please don’t throw slippers at me when you start watching today’s video! LOL Because in order not to make this video last up to an hour, I showed short excerpts from my detailed tutorials “How to make a split ring”. But, these excerpts are very much sped up and shortened. Of course, I’m sure you’ll agree, it makes no sense to duplicate what is already on my channel.

I know 9 way how to make Split Ring. Maybe you know another one? Please write in the comments. It will be very interesting. In addition, in the descriptions under the video you can read the names of each method (at least the names that I know). I will also be glad if you write in the comments under the video the names that I do not know for the methods demonstrated.

Perfect tatting – Part 13-2
Lace table runner Quasi chess


Here are the links to these detailed video tutorials:


How to make split ring, Part 1
https://www.youtube.com/watch?v=PuweruFd6Kw
How to make split ring, Part 2
https://www.youtube.com/watch?v=5nOMsstL15w&t=1109s

Perfect tatting – Part 13-3
Detachable blue collar necklace for Dress Sia Glass

And finally, a link to today’s video lesson Perfect tatting – Part 13, how to attach a Split Ring to the previous element: https://youtu.be/bgaH-SduZ34

Don’t forget to comment, like and share my videos and articles on social media, please! Happy tatting! Thank you!

Posted on 2 Comments

Perfect tatting – Part 12

Yellow tatting round motiff.

Perfect tatting – Part 12, or why do picots curl and how to avoid it.

Hello everyone! This is the twelfth lesson in the series “Perfect Tatting”. You can read the previous part here: https://fairylace.kozinenko.com/perfect-tatting-part-11/

My articles are also accompanied by video tutorials. Along with the article, I add them to my YouTube channel.

Please write in the comments what subtleties you would like to learn. Then it will be easier for me to make a lesson plan.

You can also ask me questions in the comments, I am ready to help!

Perfect tatting – Part 11-1

Oh, you must admit, it’s very annoying when a couple of three sloppy picots spoil the product and the mood of the master! I’m talking about curled picots.

Today I want to show several simple ways to avoid this mistake.

SHUTTLE TATTING

Perfect tatting-part 12 - 2

First, try to wind the threads onto the shuttle correctly. Do not wind the thread around the shuttle, but rotate the shuttle. By the way, there are various devices for winding threads onto the shuttle. I know that some craftsmen use sewing machines for this (for “bobbin shuttles”).

Secondly, try to place the shuttle horizontally. I have a special device for this. It is very convenient. Because the shuttle rotates around the axis and the thread does not twist. By the way, you can use this technique while weaving as well.

Thirdly, spin the shuttle more often! This is a very simple technique, but popular and used by absolutely all tatters! Or am I wrong?

Perfect tatting-part 12-5

Fourth, you can also untwist the ball. This is especially true when making chains. Use a ball-point needle to secure the thread. And “send the ball on the carousel”!

NEEDLE TATTING

Unwinding the ball can also be useful for needle tatting.

Also, use the horizontal ball placement method. If the ball is big enough, you can take a knitting needle and attach it together with the ball to a box, for example. I have an oval box made of cord for this purpose.

And of course, don’t forget to untwist the needle more often.

I hope my tips will help you! But I’m sure my video will demonstrate all these little tricks more clearly! https://www.youtube.com/watch?v=vzX1YYB7d_o&list=PLmUVrN61lH3yT7k0vrL0PosljWkYTjM3a&index=12

Perfect tatting – Part 12 is over!
Don’t forget to comment, like and share my videos and articles on social media, please! Happy tatting! Thank you!

Posted on 2 Comments

Perfect tatting – Part 11

Tatting doily white-yellow

Perfect tatting – Part 11, or how not to twist chains.

Hello everyone! This is the eleventh lesson in the series “Perfect Tatting”. You can read the previous part here: https://fairylace.kozinenko.com/perfect-tatting-part-10/

My articles are also accompanied by video tutorials. Along with the article, I add them to my YouTube channel.

Please write in the comments what subtleties you would like to learn. Then it will be easier for me to make a lesson plan.

You can also ask me questions in the comments, I am ready to help!

I often hear from beginner tatters: My chains are twisted! What am I doing wrong? Because, most often, this problem arises from the incorrect position of the shuttle and ball threads (for needle tatting, this is the needle and ball thread).

First, let’s remember the terminology! So, I’m turning to the ABC Tatting website again: https://abctattingpatterns.com/terms/ These are the names accepted in English:

Ball Thread (BT): Thread originating from the ball of thread.

Core Thread: a.k.a. foundation thread, shuttle thread, needle thread or running thread. Traditionally, the shuttle or needle thread is used as the core thread. It used like a clothesline upon which the double stitch hangs.

Although, in other languages, these may be other names. For example, a shuttle thread or a needle thread is called a leading thread. Because it kind of leads the double stitches. And a ball thread is called a working thread. Because it “works” by tying knots. What are these threads called in your language? Please write in the comments. It’s very interesting!

Shuttle tatting

So, first, let’s look at shuttle tatting.

Perfect tatting - Part 11 -1

Note that the main (shuttle) thread is always in the right hand. If you are right-handed! And we are not looking at pearl weaving, split ring, etc. techniques.

For left-handers, it’s the other way around.

Perfect tatting - Part 11 - 2

Thus, the Core thread is always BELOW the Ball thread. By the way, you remember Ball thread can also be wound on the second shuttle?! But the name of the thread is still retained for convenience.

Perfect tatting - Part 11- 3

It is interesting that when performing the Ring, the same thread is the Core and the Ball threads. The role of the Ball thread is played by the thread that forms a loop on the hand.

If you are going to make a Chain after turning the work, you just need to move the Ball of Thread upwards (if it was not located there initially). This way, the threads will be in their places again after turning. Namely: the main thread in the right hand, and the Ball of Thread above it. By the way, pay attention! The threads do not cross!

Amazing tatting part11-4
Shuttle tatting

If the pattern does not call for you to turn before the Chain, you need to swap the threads. It’s very simple! Make one simple knot, as if you were tying shoelaces. Similarly, change the threads after the chain, when moving to the Ring without turning the work.

NEEDLE TATTING

There is a small nuance for needle tatting. Firstly, most often we work with only one thread from the ball. How interesting, but the same thread “bifurcates” and becomes the Needle thread ( or Core thread ) and the Ball thread. Do you know what separates them and thus “gives individuality by giving names”? ( LOL ) Of course, it’s a joke! But we can smile while doing tatting. And even while reading such a serious lesson Perfect tatting – Part 11. Because a good mood is always appropriate!This is the very first stitch that you make on the needle.

Thus, the thread from the eye of the needle to the stitch will be the Core Thread. And the thread from the stitch to the ball will be the Ball Thread. It’s simple.

Needle tatting

I’m sure you can guess which photo illustrates the work for right-handed people and which one for left-handed people!

When turning the work, we also make one simple knot to swap the threads.
If there is no work rotation, then we will need to make two knots. This way we fix the element and do not swap the threads.

Thus, remembering the correct position of the threads, we will always get perfect, untwisted Chains!

Oh, my long article Perfect tatting – Part 11 is over! I hope you have enough strength to follow the link and watch the video: https://www.youtube.com/watch?v=9sZ3HmRs4cY&list=PLmUVrN61lH3yT7k0vrL0PosljWkYTjM3a&index=11
Don’t forget to comment, like and share my videos and articles on social media, please! Thank you!

Posted on 4 Comments

Perfect tatting – part 10

Purple tatting ring with bead

Perfect tatting – part 10.

Hello everyone! This is the tenth lesson in the series Perfect Tatting. You can read previous part here: https://fairylace.kozinenko.com/perfect-tatting-part-9/

Also my articles will be accompanied by video tutorials. Simultaneously with the article I will add them to my YouTube channel.

Please write in the comments what subtleties you would like to know. Then it will be easier for me to make a lessons plan.

Also you can ask me questions in the comments, I’m ready to help!

Perfect tatting – part 10-1

Sometimes when making two or more rings in a row, there is a small distance between the rings, especially for beginner tatters.

This kind of trouble happens both when working with shuttles and when working with a needle. I want to show you how you can avoid this kind of mistake with a little tricks.

For tatting shuttle

Perfect tatting – part 10-2

After you make the first part of the first double stitch, press this knot with your fingernail. Oh, you don’t have to have long beautiful nails and a perfect manicure for this! Of cource, you can use short ones like mine, for example, LOL

Perfect tatting – part 10-3

Then do the second part of the double stitch and check your perfect result!

Perfect tatting – part 10-4

In this way you can make two, three or more rings.

For tatting needlee

Perfect tatting – part 10-5

Make the first ring. You can use method with knot. I told you about it in the previous lesson. This way you won’t have to make fixing knots between the rings. And before making the second and also all subsequent rings, place the needle exactly in the middle of the ring and press the needle to the ring with your fingers.

You will be surprised how easy it is to make the next ring perfectly close to the previous one if you position the needle just like this.

As I promised, a short video demonstrating these little tricks is already on my YouTube channel. Subscribe, comment, like and share my videos on social networks! https://www.youtube.com/watch?v=1qE1POw-dIE&list=PLmUVrN61lH3yT7k0vrL0PosljWkYTjM3a&index=10

Perfect Tatting – Part 10 is finished! Happy tatting!
I hope my previous blog posts will also be useful and interesting: https://fairylace.kozinenko.com/blog/

Posted on 18 Comments

Perfect tatting – part 9

Oval tatting lace doily in white-yellow colors

Perfect tatting – part 9.

Hello everyone! This is the ninth lesson in the series Perfect Tatting. You can read previous part here: https://fairylace.kozinenko.com/perfect-tatting-part-8/

Also my articles will be accompanied by video tutorials. Simultaneously with the article I will add them to my YouTube channel.

Please write in the comments what subtleties you would like to know. Then it will be easier for me to make a lessons plan.

Also you can ask me questions in the comments, I’m ready to help!

In this article I describe several ways to tighten the rings. Two ways for the shuttle and two ways for the needle.

The first method for the shuttle

Perfect tatting – part 9.2

I won’t even describe this method, because all tatters use it (well, almost all, but more on that later). We just tighten the Ring. But if you look closely at the photo, you’ll see a small knot between the shuttle and ball threads after the Ring is formed.

Madhur Dadlani Method

A few years ago I saw a video of how a talented tatting master from India, Madhur Dadlani, does tatting. Oh, the speed of her work is absolutely amazing! At the same time, the precision and accuracy of the knots are beyond praise! I was delighted with this mastery. It is not for nothing that in India she is called the “Queen of Tatting”!

But I also noticed how she tightens the Rings. Of course, I tried to repeat this technique. This technique has been known for a long time and is called “posting the shuttle”. But I first saw it with Madhur. So let me call this method by her name!

Perfect tatting. Part 9. 3

Before tightening the Ring, pull the shuttle through the loop where the double stitches of the Ring are located.

Perfect tatting. Part 9. 4

Pay attention to the placement of the threads. This is perfect, isn’t it?

The first method for the needle

I will not describe this method either, because absolutely all tatters who use a needle use this method (or not all? Write to me in the comments, please). The only “imperfection” of this method is the need to tie knots after each element to fix the Rings and Chains. In principle, these nodes are not very noticeable. But I know about them…

Needle Tatting. The Method with Knot

I admit, I watched a lot of videos for the needle. But I didn’t see another way anywhere. It’s quite possible that I wasn’t diligent enough in my search. So I came up with my own way. You need to twist the loop where the double stitches of the ring are located BEFORE you pull the needle through it.

This method is especially convenient when you need to make two or more rings in a row. Of course, it is better to watch all these techniques on video. For ease of viewing, use the time code, which is indicated in the description under the video. https://www.youtube.com/watch?v=Fwr8fbbhMn0&list=PLmUVrN61lH3yT7k0vrL0PosljWkYTjM3a&index=9

Perfect Tatting – Part 9 is finished! Happy weekend!
I hope my previous blog posts will also be useful and interesting: https://fairylace.kozinenko.com/blog/