Posted on 4 Comments

Tricks tatting (cluny)

Square white tatting doily with cluny leaf motifs on wooden background by FairyLacefromElena

I called my post today, “Tricks tatting (cluny).” Why? Read to the end, please, and you will understand me. ๐Ÿ™‚

In a previous post, I talked about additional tools that help me in tatting. https://fairylace.kozinenko.com/2019/10/22/additional-tools-for-tatting/
Thanks for the questions and comments. So, at the request of my reader, I return to this topic (very little!)
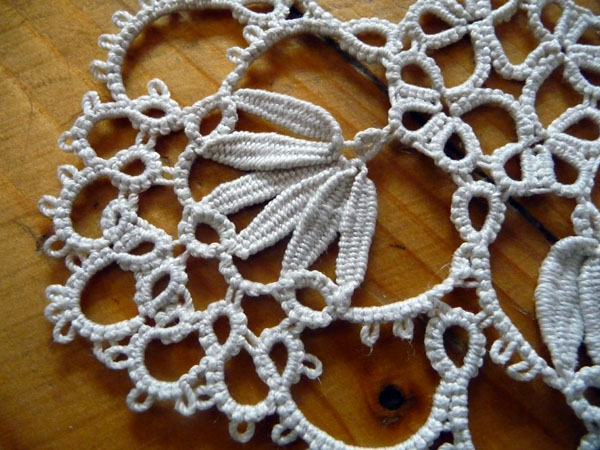
You asked me to show how I use a piece of thin wire. This is an indispensable helper for weaving cluny (leaves). You can find many articles and photos about the process of working on cluny on the Internet. But best of all, watch the video of the talented master tatting master Karen Cabrera. You will recognize her by long nails and a dazzling smile ๐Ÿ™‚ https://www.youtube.com/watch?v=dsm37KxFxjE

Pay attention to a piece of thin wire. This is exactly the tatting trick that I spoke about before.

For needle tatters, a link to a video about cluny. The author of this lesson is Geogria Seitz. https://www.youtube.com/watch?v=O_VVZBEq59g

And now it’s time to explain why I called this post: Tricks tatting (cluny).

Do you know that this technique is used in bobbin lace? I do not presume to say where this method originated earlier. An important fact is that all types of needlework are interconnected and complementary. Is not it?

I was struck by the extraordinary beauty of Elisa du Sud’s creations , in which cluny were used many, many, many times!

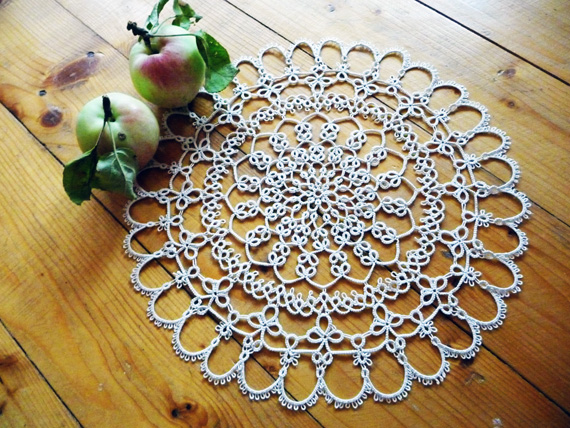
Of course, I was so inspired that I could not resist! These are my little tatting pieces ( based on Elisa du Sud’s patterns).

tatting, cluny

Subscribe to my blog. Comment and ask questions. I will be happy to help with tips!

Welcome to my YouTube channel: https://www.youtube.com/channel/UC3dn4_9pp7tIKA2k564wLBQ/videos?view_as=subscriber

And of course, do not forget to visit my store, welcome! https://fairylace.kozinenko.com/

Posted on Leave a comment

Tatting little tricks

Beige tatting lace doily made with split rings and chains, lying on a wooden background next to a red apple. #FairyLacefromElena

You already know that I like to use different little tricks for tatting. And today is another tatting little trick for you, my dear readers!

Nobody likes to hide threads after weaving. Is not it? I also do not like! Therefore, I try to leave as few trimmed threads as possible. For example, I made this doily WITHOUT CUTTING THREADS completely. In this case, I used split rings and split chains.

Do you think this is difficult? Not at all! Start by connecting the first and second rows of any doily. Often, patterns begin with one ring. For example, like here:

This is a fragment of the tatting pattern of the Japanese master Yusai Shokoin.

First, try not to cut the thread after the first row, use a split ring. And you can watch this process on my YouTube channel. By tradition, I am doing a video lesson for three types of tatting: tatting shuttle, tatting needle and cro-tatting. https://youtu.be/wETpH0sP56o
Maybe, you may not using split ring very well. In this case, a detailed video tutorial on this topic will come in handy, I think! https://www.youtube.com/watch?v=-asLG1i2pTQ&t=483s

Subscribe to my blog. Comment and ask questions. I will be happy to help with tips!

A variety tatting patterns you can buy in my store. Welcome! https://fairylace.kozinenko.com/product-category/patterns-tutorials/

Posted on 16 Comments

How to reduce the pattern tatting.

White tatting lace doily on a black background next to a transparent box with a red artificial rose and green ribbons โ€” used to show three ways to reduce a tatting pattern by FairyLacefromElena

How to reduce the pattern tatting. Very often on the Internet you are see tatting pattern that very much likes you! Whether a doily or earrings, a bracelet or a tablecloth โ€ฆ But for some reason the size of a lace decoration, indicated in the instruction, does not fit for You. How to reduce the size of the finished product? I have three ways. Each ways has its own advantages and disadvantages. Hopefully, my tips will be useful to you!

Way 1 how to reduce the pattern tatting.

Take a little thinner threads, as indicated in the instruction. And weave according to the pattern, not changing anything! Look at the difference between the earrings I made from Threads # 10 and # 20.

The advantage of this way is its ease.
But there are disadvantages: you can not know for sure what size of the finished product you will get ๐Ÿ™‚ . And when changing the thread size the pattern works perfectly not always.

Way 1 how to reduce the pattern tatting.


Remove the last Row from the Pattern. For example:
In this Doily there were 4 rows and a size 10,6 inches in diameter.

Remove off the last, fourth row. And in the third row add the picot for a more logical pattern completion.

Way 3 how to reduce the pattern tatting.


Remove some middle rows from the pattern. For example:
This pattern has 8 rows, the finished doily size is about 9 inches. I want to exclude 5 and 6 rows.

Tat 1 – 4 rows.

Divide the finished piece into 4 parts mentally. (If the finished piece is very large, it can be divided into 8 or 12 parts for easy drawing).

Draw the border of the fourth row (one quarter. In order not to use the large size of the paper page).

Draw the fifth row similar to the seventh (graphic diagram). There will be fewer repetitions of elements in this row, of course (we are reducing the pattern. Do you remember ? โ˜บ ) Now we can weave a โ€œnewโ€ fifth row. The size of the tatted elements should match the drawn elements. Record the appropriate number of double stitches in rings and chains. ( R: 5, p, 5, p, 5; C: 8, jp, 8 )

We continue to the end of the row. That’s what will get.

Draw the sixth row (this will be the last row in the pattern). You can copy a pattern from a graphic diagram or be creative and add something new. I changed the design slightly. And again: the size of the tatted elements should match the drawn elements. Record the appropriate number of double stitches in rings and chains.

The finished doily is approximately 6 inches in diameter. This size corresponds to the drawn pattern.

If you liked the third way, you can use this to create your own designs!

Thanks for reading!

Subscribe to my blog. https://fairylace.kozinenko.com/blog/

You can buy tatting patterns in my store: https://fairylace.kozinenko.com/product-category/patterns-tutorials/

Comment and ask questions. I will be happy to help with tips!

Join me on FB: https://www.facebook.com/kozinenkoelena

Posted on 4 Comments

Cute tatting ring, final.

Easy pattern for cute tatting ring from FairyLacefromElena

I shared a master class how to make a cute tatting ring in a previous post https://fairylace.kozinenko.com/2019/09/27/free-tatting-pattern-how-to-make-cute-tatting-ring/
and thank you, dear friends, for comments, subscriptions and suggestions. Your support helps me improve my blog and store!
So subscribe to my blog. Comment and ask questions. I will be happy to help with tips!

At your request, today I will tell you in detail how to stabilize the lace ring. This is my personal experience, and you can use other methods.

So our ring is woven.

Then prepare a fixing solution. It can be a mixture of PVA glue and water, a sugar solution or gelatin. I do not recommend using sugar. Products impregnated with sugar solution look attractive, of course! But these products cannot be washed – sugar is absorbed into fibers and threads can crumble from water. Believe me, I saw it with my eyes!
I do machine embroidery, so I have a lot scraps of soluble stabilizer. I take several pieces of the stabilizer, dip them in a glass bowl and pour warm water on it. The solution is ready!

After that measure the thickness of your finger ( my finger in thickness 5,5 cm). Find a template of the appropriate size. You can use the ring sizer. But I found a plastic pipe with a diameter of 5,5cm (in garage of my husband! ) . This is what I need!

Next put the ring on the pipe. Use a sponge or a piece of cotton wool to apply the solution to the threads, giving the ring a pipe shape. Soak the threads well, pat the excess solution with a dry cloth.

Leave to dry. If you need fast, use a hairdryer!

After complete drying, the ring can be removed from the pipe. Be careful, not pull the ring so as not to deform the shape. Holding the ring with your right hand, rotate the pipe. Your lace ring is ready!

And finally one more trick! You can wash the ring by putting it on this pipe. First, soak the ring with soap and water using a sponge, and then rinse the soap with warm water. You do not have to straighten out each picot, sponge and pipe will do it!

Welcome in section Patterns of my store: https://fairylace.kozinenko.com/product-category/patterns-tutorials/

And, of course, I will be glad to meet on my YouTube channel: https://www.youtube.com/@ElenaKozinenko

Posted on 6 Comments

Tatting with beads and little trick

The photo shows white and blue earrings with beads next to red gladioli. Lace tatting earrings #FairyLacefromElena

Tatting with beads – a great way to decorate lace. Tatters are very creative masters. Do you agree? To create lace products, not only threads are used. For the realization of new ideas, tat-artists often use unexpected materials. For example, looks great tatting patterns with zigzag ribbon.

Else beads, rhinestones, and cabochons are relevant additions too. The desire to realize new ideas inspired talented artists to create new techniques in tatting. Angelina Rozanova, her daughter Ekaterina (Rina) Stepnaya and Anjella Safonova is talented masters and autors ANKARS tehnique. At present the works of ANKARS masters look further removed from tatting than at the beginning (some twenty years ago), and the difference lies in technique: innovative methods, new elements, and a new approach.
Nina G. Libin connected in new art form two elements widely used since ancient times – Beads and Knots . This is tehnique BEANILE .

I love tatting with beads too. Some projects cannot be imagined without beads. For example, this collar for dress. I called it “Sea glass.” Whimsical Pattern reminds me Whirlwind of Sea Waves. White Beads shine in the Sun.

Detachable blue collar necklace for Dress Sia Glass

I sometimes use beads with thin holes in my projects. It is difficult to put such beads on a needle with thread. Doubly folded thread does not pass through such a little hole. Maybe my little trick comes in handy. ๐Ÿ™‚

You will need: PVA glue, scissors and 5 minutes of your time!

First step :

soak the end of the thread with glue.

Second step:

gently spread the glue over the thread, as if forming a needle.

Third step:

Hang the end of the thread vertically and allow the glue to dry (5-10 minutes).

Fourth step:

Cut the thread obliquely, imitating the tip of the needle.

Fifth step:

Carefully string the beads onto a thread, using the end of the thread as a needle.

So, voila! We are ready to create lace masterpieces!

Subscribe to my blog. Comment and ask questions. I will be happy to help with tips!

So, you want to buy a collar pattern “Sea glass”? Welcome: http:// https://fairylace.kozinenko.com/product/sea-glass-collar-necklace-tatting-pattern/

And finally, I invite you to my YouTube channel. I hope you will enjoy!https://www.youtube.com/watch?v=3U-z6wuzX08&list=UU3dn4_9pp7tIKA2k564wLBQ