Gift for Cro-Tatters 🎀, or why I don’t sum up the past year.
Hello everyone! Another year of our turbulent lives has come to an end — a year full of pain, disappointments, and tears. Yet, I don’t want to dwell on all the hardships; instead, I try to look to the new year with optimism. It is only thanks to you, my friends and followers, that I keep going and even create something new and, I hope, inspiring.
Today, I invite you to create a small cro-tatting motif with me — and it even features double chains! Don’t be afraid: with the help of the instructions and the video tutorial, you’ll easily master this fascinating technique.
My small motif is called “Harmony in Two Colors”. It consists of six rings and six double chains, with alternating yellow and blue threads. This technique creates a cheerful, vibrant effect, and it’s fun and engaging to work on. You can find all the details, the diagram, and a step-by-step video in the PDF I’ve prepared for you.
I wish you a new year full of creative ideas, inspiration, and joy in your favorite craft. 🎉I hope my little Gift for cro-tatters will come in handy! May every knot bring you satisfaction, and may your little colorful motifs brighten your life!
Finally, I want to thank everyone who supports me and helps me in my creative journey! ❤️ Without you, I wouldn’t be able to create, share patterns, and inspire others. You are my true motivation!
Helpful advice for cro-tatters — or how to make your tatting life easier!
Hello everyone!🌸Sometimes it happens like this: you see someone online creating something beautiful, trying a new technique, or using an unfamiliar tool — and you think, “Oh, that looks easy! I can do that too!” Well… this happens to me all the time! 😄 I truly enjoy learning new things!
And that’s exactly when any helpful advice from those who have already practiced these methods can become so valuable. Right? 😉
Today I’d love to share a few tips for all cro-tatting enthusiasts — for those who already feel confident with the hook, and for those who are just beginning this wonderful journey. ✨
For those who haven’t seen this new hook yet — let me introduce this little beauty! It’s a creative “hybrid” of a tatting needle and a crochet hook. 🌿💕
I hope I’ve sparked your curiosity! Ah, it seems you did everything right… And yet the hook still refuses to slide through the stitches! What should you do then? 😄
So here comes my first tip: when you make double stitches on the hook, don’t tighten them too much. Keep them slightly relaxed so the hook can easily pull the loop through. 😊
The second important point: when you slide the stitches closer to the tip of the hook, make sure they don’t tilt or twist. They should stay perfectly perpendicular to the shaft. 😊
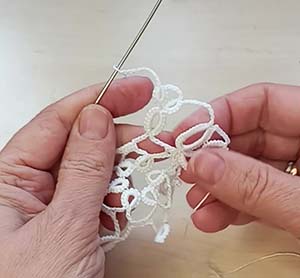
When pulling the hook through the double stitches, gently press the stitches toward the hook’s shaft from the back of your work, just like in the photo. This helps secure the stitches and creates a little “extra space” inside them.
Watch my video — it looks so simple! With a little practice, I’m sure you’ll master this technique in no time. 😊
The trickiest tip!
Please let me know in the comments — do you enjoy cro-tatting? Or is this your first time hearing about it? Will you try my ring-forming method? ✨
Blue and Yellow Tatting Doilies, or vintage shuttle and modern meaning.
Hello everyone!🌸 Do you enjoy receiving gifts? You’ll probably say it’s a silly question — because who doesn’t love presents? 🎁 Oh, I truly adore them!
✨ Look at this absolutely amazing tatting shuttle that my dear friend Edna sent me as a gift! 💌 It has the name James Lees & Sons engraved on it.
The James Lees and Sons Co. was an American textile manufacturer founded in Bridgeport, Pennsylvania. The company operated from the early 20th century and specialized in producing yarn, carpets, fabrics, and accessories for handicrafts. In 1956, it was even listed in the Fortune 500, ranking 409th with a revenue of $71.3 million and 3,500 employees. 🧵🏭
But whether these tatting shuttles were made in very small numbers, or whether it was just too long ago, I couldn’t find detailed information about mine. 🤔 👉 If you know anything about tatting shuttles produced by James Lees & Sons, please share in the comments!
Of course, I couldn’t resist trying this shuttle in action. ✨ It feels so light, comfortable, and pleasant to the touch. Working with beautiful tools is pure joy — it turns every process into true creativity! 🎨🧵
The name of these Blue and Yellow Tatting Doilies
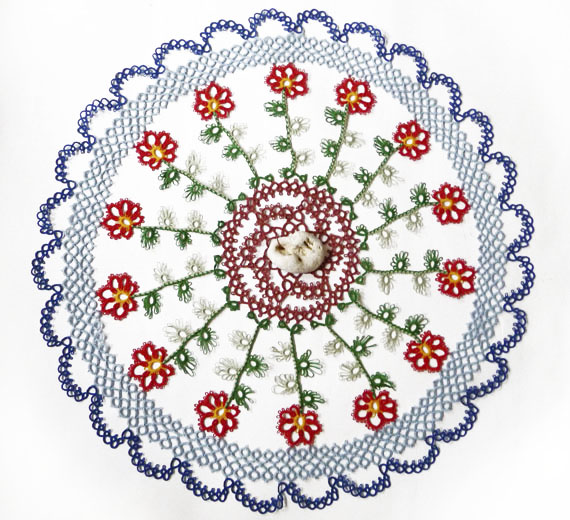
By the way, at the request of my dear friend Edna, I made three doilies with blue and yellow threads. You know that these are the colors of the Ukrainian flag. Two doilies are made according to my own pattern. 🧵Guess what I called this pattern? Of cource, I named it after a wonderful talented lady with a big heart, who constantly helps and supports me and my country in these terrible times. 🌷
Free Antique tatting lace, or let’s give new life to old patterns!
Hello, everyone! Recently, I was commissioned to create a charming collection of handkerchiefs with embroidery and tatted lace. 🪡✨ One of the patterns I used caught my heart immediately — I discovered it in an old booklet printed back in the 1930s! Isn’t that amazing?
So simple, yet so sweet — this little gem of a design was just asking to be shared. 💖 And how could I resist?
This blog post will be short 🍬 — just a few helpful notes to accompany the video tutorial. As you probably know, I love adding videos to my posts, and I hope this one brings you both joy and practical tips!
First of all, you can take a closer look at the diagram and written instructions right here — just scroll down. ⬇️ Or, if you prefer to keep this vintage treasure in your own collection, feel free to download the file using the link below:
Did you notice that we start from the back side of the work? That’s a very important detail! Why? Because it allows us to make all the Rings from the front side, which is so much more convenient — and prettier too! 💡✨
You probably also spotted the little “paperclip” icon on the diagram. 🤓 Now, let me share a secret with you: Personally, when working with fine threads, I much prefer using a short piece of extra thread instead of an actual paperclip. Why? Well, the clip can leave a rather noticeable hole, and as you may already know — I’m all about that Perfect Tatting! 💖 (If you’ve read my previous blog posts, I’m sure you saw that coming. 😉)
🧵 A Tiny Twist for Perfect Rings!
Here’s something else to notice in the video: I add an extra half of a double stitch at the end of each ring, and then pull the shuttle through the loop on my handbefore forming the next one. 🔄✨
Now, don’t get me wrong — I’m not saying this is the only way to do it! As we all know, tatting is not dogma — it’s an art! 🎨🪡
But… if you like your rings to look perfectly symmetrical and neat, this little touch might just become your new favorite trick! 😉
🪡 Needle Tatters, This One’s for You!
If you’re working with a needle instead of shuttles, I’ve got a little tip for you too! 🤫 I’ve actually shared a video about it earlier, but here’s the trick in short:
Before closing the ring, give the thread with the double stitches a single twist. That’s it!
With this simple move, you won’t need to tie extra knots after each ring. 💡 It’s especially lovely when you make two or three rings in a row — the result looks smooth and seamless! ✨💕
🧵 Want to Add a Corner or a Curved Edge? If you’d like to turn this lace into a corner or create a curved shape instead of a straight edge — you’ll find extra diagrams and tips in the full pattern available in my shop. https://fairylace.kozinenko.com/product/antique-border-tatting-pattern/
💬 Let’s Keep in Touch! If you enjoyed this, don’t forget to subscribe, leave a comment, ask questions, or share it with your tatting friends! 💌 And above all — happy tatting! 🧶✨
How to Make Ring with Curled, or Two-Needle Tatting Tutorial
Hello, everyone! 👋
😕 Unfortunately, I received very few comments on my teaser video for the “How to Make a Curled Ring” tutorial. Honestly, I felt a bit confused and even a little shy. Is this topic not interesting for you? Or maybe my explanations weren’t clear enough? Perhaps social media users just skip the video descriptions? 😅 Or… did you miss my short call-to-action video on YouTube?
📣 If so, maybe it’s time to subscribe and become a little more active on my channel? 👉 youtube.com/@ElenaKozinenko
✨ But no worries! I’ve decided to treat my most loyal and curious followers. So today I present to you a detailed step-by-step tutorial and supporting video on how to make a Curled Ring using two-needle tatting technique!
To get started, you’ll need just a few simple tools: ✨ thread, ✨ two tatting needles of the same size, ✨short pieces of contrasting thread, each about 10 cm (4 inches) long, ✨ and a small pair of scissors.
🔍 Important note: Make sure your thread thickness matches the size of your needles. I used #5 tatting needles and #10 mercerized cotton thread.
🧰 What You’ll Need for to Make Ring with Curled
But don’t worry — you can choose different needles and threads. In this case, it won’t affect the technique, only the final size of the curled ring. So feel free to experiment! 🎨😊
🔹 Step 1: Start with the First Needle
Take the first needle and make 3 double stitches.
✂️ The needle thread can be around 20–30 cm long — short enough to handle easily, but long enough so it doesn’t slip out of the needle. Just make sure it’s comfortable to work with!
🔹 Step 2: Work with the Second Needle
Now take the second needle and make 25 double stitches using the ball thread.
Here are two important tips to keep in mind: 1️⃣ Hold the needle backward, with the eye of the needle pointing forward. 2️⃣ Start your stitches right next to the ones made with the first needle. There should be no gap between them!
These small details make a big difference — so don’t skip them! 😉
🔹 Step 3: Measure and Cut the Ball Thread
Now that you have 25 double stitches on the second needle, it’s time to measure out 4.5 meters of the ball thread and cut it off.
✂️ This way, you’ll have a long enough thread to complete the entire curled ring without needing to add more thread later.
Plus, you’ll now have a free end of the ball thread that can easily be inserted into the eye of the second needle. Neat and practical! 😉
🔹How to Make Ring with Curled Step 4: Forming the First Chain
Insert the free end of long cut thread into the eye of the second needle. Then gently pull the thread through the 25 double stitches, forming an Cain.
🚫 Don’t rush! Try not to tangle the long piece of thread. But don’t worry — with every new Chain, the thread will become shorter, and pulling it through will get easier and easier. 😌
⚠️ Be very careful at this step! Before tightening the arc completely, insert a helper thread into the loop at the base of the Chain.
✨ This little trick will do you a big favor: ✔️ it makes shaping the curl much easier, ✔️ it keeps the end of the Chain neat and strong, ✔️ and it helps you gently arrange the curled elements later.
You’ll thank yourself for taking this extra step! 💡🧶
🔹 Step 5: Tighten the Chain
Now tighten the chain well to create a nice, clean curl.
✨ And here’s what you should have — a beautiful, elegant swirl forming before your eyes!
🔹 Step 6: Continue Working with the First Needle
Pull the thread out of the second needle (you can set it aside for now) and use this long ball thread to make 8 double stitches on the first needle.
You’re now slowly building the total number of stitches needed to form the ring on the first needle.
🔁 Important: Do not pull the first needle through your work yet — keep it in place until it’s time to close the ring.
🔹 How to Make Ring with Curled Step 7: Repeat and Create the Full Pattern
Now bring the second needle back into action and repeat Steps 2 through 6.
That means you’ll be making 6 curled chains, with 8 double stitches in between them — all on the first needle.
⚠️ Attention! At the very end, instead of 8 double stitches, make only 5 double stitches on the first needle.
🌀 This way, you’ll have 6 equal segments between the curls — nice, symmetrical, and perfectly balanced.
🔹 Step 8: Close the Ring and Finish Your Work How to Make Ring with Curled
Now pull the first needle through all the double stitches you’ve made on it and form the ring.
🎀 Tie a secure knot, hide the thread tails, and trim the excess.
And finally — the most satisfying part! — arrange all the curls nicely.
🌟 (Did you notice how helpful those extra helper threads were? They make it so much easier to shape the curls neatly!)
🔹 Finishing Touches – and a Video Tutorial, Too!
As the final step in your How to Make Ring with Curled project, carefully remove the helper threads, holding the curls gently in place as you do so.
💧 If needed, you can lightly apply a stiffening solution to the ring to keep its shape — then let it dry completely.
If you’ve mastered the How to Make Ring with Curled method and feel inspired to try something a bit more advanced, why not create a whole Heart with Curls?
💖 This lovely heart combines the same swirling elements into a graceful, romantic shape — perfect for gifts, decor, or just pure tatting joy!
Just tie and cut — or is it really that simple? ✂️🧵
Hello, everyone! 👋
Have you ever come across the phrase “ tie and cut” in a tatting pattern? Of course you have — it’s in almost every single one! But wait… is it really that simple? 🤔
🎥 The video is already edited and available on my YouTube channel, so you can watch every detail step-by-step!
A mysterious instruction? Well, maybe not mysterious, but certainly more interesting than it first appears! These few innocent words — “just tie and cut” — often hide a lot of nuance. And trust me, ignoring them can lead to some very disappointing results.
One day, I read a comment from a beginner in a tatting group. She wrote:
“I tied the knots very tightly, but after washing, my doily tore apart wherever I had finished the threads!”
💔 I could feel her frustration! Sadly, this kind of thing happens more often than you might think. Especially when you’re learning on your own, it’s easy to miss the fact that simply tying knots and trimming the threads is not enough. There’s a hidden art to it — and that’s exactly what we’re going to uncover today.
Never do this! ❌
It may look neat now, but disaster awaits! If you leave your ends like this, your tatting will unravel during washing or even gentle use. The knots will slip, and your beautiful piece will fall apart — with no way to save it. 😢
To achieve a flawless result, you need to add one simple step between “tie” and “cut.” First, make sure to tie a firm knot — a square knot works best. ✅
Then, carefully hide the loose thread ends inside the double stitches. Only after this should you trim the excess. ✂️
🔍 Pro tip: Always tuck the ends on the back side of your tatting. This way, the finish will remain invisible — and perfectly neat! 🌸
There are a few special tricks for each tatting method — shuttle, needle, or cro-tatting. We’ll get to that soon!
Shuttle tatting, tie and cut
To hide the thread tails, you’ll need a thin embroidery needle — preferably a blunt one. 🪡 If you use a regular sharp needle, you might accidentally pierce through the double stitches, which can damage the texture of the thread — something we definitely want to avoid. A thick needle is also not a good choice. First, it will be difficult to pass it through the stitches. And second, it can stretch the lace element where you’re trying to hide the threads. That doesn’t look neat or professional.
🧵Needle tatting
This method is a bit easier compared to shuttle tatting. In fact, you can use the very same needle you used to make your lace — how convenient is that? 😌
However, there’s one important thing to remember: when you finish a needle tatting project, both thread tails remain in the last element. To secure your work properly, you need to pass one of the threads through the starting point — in other words, join the first and last elements together. Only then should you tie a secure knot, hide the thread ends neatly, and trim the excess.
🪡 Cro-Tatting, tie and cut
Cro-tatting might not be the most popular tatting technique, but I truly enjoy it! 💖 Hiding thread ends is just as simple as with needle tatting — no stress at all.
Even better, you have options: you can use a fine embroidery needle or a special tatting needle if you have one on hand. Either tool will work beautifully to keep your lace looking clean and polished. ✨
👉 Curious to learn more? If you’d like to dive deeper into the differences between the three main types of tatting — shuttle, needle, and cro-tatting — feel free to check out my detailed blog post: 🔗 https://fairylace.kozinenko.com/three-types-of-tatting/
It’s packed with helpful tips and clear comparisons to help you choose your favorite technique! ✨
🎥 Watch the Full Video on YouTube!
Now it’s time to see everything in action! 🎬 Click below to watch my step-by-step video: 🔗 https://youtu.be/Hi6nQ27Wtio
If you enjoy it, don’t forget to subscribe to my channel, give it a thumbs up, leave a friendly comment, and share the video or my blog with your crafty friends on social media! 💬💖 Your support means the world to me! 🌍✨
Heirloom Hanky with Tatting, or a combination of two of my favorite handicraft techniques.
🌸 Hello everyone!
I’m so happy to share one of my favorite projects with you today — a delicate handkerchief that combines machine embroidery and tatted lace 🧵✨ This timeless piece was crafted with love, patience, and a deep admiration for heirloom techniques. I adore blending different styles, and this hanky is a perfect example of how tatting and embroidery can work in harmony 💖
Before assembling the hanky, I needed to create a long piece of tatted lace edging. Sounds simple, right? 😅 But this pattern includes four rows of delicate stitches and picots, all worked with thin polyester thread — just as my client and I agreed. Because of the thread’s fineness and the required length of 1.2 meters, this step was incredibly meticulous 🪡💠
Despite the challenge, the result was absolutely worth it. The lace looks light, elegant, and strong at the same time — exactly what I needed for an heirloom-quality piece.
📐 Preparing the Base for the Heirloom Handkerchief
The next step in making this heirloom handkerchief was all about precision! 🧵 First, I cut out a square of paper matching the final size of the hanky. Then, I covered the paper with a piece of transparent plastic. This step might seem simple, but it’s absolutely essential — it helps me pin the lace evenly and accurately 🔍
To make sure the lace edging fits perfectly, I gently arranged and pinned it around the square. As a result, the shape and proportions of the future lace hanky are fixed exactly. No guessing, no distortion — just perfect symmetry for a truly vintage handkerchief 💫
🧴 Stiffening the Lace for the Heirloom Hanky with Tatting
To keep the lace edging in perfect shape, the next step is stiffening it with a special solution. ✨ This stage is truly important because it gives the heirloom handkerchief a clean, elegant look that will last for years.
I use a homemade stiffening solution made from leftover embroidery stabilizer — nothing goes to waste in my workshop! 🌿 If you’re curious how I make it, you can read the detailed tutorial on my blog here: 👉 https://fairylace.kozinenko.com/how-to-stiffen-tatting-lace/
So, after applying the solution, I leave the lace to dry naturally. This ensures it stays crisp and beautifully shaped, ready to be sewn onto the fabric square later on. 💫
💻 Preparing the Embroidery Design for the Heirloom Handkerchief
While the lace was drying, I turned my attention to the embroidery 🌼 This step required adapting the design to fit the heirloom handkerchief and meeting the exact wishes of my client. So, I opened my embroidery software and began fine-tuning every little detail.
Believe it or not, to work with my sewing-and-embroidery machine, I had to dive into a whole new world of digital skills! 🧠✂️ It’s amazing how traditional craftsmanship and modern technology can come together in one project. Learning how to digitize and modify embroidery patterns was challenging — but also exciting. Every project teaches me something new, and that’s what I love most about handmade work 💖
🧺 Preparing the Fabric for the Heirloom Handkerchief
Now it was time to prepare the fabric for embroidery — a delicate and important stage. To start, I carefully smoothed the cotton base to remove every wrinkle 🧼 Then, I applied a piece of sticky water-soluble stabilizer to the wrong side of the fabric. This type of stabilizer is incredibly helpful, especially when working on a Heirloom Hanky with Tatting project like this one!
Because the lace and embroidery must align perfectly, every step here must be precise. The sticky stabilizer keeps the fabric steady while I embroider, so there’s no puckering or shifting during the stitching process. As a result, the final piece turns out both beautiful and professional ✨
🪡 Hooping the Fabric for the Heirloom Handkerchief
Next, I carefully placed the fabric into the embroidery hoop. This step might seem simple, but it’s actually one of the most crucial! 🧐 In order to keep the design crisp and aligned, the fabric must be inserted without pulling, stretching, or twisting it.
To ensure the embroidery lines are perfectly placed, I double-checked the printed guidelines and adjusted the hoop gently. That way, when the embroidery machine starts its dance, every stitch lands exactly where it should. 🧚♀️ Proper hooping is what gives the heirloom handkerchief its polished, symmetrical look — just like a fine vintage piece!
🧵 Embroidering the Heart of the Heirloom Handkerchief
Now comes the most exciting part — embroidery! ✨ It’s always a delight to watch how, stitch by stitch, the design appears on the once-empty fabric. Like a slow bloom, the gentle lines take shape, forming a romantic pattern with two tiny hearts at its center 💕.
This stage always feels like magic. For a heirloom handkerchief, every thread carries meaning — especially when created with love and care. The embroidery machine hums softly, and I can’t take my eyes off it. It’s a process I could watch endlessly. Just like in fairy tales, the invisible becomes visible — and beauty is born. 🌹
Once the embroidery was finished, I gently rinsed the stabilizer in warm water and allowed the fabric to dry completely ☀️ This step is essential — it ensures the fabric returns to its natural softness and shape. Then the true magic begins!
With a fine needle and a thimble, I slowly and carefully hand-stitched the tatted lace onto the fabric, following the marked lines with precision and love. 🪡 Of course, you could use a sewing machine to do this. In fact, I have a helpful video tutorial showing how to attach tatting lace to fabric here:https://www.youtube.com/watch?v=akpnypHDdW8&t=125s
However, for this heirloom handkerchief, I chose the old-fashioned way — slow, mindful stitching by hand. It brings a sense of connection and authenticity that no machine can replace. 💫
🪮 Finishing Touches for the Heirloom Hanky with Tatting
To complete the heirloom handkerchief, I carefully folded the fabric edges and shaped the corners neatly. Using pins, I fixed the folds in place, making sure every side was straight and precise. This process requires a gentle hand and a keen eye for detail 🔍
Then, I used my sewing machine Bernina to stitch the hem, securing the edges with clean, even lines. ✂️ Once the sewing was done, I gave the handkerchief a final press with the iron — a satisfying step that brings out its crisp, elegant look. Finally, I wrapped the piece carefully, ready for delivery and joyful unboxing! 🎁
Every heirloom carries a story, and I’m thrilled to pass this one on to its new owner — with all my heart in every stitch. 💗
💌 Your Custom Heirloom Hanky with Tatting Awaits
Would you like to have a unique heirloom handkerchief designed just for you? I’d be delighted to bring your vision to life! 💫 You can choose the lace pattern, thread color, and embroidery design — everything can be personalized to your taste.
Whether it’s a special keepsake, a wedding gift, or a memory stitched with love, I’m here to create something truly meaningful for you. 🧵
📩 Please feel free to contact me via:
💌 Email Me: fish20085@gmail.com
Click below to follow me into the world of lace dreams!
How to adapt tatting pattern, or how to make a flat doily from a ball.
Hello everyone! Today’s article will be very useful not only for beginner tatterers, but also for experienced lace makers, I’m sure! In a comment to one of my previous articles, Debra asked if it was possible to make a round Doily from Christmas Clover by Kendra Goodnow.
This is a wonderful decoration for your Christmas tree ball!
Debra, I apologize for my inattention! But I made an adaptive pattern for 15 cm in diameter (I forgot, you asked for 4 inches). But I hope this method will help you make any size yourself!
By the way, Kendra’s pattern is free, so we are not violating anyone’s copyright. So, we take the graphic diagram from the downloaded file. Using a computer program, I made a diagram measuring 15 cm in diameter. And now we need to print it out. By the way, if you are not sure about your computer program, you can check the size of the printed template with a ruler. Mine was exactly 15 cm!
And now we have some painstaking but very useful work ahead of us. This way you will avoid big mistakes in the finished product. We need to make test elements for all the Rings and Chains of the pattern. Of course, we do not take into account the repeating elements!
In the video you will see that the first row turned out to be unchangeable.
But in the second row we had to change some Rings and all the chains. Of course, because we need to get an even doily from the ball.
I changed the number of double stitches and added some picots.
I suggest you make a round doily size 15 cm in diameter, threads No. 20!
So now, when you are asked how to adapt tatting pattern, you can confidently answer: easy! And of course, you can watch a video illustrating the process described: https://youtu.be/k3l88qw_Yc4
Some tricks for needle tatting, or whether it is necessary to strive for perfection.
Hello everyone! I love receiving comments, advice, requests and kind words from you! This article was the result of my new very pleasant online acquaintance with Luisa. Perhaps, we are kindred spirits! Because she is also a perfectionist and is always looking for new ways to improve the appearance of her work and bring it to perfection.
I have already made a video on the topic of Self-closing mock ring and floating ring . But today I decided to tell you more about working with a needle on this element. It was Luisa who inspired me to search for a new way. So, now I have 4 ways how you can make this interesting element with a needle. The link to the video, as usual, is at the end of the article.
Chains and Rings
This is the easiest method that even a beginner can use. The secret is that you do not make Floating Rings. We simply divide the Self-Closing Ring into Chains and alternate Rings and Chains as needed according to the pattern. The disadvantage of this method is that you do not get an even Ring on which the Floating Rings are located. You can make a turn of the loop before tightening the Ring, this will smooth out the silhouette a little (watch the video!).
Extra stitch
This method is similar to the previous one. But you don’t do any securing after the Ring. And also to align the Chains, make one “seam” with the needle into the second half of the last double stitch of the previous sector of the Chain. Cool, did I say? LOL! It’s actually easy to do, you’ll see after watching the video.
Back of the needle
This method is often used when making a Floating Ring. You will need a second needle. And you will also have to cut off the ball thread (and not just once!) during the process. Naturally, you then have to attach the ball thread. These are additional tails, pieces of thread… But this method looks perfect!
Extra thread
This method is for very diligent and demanding tutters. You will need a second needle (take a needle slightly thinner than the main one) with a small piece of thread. Inside the Chain for the Self-closing Ring you will have two threads. And you will make Floating Rings with the thread from the ball with the main needle, like regular Rings. It looks beautiful! Thanks to the double inner thread, the fake ring turns out dense. But are you ready to hide the tails of the extra thread in each Self-closing Ring?
I hope you enjoyed Some tricks for needle tatting. After all, we are engaged in creativity and self-development, right? More knowledge – more opportunities! The link to today’s video is here, you are welcome: https://youtu.be/CnUjY08HJF8
Please write comments on the blog and on YouTube, support me by subscribing, liking and sharing. In my blog you will find interesting articles about tatting: https://fairylace.kozinenko.com/blog/
My articles are also accompanied by video tutorials. Along with the article, I add them to my YouTube channel. ( Link to the video at the end of the article)
Please write in the comments what subtleties you would like to learn. Then it will be easier for me to make a lessons plan.
Alligator Join
This is a very interesting and simple connection. I like the name (although there is another one) because your knot is like “capturing the element in the mouth of an alligator”! By the way, please write another name for this element in the comments to the post.
Folded join
Oh, I’ve already made several videos and written detailed posts about this. So I’ll save my time (and yours, too, of course!) and not go into detail about it. But just in case, here’s the link to the article: https://fairylace.kozinenko.com/closed-tatting-motif/
Lark’s Head Join
This method allows us to make an invisible connection, imitating a double stitch. You will certainly agree with me that this is especially useful when connecting different colors. In the video you will find two ways to tat this join.
Tapestry needle instead of shuttle
This is the easiest way to “knotless” connection. But you will be limited in the length of the thread. We can’t work with a free thread 3 meters long, for example. Although, who knows! LOL
Joining to twisted picots
It’s hardly a separate method. After all, here we use a regular connecting picot. But I still decided to add this type of connection. There is no such thing as too much knowledge, right?
Joining with Curled Ring
The Curled Ring is a very interesting element. I suggest you use it as a connection between rows. You will get beautiful volumetric elements.
Reverce join
You will be surprised how easy it is to change the direction of the Chain with this join.
Lock Join Plus
This technique is best used to change the color of the threads. And also with this knot you can simply swap the shuttle and ball threads. You can read about several ways of this join in Muskaan’s blog. I really like her blog. There are so many new ideas, different useful techniques and interesting patterns! https://tipsaroundthehome.blogspot.com/2020/07/lock-join-plus.html
Tatting Loop Join
Again, I need your comments because I don’t know if this knot has a name. I like to use this knot over at the beginning of the next row. And depending on which side you insert the hook into the join picot, you’ll get a “cap” on the front or back.
I think I’ve listed all the join methods I know. Thanks for reading to the end “Tatting Join Picot and More, part 2”! I hope you have the strength to watch the additional video to this article: https://youtu.be/E6WlFUGnj2g
Support my blog and my YouTube channel with your likes, comments and shares, please! Thank you!