Posted on 2 Comments

Special for needle tatters!

Special for needle tatters today I write continue of the previous post. https://fairylace.kozinenko.com/2019/10/08/free-tatting-pattern-earrings/

Last time I drew for you a pattern of simple, but graceful tatting earrings. And then you read the detailed instructions on how to do this (did you really read? I hop! ). But the last time we were carried away by the shuttle tatting only. So today I’m trying to fix this shortcoming.
So, special for the tatter needle!

I will not repeat the graphic pattern and the first version of weaving. Because the needle and shuttle methods in this case are nearly identical. But note that you need beginning tat from the back side. When making the double stitches on the back side, make the second half of the second stitch fixture and the first half of the double stitch next.

So let’s look at the second option right away.

Abbreviation:

R – ring; SR – split Ring; C – chain; p – picot; jp – join picot; tw – turn the work; numbers indicate the number of double stitches.

Beginning work – green circle. (We beginning tat from the back side, do you remember?) 1. R: 2, p , 2 , p , 2 , p , 2 , p , 2 , p , 2 , p , 2 , p , 2, tw; 2, 4, 6, 8, 10, 12, 14. C: 2 , p , 2 , p , 2 , p , 2 , p , 2 , p , 2, tw; 3, 5, 7, 9, 11, 13. R: 2 , p , 2 , p , 2, jp to previous Ring (according to the diagram), 2 , p , 2 , p , 2 , p , 2 , p , 2, tw; 15. R: 2 , p , 2 , p , 2, jp to previous Ring (according to the diagram), 2 , p , 2 , jp to R1 (according to the diagram), 2, p , 2 , p , 2 .  Do NOT CUT thread.

16. SR:  [ Tat of the ball thread: 2, p , 2 , p , 2 , p , 2 ], here we turn the work ( photo 1) and un-thread the needle, [tat next 8 double stitches using the needle thread, that was just un-threaded, passing the double stitches over the eye end of the needle ( photo 2 and 3): 2, p , 2 , p , 2 , p , 2 ], re-thread the needle (photo 4), and close the ring as usual (photo 5);

17. C: 2, p, 2, p, 2, p, 2, small picot for earrings hook, 2, p , 2, p, 2, p, 2; 18. R: 2, p, 2, p, 2, p , 2, ( joining to Element 1 according to the diagram), 2, p, 2, p, 2, p, 2, tie and cut.

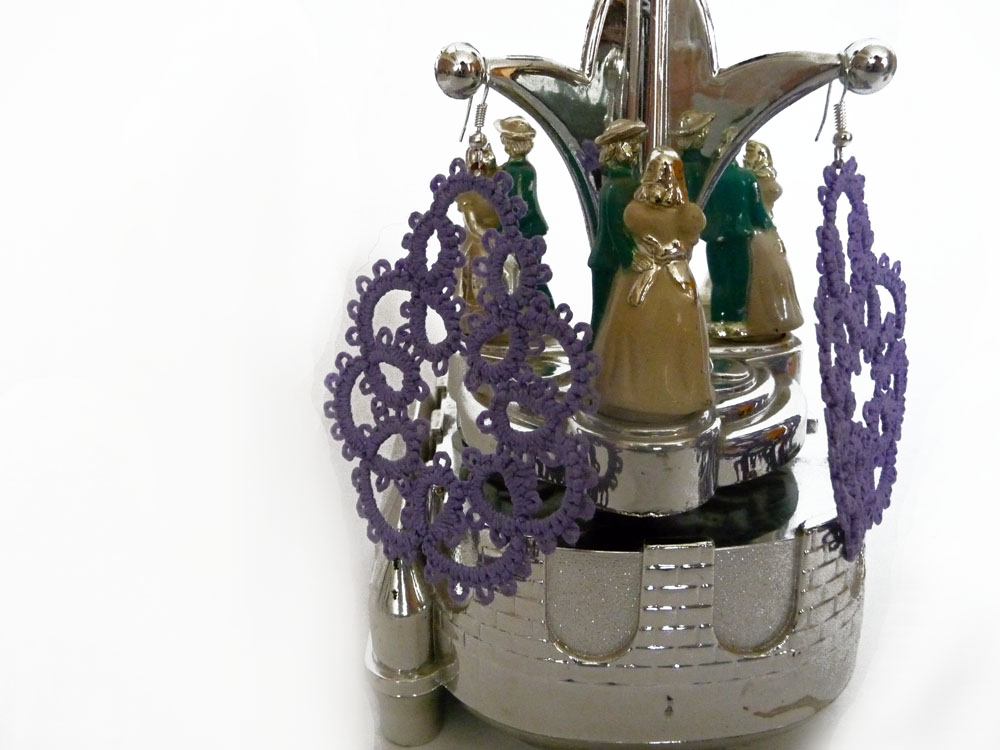
Attach the hook for the earring. We make the second earring in the same way. And your earrings special for needle tatters ready!

Attention! SALE!

You can use the coupon code OFF10HAPPYPATTERN and guaranteed to get a 10% discount on the purchase of patterns in my store: https://fairylace.kozinenko.com/product-category/patterns-tutorials/patterns-and-tutorials/

Now you can use this way for tat doily “Diana”. The pattern is here, please: https://fairylace.kozinenko.com/product/diana-square-doily-needle-tatting-pattern/

Subscribe to my blog. Comment and ask questions. I will be happy to help with tips! https://fairylace.kozinenko.com/blog/

You can see three tatting methods on my YouTube channel: https://www.youtube.com/watch?v=3U-z6wuzX08&list=UU3dn4_9pp7tIKA2k564wLB

And of course, welcome to my store : https://fairylace.kozinenko.com/

Posted on 6 Comments

Free tatting pattern earrings

Attention! SALE!

You can use the coupon code OFF10HAPPYPATTERN and guaranteed to get a 10% discount on the purchase of patterns in my store: https://fairylace.kozinenko.com/product-category/patterns-tutorials/patterns-and-tutorials/

Very easy free tatting pattern earrings for tatters! Want to make these earrings yourself? These lace earrings are very simple but spectacular. So for you master class .

tatting pattern earrings, free pattern, tutorial, master class

I offer two ways of tatting, choose what you personally like!

Abbreviation:

R – ring; SR – split Ring; C – chain; p – picot; jp – join picot; 1S – shuttle; TS – shuttle and bow ( or two shuttles for way 2); tw – turn the work; numbers indicate the number of double stitches.

The first way:

This is very simple, for beginners tatters. Therefore, you should be able only to Ring and Chain. You will need cotton threads №10, one shuttle, scissors, crochet hook and two earrings hooks.

Take the shuttle, wind the thread on the shuttle ( 2 – 2,5 m ), do not cut the thread.

We do it according to the scheme. The scheme consists of two elements: A ( pink color on the diagram) and B (brown color on the diagram).

Element A:

Beginning element – green circle. 1S – 1. R: 2, p , 2 , p , 2 , p , 2 , p , 2 , p , 2 , p , 2 , p , 2, tw; TS – 2, 4, 6, 8, 10, 12, 14. C: 2 , p , 2 , p , 2 , p , 2 , p , 2 , p , 2, tw; 1S – 3, 5, 7, 9, 11, 13. R: 2 , p , 2 , p , 2, jp to previous Ring (according to the diagram), 2 , p , 2 , p , 2 , p , 2 , p , 2, t 1S – 15. R: 2 , p , 2 , p , 2, jp to previous Ring (according to the diagram), 2 , p , 2 , jp to R1 (according to the diagram), 2, p , 2 , p , 2 . Tie and cut.

Element B:

Beginning element – blue circle.

1S – 1. R: 2, p, 2, p, 2, p , 2 ( joining with hook to Element 1 according to the diagram) , 2, p, 2, p, 2, p, 2, tw; TS – 2. C: 2, p, 2, p, 2, p, 2, attach to earrings hook, 2, p , 2, p, 2, p, 2, tw; 1S – 3. R: 2, p, 2, p, 2, p , 2, ( joining with hook to Element 1 according to the diagram), 2, p, 2, p, 2, p, 2, tie and cut.

Second Earring tatted similarly.

The second way:

The second way is more complicated. Therefore, you should be able to Ring, Chain and Split Ring. You will need cotton threads №10, two shuttles, scissors, crochet hook and two earrings hooks.

Take two shuttles, wind the thread on the shuttle ( about 4 m), do not cut the thread between shuttles.

Rings and Chains 1 – 15 are done similarly to Method 1, but after Ring 15 DO NOT CUT the thread!

TS – 16. SR: [ 2, p , 2 , p , 2 , p , 2 ], [ 2, p , 2 , p , 2 , p , 2 ], tw; TS – 17. C: 2, p, 2, p, 2, p, 2, attach to earrings hook, 2, p , 2, p, 2, p, 2, tw; 1S – 18. R: 2, p, 2, p, 2, p , 2, ( joining with hook to Element 1 according to the diagram), 2, p, 2, p, 2, p, 2, tie and cut.

Congratulations! Your earrings ready!

In the next article I will describe in detail how to make these earrings with a tatting needle using method 2. If you are interested, subscribe to my blog. Comment and ask questions. I will be happy to help with tips! https://fairylace.kozinenko.com/blog/

You can see three tatting methods on my YouTube channel: https://www.youtube.com/watch?v=3U-z6wuzX08&list=UU3dn4_9pp7tIKA2k564wLB

And of course, welcome to my store : https://fairylace.kozinenko.com/