Posted on 2 Comments

Perfect tatting – Part 12

Yellow tatting round motiff.

Perfect tatting – Part 12, or why do picots curl and how to avoid it.

Hello everyone! This is the twelfth lesson in the series “Perfect Tatting”. You can read the previous part here: https://fairylace.kozinenko.com/perfect-tatting-part-11/

My articles are also accompanied by video tutorials. Along with the article, I add them to my YouTube channel.

Please write in the comments what subtleties you would like to learn. Then it will be easier for me to make a lesson plan.

You can also ask me questions in the comments, I am ready to help!

Perfect tatting – Part 11-1

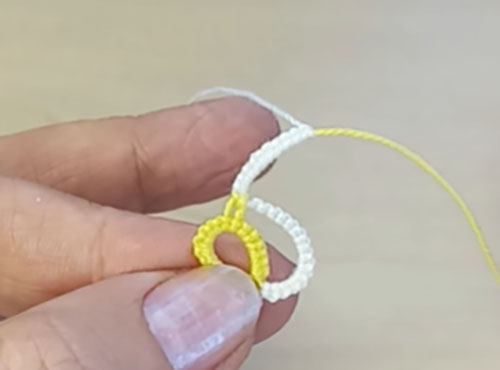
Oh, you must admit, it’s very annoying when a couple of three sloppy picots spoil the product and the mood of the master! I’m talking about curled picots.

Today I want to show several simple ways to avoid this mistake.

SHUTTLE TATTING

Perfect tatting-part 12 - 2

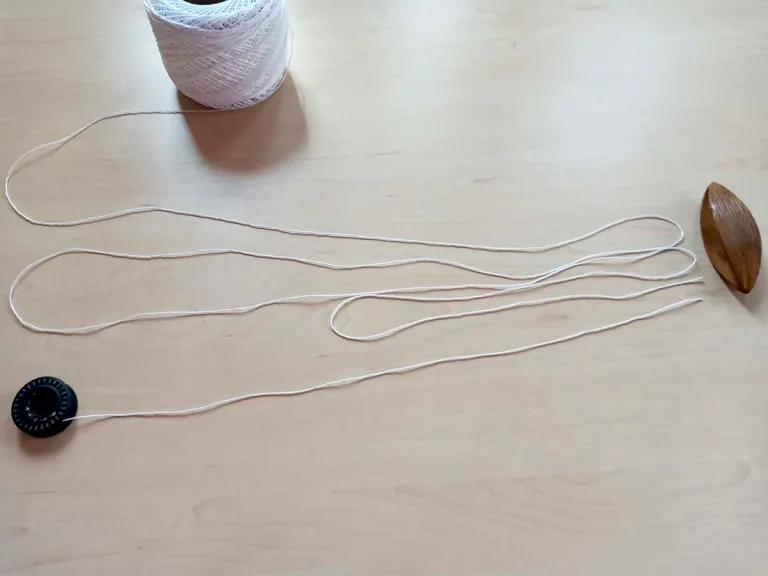
First, try to wind the threads onto the shuttle correctly. Do not wind the thread around the shuttle, but rotate the shuttle. By the way, there are various devices for winding threads onto the shuttle. I know that some craftsmen use sewing machines for this (for “bobbin shuttles”).

Secondly, try to place the shuttle horizontally. I have a special device for this. It is very convenient. Because the shuttle rotates around the axis and the thread does not twist. By the way, you can use this technique while weaving as well.

Thirdly, spin the shuttle more often! This is a very simple technique, but popular and used by absolutely all tatters! Or am I wrong?

Perfect tatting-part 12-5

Fourth, you can also untwist the ball. This is especially true when making chains. Use a ball-point needle to secure the thread. And “send the ball on the carousel”!

NEEDLE TATTING

Unwinding the ball can also be useful for needle tatting.

Also, use the horizontal ball placement method. If the ball is big enough, you can take a knitting needle and attach it together with the ball to a box, for example. I have an oval box made of cord for this purpose.

And of course, don’t forget to untwist the needle more often.

I hope my tips will help you! But I’m sure my video will demonstrate all these little tricks more clearly! https://www.youtube.com/watch?v=vzX1YYB7d_o&list=PLmUVrN61lH3yT7k0vrL0PosljWkYTjM3a&index=12

Perfect tatting – Part 12 is over!
Don’t forget to comment, like and share my videos and articles on social media, please! Happy tatting! Thank you!

Posted on 2 Comments

Once I caught a fish alive

Once I caught a fish alive

Once I caught a fish alive, or how to quickly and easily wind the threads in several layers.

All plans go to hell when the air raid signal goes off…
It scares me terribly. Because the consequences of the bombing are always unpredictable and terrible. And every time I seem to crumble into small pieces. This is a very unpleasant feeling, believe me. Each time it becomes more and more difficult “to collect yourself as a whole”. But your kind words, your prayers and thoughts about me and my country help me.
Today, the third time, an air alert has been declared throughout Ukraine. Everyone get to cover now! I managed to shoot material for the video in my studio. And I can mount the video and write an article anywhere (even sitting in the basement, which I don’t have, unfortunately…).
Sorry for such a sad start. I thought for a long time if I could write about the war in my needlework blog. Tatting, sewing, embroidery, knitting, macrame, all my creativity is my life. But this terrible reality is now also my life, alas.

I caught a fish alive

So, I wanted to remind you of a nursery rhyme. Probably, in every language, children count one-two-three-four-five, read a poem or sing a song.

Once I caught a fish alive

One, two, three, four, five,
Once I caught a fish alive.
Six, seven, eight, nine, ten,
Then I let it go again.

Why did you let it go?
Because he bit my finger so.
Which finger did it bite?
This little finger on my right.

Surely you will be surprised and ask me: why a nursery rhyme? We’ve come to wind the threads! The fact is that winding threads in 2, 3, 4, 5 and even 6 layers is as easy as singing a song.

So, all you need is a ball of thread that you need to rewind, and an empty spool from the sewing machine. I was lucky, on my Bernina the bobbin reel is enlarged. Therefore, more thread is wound on this bobbin. I’ll be honest with you, I don’t like working with multiple layers of thread. But sometimes I just don’t have threads of the right color with the right thickness. For example, for jewelry set Danuta, I wound metal embroidery threads in three layers. The pattern for this set is available in my store: https://fairylace.kozinenko.com/product/tatting-pattern-set-danuta/

So, step one:

Wind the threads from the ball onto the spool. I do this on a sewing machine.

Two layers

It’s elementary, Watson! Two threads in one.

Three layers

I caught a fish alive

You only need a ball. Make a loop, forming three strands. Tie the end of the thread and loop to the shuttle. Gradually winding three threads on the hook, thread the ball of thread into the loop. Ah, I’m not sure I can explain clearly. Therefore, it is better to watch the video, please (link at the end of the article).

Four layers

In this case, you need to go back to winding in three layers and simply add thread from the spool. Thus, in one step you get 4 layers at once, hooray!

Five layers

 caught a fish alive

You only need a ball threads. We do the same as winding in three layers. But now we need two loops of different lengths. Oh, I won’t even try to write how to do it. And again, I suggest watching the video.

Accordingly, for six layers, you need a winding option for five layers plus one thread from the spool. And this “song” can go on forever!

I am very grateful to you for your patience! Now finally a link to the video. Don’t forget to subscribe to my YouTube channel. And also I will be very grateful for following my blog and comments. https://youtu.be/q53Ejc9gI60

Thanks!

Posted on 2 Comments

Ring on chain

Two handmade tatting bookmarks, red and blue, using triple FR tatting, placed on a dark red thick book, by FairyLacefromElena

Ring on chain, or don’t be afraid to experiment!

Hello, everyone! My regular readers know how much I love experiments. I love using new tools or materials. I also really like finding new tatting weaving techniques. When I create my patterns, I always try to make them original, understandable and usable. But I love it when my customers make their own changes and additions to my work. Ah, I keep repeating: creativity is welcome!

Ring on chain

My model of earrings is called Snow. These are the white earrings in the photo. And the second photo was kindly provided by Christy. I am delighted with her version! The beads and the color of the threads are reminiscent of the glittering drops of melting snow on the first spring flowers, isn’t it?

Ring on chain

And in these photos my 3D Bow pattern and a completely unexpected version of Christy . She combined two bows into an original brooch, bravo!

Ring on chain

When I was creating the Mandala doily pattern, I could not even imagine that it could be a wonderful dream catcher! Look at the beauty of Dawn!

Ring on chain

Finally, my favorite collar is Sea Glass. Elena made her own version, complementing the collar with large beads and small details along the edge of the collar. It is amazing!

These and other patterns are in my store, welcome: https://fairylace.kozinenko.com/product-category/patterns-tutorials/

Of course, I can talk about my customers endlessly! These are extraordinarily lovely ladies and very talented tatting masters. But I hasten to tell you about my new video. The topic of the video tutorial is how to make a ring on a chain. And, naturally, I tried to show my creativity and shot 5 ways.

Method 1.

This is the traditional way for two shuttles. In my opinion, in this case, the ring on the chain look perfect.

Method 2.

You can try this motif with one shuttle and one ball. Of course it will look like a chain-ring-chain. But why not?

Method 3.

And this method is for tatting with a needle. I think you will like it. So, if you do not knot after half of the chain and after the ring, it almost looks like a classic ring on a chain. Do you agree?

Method 4.

In this method I used knots and it is very similar to method 2 for the shuttle. But you do not have to cut the thread and change the needle. Of course, this method has its pros and cons!

Method 5.

And this method looks perfect, in my opinion. You can use two needles. By the way, do not forget that both needles must be the same thickness. But you can do this with just one needle. Of course, in this case, after the first half of the chain, pull the thread out of the needle, then weave a ring on this needle. Then pull the thread out of the needle again and weave the other half of the chain. Sounds complicated? It’s actually very simple, you should try it! I say: don’t be afraid to experiment!

Please, after watching the video, do not forget to subscribe to my YouTube channel. And I am always glad for your comments and questions on my blog. It helps me to make my blog interesting and useful for you! https://www.youtube.com/watch?v=xL5lhlGs6ek&list=UU3dn4_9pp7tIKA2k564wLBQ

Posted on 4 Comments

Split ring again

Long dark blue tatting earrings with beads and round natural stones on hand, fully made with split rings (SR), handmade by FairyLacefromElena

Split ring again, or how to embrace the immensity.

Hello, everyone! I was very pleasantly surprised by the popularity of my post and video on the topic How to make a split ring. Thank you all for your comments, kind words and questions. Therefore, your support helps keep my blog useful and interesting, I hope!

You may ask why there are so many different ways of weaving a split ring. Of course, all the time we can weave patterns only a ring and a chain in different combinations. I do not want to offend anyone, in any case. Of course, there is a special charm and appeal in simple patterns. But what about the desire for development and improvement? Don’t be afraid to learn and master new techniques. Perhaps you are not planning to make special lace right now. But the more techniques you master, the wider your range of possibilities will be. Therefore, you will be able to perform work of any complexity.

So what’s in my second split ring video. Hope you find it interesting!

1. Two shuttles for ring

First, you will see how to make a split ring with two shuttles and threads in two different colors. And I could not deny myself the pleasure of showing once again how I hide the threads at the beginning of work. Oh yes, I hate thread tails! In addition, you can swap the threads of the first and second shuttles. In this case, you will end up with a colored “snake”.

2. One shuttle

Then I decided to show Dora Young’s absolutely unique method for one shuttle. I really liked this method. Because the application of a split chain for the second half of a split ring is very interesting! Many thanks to the talented tatting master Muskaan. She told me where I can get acquainted with this method.

3. Shuttle and ball

The next method I call “false split ring”. Oh, just don’t throw stones at me! Ha ha! Perhaps I am far from the first master who applies this method. But maybe there is a special term in English for this method. It’s very easy! You will be surprised. I used arcs instead of rings, that’s all! You just need extra paper clips.

Split ring again
Split ring again

4. Tatting needle

And at the end of the video, you will see another way for tatting needles. In the comments on FB, I was asked to show how to make a two-color split ring with a needle. I am always happy to help! By the way, pay attention to this nuance: You can get identical rings or mirrored ones. It depends on whether you are making a knot when closing a ring or not.

Subscribe to my blog to keep abreast of updates. Also don’t forget to visit my store, I’ve made some new patterns! https://fairylace.kozinenko.com/
Like my video, comment and subscribe, please! Thanks! https://www.youtube.com/watch?v=5nOMsstL15w&list=UU3dn4_9pp7tIKA2k564wLBQ

Posted on 2 Comments

The perfect start to two-tone lace

Perfect start for two tone lace

The perfect start to two-tone lace, or how to hide the threads at the beginning of work.

Hello, everyone! In today’s post, I want to tell you how I hide the threads at the beginning of working with two colors.

I’m sure you all know that in the beginning we may have several options. It all depends on the pattern, of course! With a product of one color, everything is simple. This is either a shuttle – a ball, or two shuttles. Although there may actually be three, four shuttles or more, I’ve tried it! But let’s not delve into the impenetrable forest, ha ha!

If we start working with threads of two colors, we usually tie two threads.

Perhaps, if the threads are very thin, this initial knot is almost invisible. But I know about him! Ah, my perfectionism does not let me get bored! At the end of the work, I tried to untie this connecting knot in order to tie, hide and cut two pairs of threads. So instead of three nodes, I got only two. But I didn’t like that either. In addition, hiding FOUR ends of a thread at once is not for me, I sooooooo really don’t like hiding threads. But of course you will not find “tails” of threads sticking out in all directions anywhere in my products, lol! Because I love the option when the threads are hidden during the weaving process. By the way, you can watch my video on this topic.

I made this video for three tatting methods: shuttle, needle and cro-tatting. I hope you come back here after watching this video and read the post to the end: https://www.youtube.com/watch?v=K_fWxN3THBc&list=UU3dn4_9pp7tIKA2k564wLBQ&index=26

Ah, Mozart’s music is perfect for creating creative projects, isn’t it? Please write in the comments if you are hiding threads during work or only after the completion of the project.

But I’m a little distracted. Our theme is how to make the perfect start to two-tone lace. So, I don’t do the connecting knot at the start. I also hide both tails of the threads at once. At the end of the work, I connect the last element to the beginning with a crochet hook or needle. And in the end, I only have two tails of threads at the end of the work, which I hide with a sewing needle. Voila!

I showed the beginning of the process of weaving a tatting in two colors in my new video, welcome!
I will be glad to new subscribers, your questions and comments. https://www.youtube.com/watch?v=oZkXevylGAc&list=UU3dn4_9pp7tIKA2k564wLBQ&index=1


Also don’t forget to visit my store:

https://fairylace.kozinenko.com/product-category/patterns-tutorials/patterns-and-tutorials/

Posted on 18 Comments

How to stiffen tatting lace

How to stiffen tatting lace

How to stiffen tatting lace, everything I found on the internet and my personal experience. But I would sooooo much like to see your comments on my posts. Trust me, feedback is very important. After all, this is the only way I can understand how interesting my articles are. I am very interested to know if my experience was helpful to someone. So subscribe to my blog. Comment and ask questions. I will be happy to help with tips!

 Hello everyone! Thank you, dear friends, for new subscriptions. Your support helps me improve my blog and store!

Please be patient. Because the article will be too long. But I added pictures for fun! So, let’s begin! As beautiful as the pattern is, the finished tatting product almost always needs to be fixed. I mean giving stiffness and stability to the lace. All tatters know if the lace is not fixed, it looks sloppy. But we should always strive for excellence. Do you agree?

Apart from my own experience, I have found many articles on the Internet on this topic. There are many solutions. Among which are absolutely unexpected, ha ha! It turns out that you can make the lace stiffer: sugar syrup, starch, hairspray, nail polish, PVA glue, varnish for resin, embroidery fixing agent, and even candle wax. I’ve seen a few more experiments. But they did not interest me. So let’s talk a little more about each method.

Sugar syrup for to stiffen tatting lace

I don’t like using sugar syrup. It’s hot and uncomfortable. In addition, sugar lures pests who will eat delicious lace with pleasure!

Starch for to stiffen tatting lace

You can use the powdered kind that is dissolved in water. You will have to get the object totally wet with the starch and then pressed with a hot iron.

Or you can use the pressurized starch sprays that are available in the laundry section. There is a drawback to this method though. It isn’t recommended to use starch for white objects as it will yellow over time.

Hairspray for to stiffen tatting lace

It is interesting to experiment with hairspray. I have tried spraying a strong hold polish on the earrings. But after a few days the varnish peeled off. Therefore, the earrings lost their rigidity and shine, alas. But this method works well with pieces for greeting cards or framed pieces. Moreover, you can use glitter polish. This is what you need for Christmas!

Nail polish for to stiffen tatting lace

I have not tried using clear nail polish. But maybe you tried it? Then share your experience with us in the comments, please.

PVA glue for to stiffen tatting lace

is great for doilies and center pieces. Mix the glue with water. The proportions may vary. If you use a lot of glue, the solution will be too thick. You may be disappointed with the thin film on the back of the product. So the glue is absolutely not suitable for colored threads, only for light ones (white, ivory, etc.). And I think you should not use glue for the products to wear. These are collars, chokers, jewelry, clothing. So I don’t really like this method. And don’t forget! Do not iron! It will darken if you stroke it.

Varnish for resin


I did an experiment with varnish for resin. But the result did not make me very happy. Because I got insufficient rigidity of the earrings. you can also notice traces of dried varnish on the leaf on the right. I think that in this case it is better to use the tatting in resin method. I wrote about this in detail in my previous posts.

Spray for securing embroidery


I don’t use this for tatting. In my opinion, these funds are too expensive. And sooooo expensive for big projects. And also scares me DANGER: Extremely flammable. Fumes are harmful. Content under pressure. Keep out of reach of children.

Embroidery stabilizer solution


This is my favorite way. Read more about this in my article here: https://fairylace.kozinenko.com/cute-tatting-ring-final/

This is how I dispose of the remains of the embroidery stabilizers. I also like that these materials are harmless and environmentally friendly.

Candle wax for to stiffen tatting lace


This is a completely unexpected way for me! I was very surprised. Read more about this on the JEDDAH MOM blog. But come back to me at once! My story is not over. We continue! https://www.jeddahmom.com/how-to-stiffen-a-doily-with-candle-wax-2/

How to soak the finished product for to stiffen tatting lace

I have seen many videos showing the complete immersion of a small piece of tatting into a container of solution. Perhaps this works for small items. Provided that there are no long picots in the lace. Ha! Have you tried this trick on a large item? I tried it once. Now you can cry with me. For I have hopelessly ruined my long work on the bag. The lace should NOT be deformed during the application of the solution.

Therefore, I do not put tatting into the solution. On the contrary, I put the tatting on a flat surface and saturate with the solution. Of course, it is convenient to use a brush for small items.

It is very convenient to work with a spray. But in this case, some of the solution will not get on the product. And be sure to blot the wet product with a towel to remove excess solution.

I use a simple and “reliable” product – a cotton ball. With this ball, I can spread the picot out during the soaking process. I often don’t even need to use needles.

Where to place tatting lace for stiffen

It all depends on the size of the finished product. For example, earrings, snowflakes, bells can be placed on a table or windowsill. In any case, find a place where they will not interfere with you while drying. There are two important points. Try to keep out the sun and dust! To do this, cover the damp item with a plastic container and a towel. I do this for tatting in resin too.

But I have to place very large projects on the floor. When I was finishing the borders for the table linen set, my family was uncomfortable for a while. By the way, do not forget to lay polyethylene or oilcloth under your product BEFORE applying the solution.

And one more important question. Do you use needles for fixation? I don’t have a definite answer here. Because it all depends on the pattern. Of course, you cannot do without needles if there are long picots in the pattern. Or in cases where you need to achieve the perfect shape. For example, for a box.

Thanks for reading my opus! Perhaps I didn’t remember everything. You probably know other methods like to stiffen tatting lace. Then write about it in the comments, please. Your experience is very valuable!