Free Patterns – a collection of free tatting patterns for shuttle, needle, and crochet tatting. Here you will find a variety of designs, from simple motifs for beginners to intricate lace projects. Download, create, and get inspired!
At first I wanted to start this article with the story of the Tower of Babel. Well, you remember how God gave people different languages so that they would not understand each other. But then I thought that this is not entirely true. The question is philosophical. Because very often, speaking the same language, people cannot understand each other. Probably, this happens because many people have forgotten how to listen, empathize and understand others. And the notation in English for crocheting terms me to such reflections. How can I figure this out, I have no idea! LOL
But I’m pretty creative, you know. Therefore, I decided to write an abbreviation for UK and for US. Hope you don’t get confused!
So, today I invite you to make a small round motif with two rows. We will make the second row with single crochets. Yep, that’s where we got it! Don’t worry, we’ll fix it. UK terms – dc ( double crochet ), US terms – sc ( single crochet ).
Row 1
The first row consists of Rings and Chains. The chains in cro-tatting are crocheted and form an “arc” of air loops (in the abbreviation сh).
Row 2
In the second row, I used rings and single crochets ( or double crochet ) . Please note that before performing the Ring, you need to turn the work. And since you are getting the wrong side, it is better to start a double stitch from the second half. You will clearly see in the photo how the front side (pink ring) differs from the wrong side (yellow ring).
If my articles are interesting and useful to you, subscribe to my blog, comment, share on social networks. Your feedbacks is very interesting and important to me. Don’t forget to check my store, welcome: https://fairylace.kozinenko.com/
I really enjoy reading your comments and questions on my posts. Because in this way you help me to make my blog useful and interesting. The idea of today’s lesson came to me after the publication of one of my old works – a coaster from the remnants of threads. You asked to make a video tutorial on how to make such a coaster. Of course I did this tutorial ! The link to the video is at the end of the post.
I’m sure many of you have stocks of thread. Well, how can I stop if I see threads of a beautiful color on sale?! And sometimes, for a specific project, I specifically buy threads of a very specific size and color. And in this case, I always buy a little more thread than required. You probably know how disappointing it is if a few meters of thread are not enough to complete the product. Therefore, I have there are ALWAYS leftovers threads! Of course, you can rewind the rest of the thread on smaller spools …
But it still takes up a lot of space.
So, I decided to get rid of the remnants of the thread. To do this, I needed to combine threads of two colors in small coasters.
Simple coaster from thread of two colors
Note! We add a new thread before the ring or after the ring. In this case, it is very easy to hide both tails on both sides of the ring. And the chain is neat. I did the work with thread of one color until the thread ran out. As you can see, the thread can end anywhere, haha! By the way, I was lucky twice – two coasters turned out to be the same color!
By the way, pay attention to the connection of rings of different colors. How to make the perfect connection, I will tell in the next lesson. So do not forget to subscribe to my blog and YouTube channel, so as “not to be late” for the lesson!
Today I want to show you how to make a simple closed motif. After all, tatters are constantly faced with such elements! Of course, you use flowers, medallions, rosettes, small squares or triangles in your work. I know it’s not always easy to connect the last element to the first one in such fragments. Especially often this question worries novice needleworkers. By the way, I advise you to start mastering the closed motif with a piece that contains at least 5-6 Rings. You ask why? Becouse in this case It is more convenient to rotate the finished part of the work for joining.
Of course, I made a short video. Although I made this video using a tatting hook, the principle of connecting the rings into a closed motif will be interesting and useful for lovers of the shuttle and the needle also. I’m sure words can’t explain everything. It’s good that there is an opportunity to find a video on YouTube that you will like and be useful to you! The Internet has brought into our lives the opportunity to learn whatever your heart desires. But be careful! I urge everyone not to get completely dependent on the World Wide Web! Haha! Sorry, I digress.
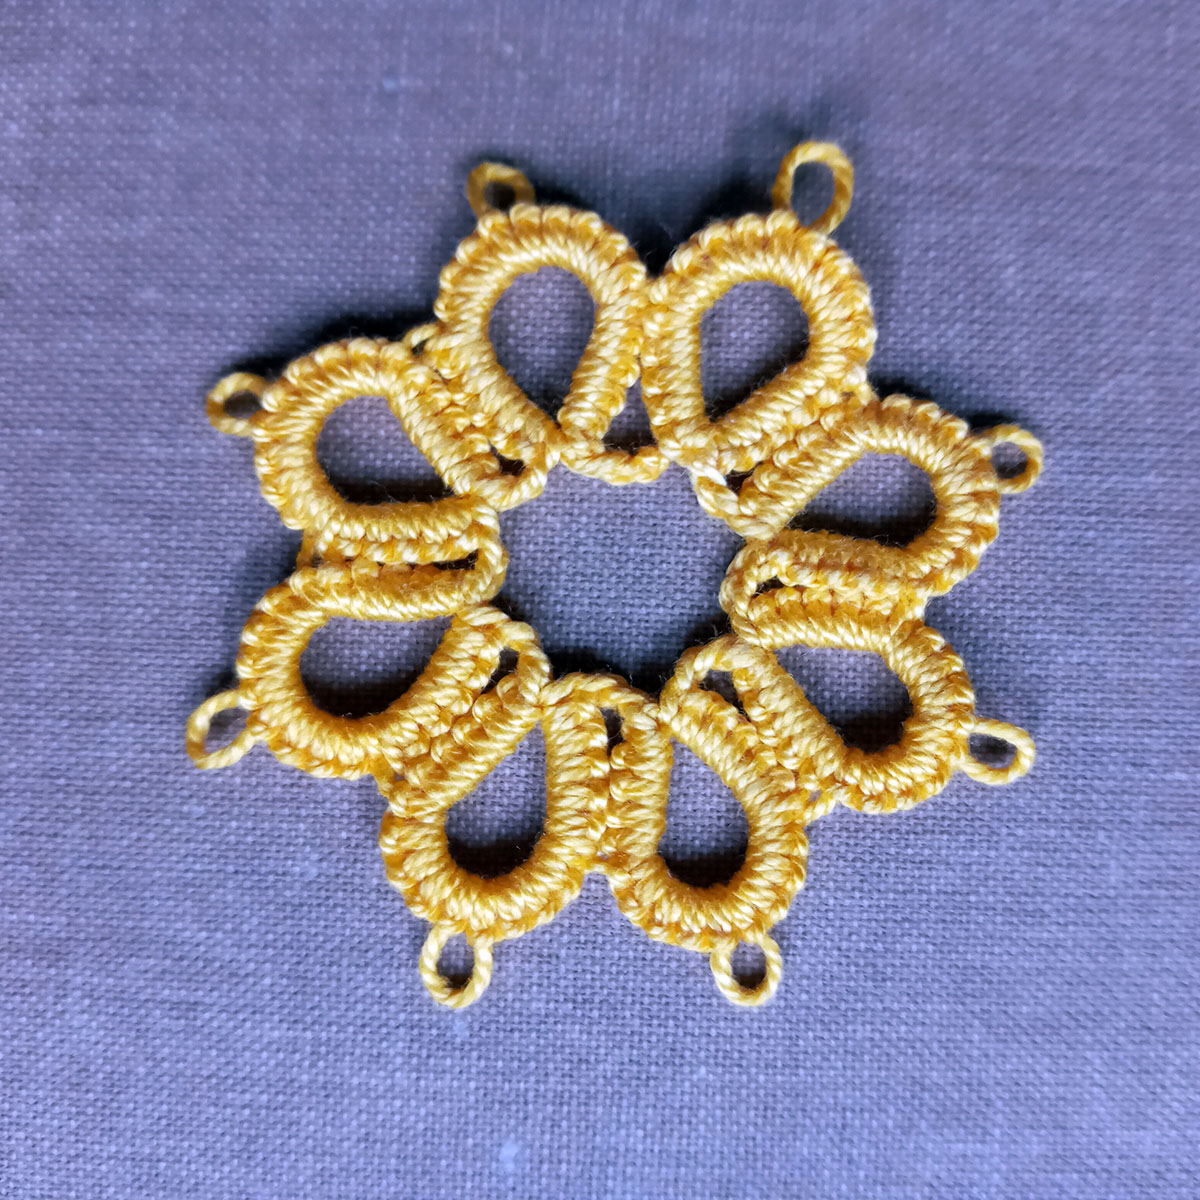
So, today I suggest you make a small motif of eight rings and eight chains. For beginners, I advise choosing high-quality #10 threads. And it is better if you take threads of light shades. Oh, believe me, dark threads (especially black ones) are very tiring for the eyes.
This is a graphic diagram and instructions. You can easily copy this picture (this is JPG file).
Hello everyone! Today I found an interesting article about collars on Wikipedia. And I want to share with you for sure! So:
In clothing, a collar is the part of a shirt, dress, coat or blouse that fastens around or frames the neck. A collar may be permanently attaced to the main body of the garment (e.g. by stitching) or detachable. Oh, I love detachable collars! Because by changing the collars, you can get several different outfits from one dress!
Collars shapes
I also found a table on Wikipedia with the names and descriptions of 66 types of collars, wow! For example, a Peter Pan collar. But I’m sure you all know that collars name. Or, zero collar. This is neckline of shirt without band and collar. Or, zero collar. This is neckline of shirt without band and collar. By the way, it is on such a zero neckline that detachable collars look best.
By the way, you can use a brooch to fasten the collar around the neck. This will add even more chic and elegance to your image.
There is also a type of collar worn as part of clerical clothing called Clerical collar. I may be wrong, but it seems to me that the shape of chokers is very similar to this type of collar.
Also I find collar Pussy Bow very interesting and unusually feminine. This collar tied in a large bow under the wearer’s chin. Particularly associated with Margaret Thatcher in the 1980s. I was very surprised to learn this fact today. Because about 10 years ago I created a little collar with a little bow and named it Pussycat! Haha!
Collars material
I’m afraid you won’t have the patience to read a list of all the materials from which the collars were made.
These are the golden collars-necklaces of the pharaohs of Ancient Egypt.
Or the finest handmade lace in the collars of French kings. It’s a Medici collar.
Also a combination of silk fabric and the finest lace is used. Nowadays, cotton, denim, guipure, leather various threads are used for collars. Add embroidery, embossing, beads. Of course, the list is far from complete!
In 2023, lace is back in fashion. Probably, not all ladies will want to wear a lace dress. But everyone wants to be at the peak of fashion, I’m sure! So be sure to add some lace collars to your wardrobe. Including tatting collars. It is for the manufacture of tatting or bobbin lace that threads are used. Because they are light and extremely chic.
Please write your wishes, feedback and comments in the comments. To do this, go to the BEGINNING of the article and click the “Leave a comment” button.
Happy Valentine’s Day, or why I love doing custom orders.
Hello everyone! Today, on Valentine’s Day, I couldn’t ignore the topic of hearts, of course! We all know that the image of a heart is a symbol of love. This is explained by the fact that love serves as a connecting element in the world. Therefore, by creating a mirror image of the deuce, they get what is considered a symbol of love. The heart is the perfect image of love as the force that binds the world. That is why they speak of two halves of the heart.
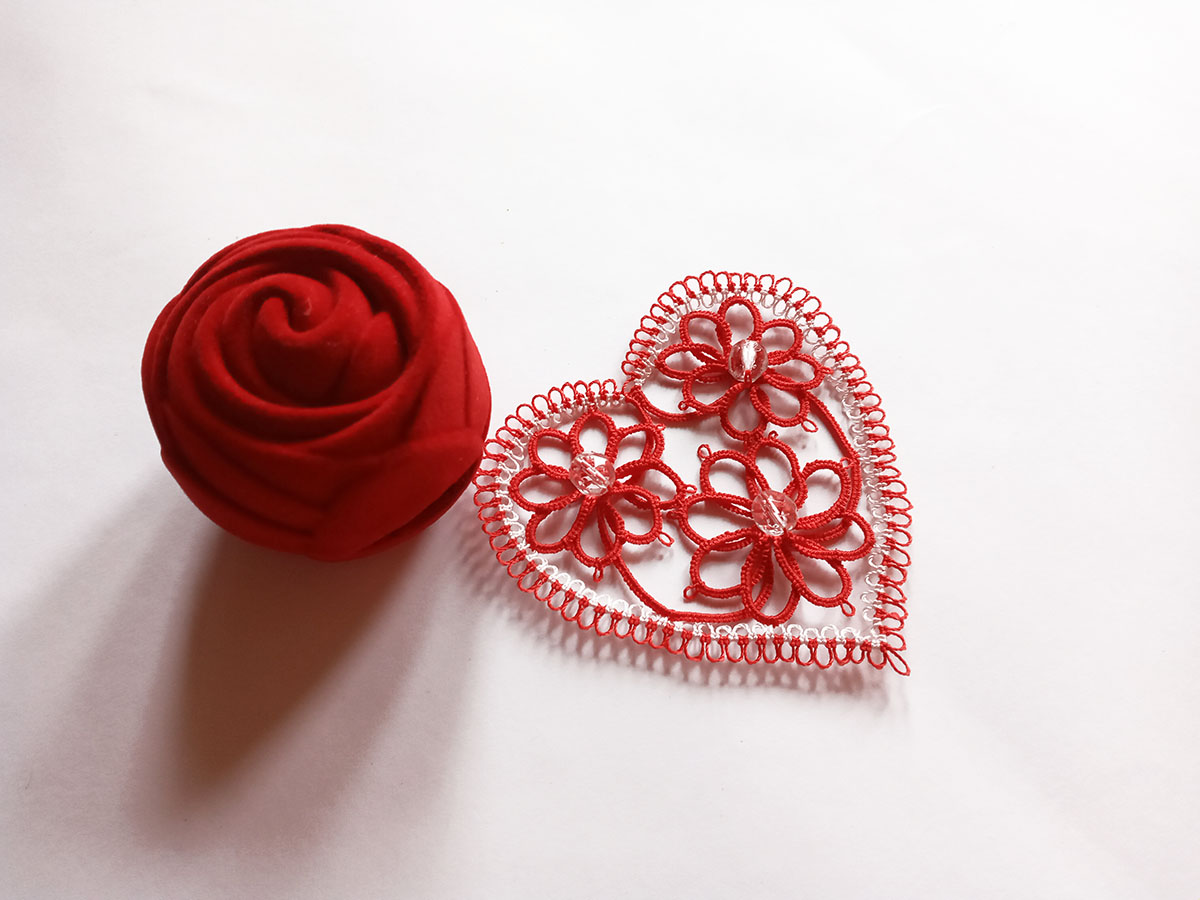
red lace heart, embroidery FSL
I really enjoy making lacy hearts. By the way, my patterns are not always symmetrical. But I think it gives a special charm to the hearts.
I also enjoy weaving hearts according to the patterns of other masters. For example, a simple but very cute heart pattern from Handy Hands.
I especially like to weave lace for custom orders. Because when I create a product for a certain client, I think about this customer all the time. I imagine how happy my customer will be when he opens the box with the order. Oh, I always try to please and surprise my customers.
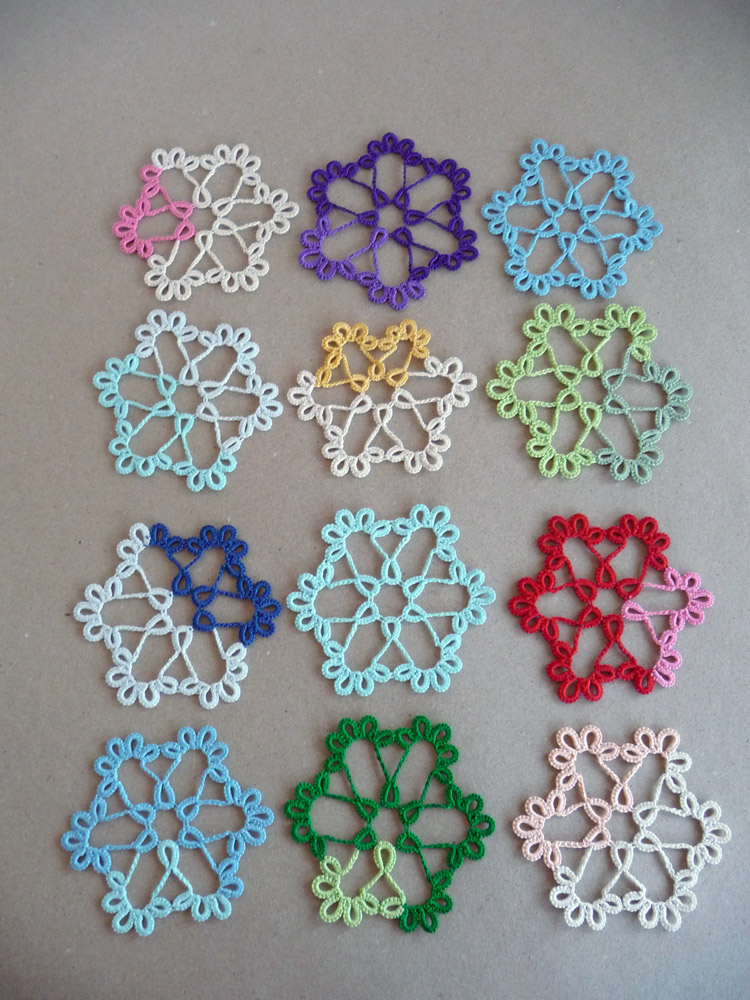
Today I finished solving another problem (ha-ha! not mathematical!). Given: one pattern and two balls of pink and light green thread, shuttles and scissors. Required: Make 12 different hearts in the same pattern. Rate how I coped with this task! Yes, I got 12 different hearts. In addition, I can make 12 more options !
I will be grateful to you for comments and remarks. This will help me make my blog more interesting and useful. You can write comments by returning to the BEGINNING of the post and clicking on the word COMMENTS.
New free pattern, the results of the outgoing year and my gift for you!
Hello everyone! And so another year comes to an end. It was a very difficult and terrible year for me, my family and my Ukraine. But even in such conditions, Ukrainian masters continue to live, work and create beauty, supporting their army and their country. So, my results.
First of all
This is the most important and most valuable thing – my family and I are alive, our house is intact, my Ukraine continues to fight the enemy for independence and freedom!
Secondly
I made 153 sales on Etsy and 304 sales on my WordPress store. This is a small part of the packages that I sent to my dear customers.
Thirdly
I transferred UAH 23,750 to the Ukrainian Army Fund. And this became possible only thanks to you, who made purchases in my stores or transferred funds to my personal PayPal.
Fourth
I have 1006 subscribers on my YouTube chan nel. Visit and subscribe to my channel, I plan many new and useful videos, welcome: https://www.youtube.com/@ElenaKozinenko
Fifth
I created 25 new patterns. Alas, it is very little. But I didn’t have the opportunity or the inspiration to do more. Often you have to make lace without electric lighting. But I have a battery operated headlamp. I look fantastic, don’t I?!
I am deeply grateful to everyone who has been with me during this difficult year. Your prayers, kind words of support and sympathy, your help and support are infinitely valuable to me. I have cried many times from overflowing feelings of gratitude to you, my dears! What a pity that I cannot write ALL your names here. Oh, that would be a very long post! But I keep in my heart the memory of each of you, believe me!
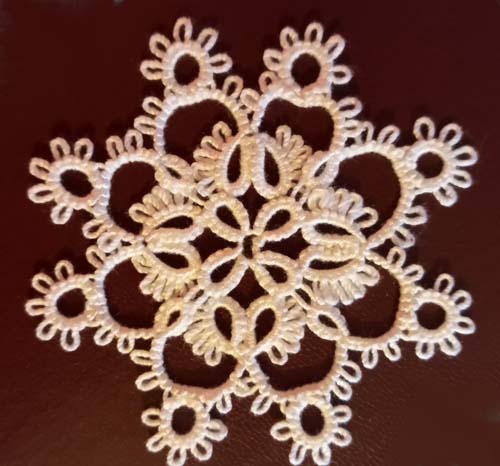
And I decided today to give you a new pattern. You can see in the previous photo how I make this snowflake, haha. Therefore, perhaps the photos in the master class are not of very high quality.
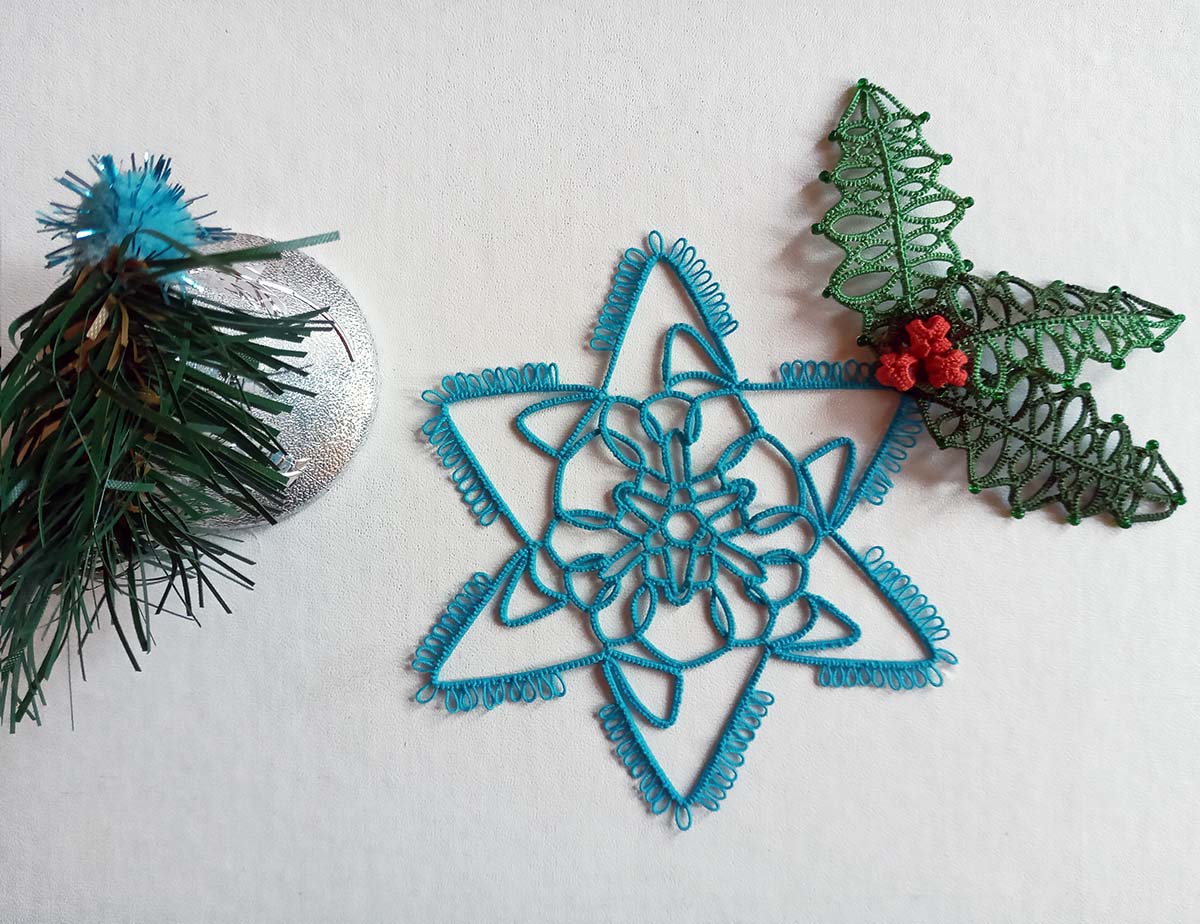
Christmas greetings for tatters and my best wishes for all my readers, followers and friends!
My dear talented tatters! Today is a very short post. But very sincere and sincere! I sincerely congratulate all the masters, beginners and just connoisseurs tatting Merry Christmas! May Guardian Angel Wing always rustles over you and let a bright guiding star will illuminate your path! Health, peace, love and happy creativity!
My Christmas greetings to tatters and my best wishes for all my readers, followers and friends! Elena
Shuttle tatting for needle. Free snowflake sample.
I am often asked if it is possible to use patterns for a shuttle when working with a needle, or vice versa. Yes, of course, such patterns have very small differences. And now I will try to show you these differences.
Hopefully this will be a nice gift for all tatters (no matter what tool you use!)
So, you’ll need a white thread (thread thickness doesn’t really matter, but I used # 40), a shuttle or needle (whichever you prefer), a crochet hook (for easy and neat connection), and scissors. You can also use a 4, 6, and 8 mm picot gauge. Also, you may be interested in reading an article on my blog about which picot gauge I use.
I have divided the page into three columns, as you will see next. In the left column there is an instruction for the shuttle, in the right one for the needle. The central column is occupied by graphic diagram and photo of process. Thus, you will clearly see that the same pattern is used for both methods.
How to make tatting with shuttle and needle
By the way, I didn’t think of a name for this snowflake. Please write your options in the comments!
Shuttle tatting for needle
If you have any questions, I will answer in the comments without fail.
Shuttle or needle tatting
Hopefully this makes it easier for you to navigate the patterns. After all, we examined in detail the topic this theme!
How to read tatting patterns, or how I write my tatting tutorials
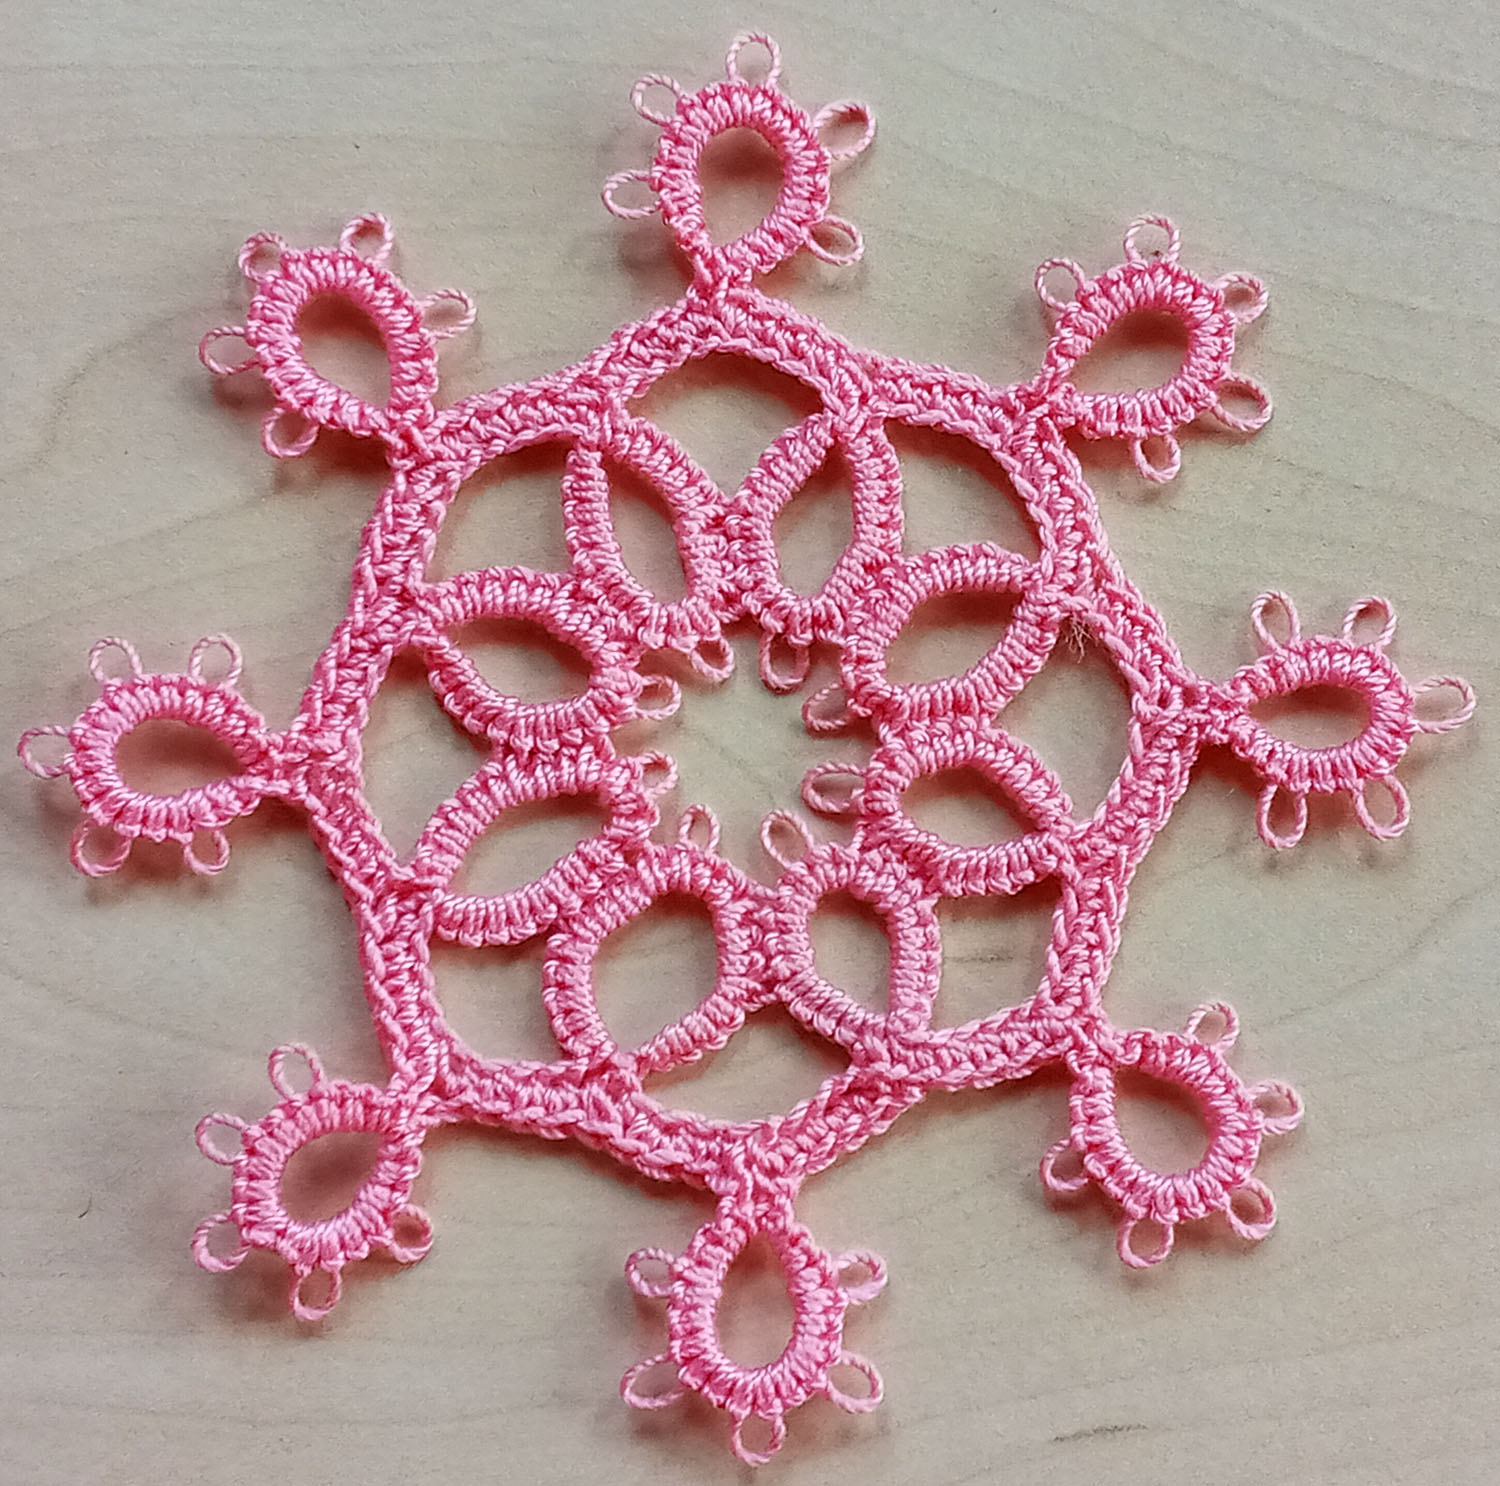
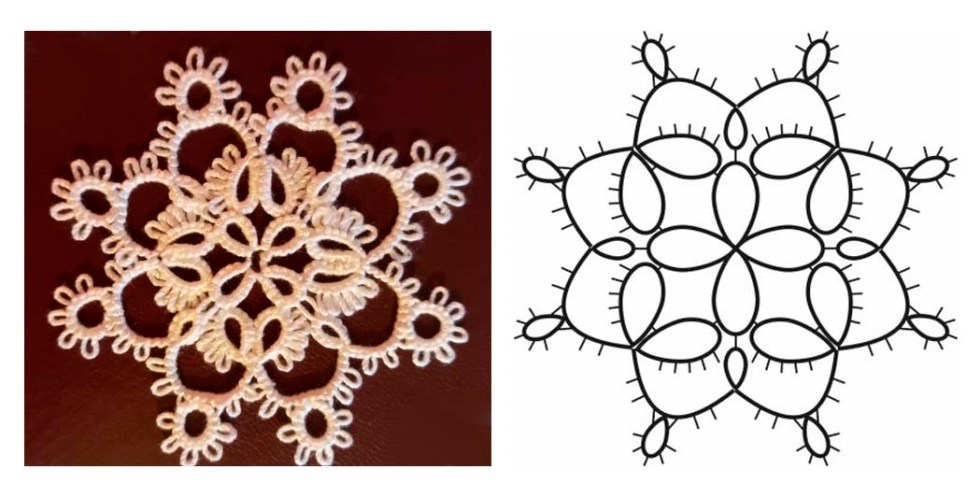
Hello everyone! I recently received an email asking me to help my FB friend learn to read tatting patterns. Oh, this is a very broad topic! Of course, I’ll try not to tire you too much! But I have prepared several versions of instructions that are in the books on tatting by different authors. So, the diagram we are going to look at today is very simple. I created this snowflake specifically for this post.
How to read tatting patterns
Before we start weaving, let’s take a look at a few example instructions. Of course, before starting work, you must carefully learn the Abbreviation. Some terms may differ from another author, but the basic elements are always the same. These are Ring, Chain and Picot. I am not covering more complex elements in this pattern. I will not name the authors who I took as templates for writing instructions for ethical reasons. You will need: two shuttles or a tatting needle, white thread # 10, a crochet hook, scissors and a good mood!
Example 1.
Abbreviation: Number = number of double stitches between the picots, R = ring, C = chain, + = joining, 1 X 4 = 1 – 1 – 1 – 1, 2 X 6 = 2 – 2 – 2 – 2 – 2 – 2, – = picot Number of shuttles: One, and second thread Row 1 Shuttle 1: R: 5 – 2 – 2 – 2 – 5. Repeat 3 times.
I really like these instructions for their brevity. But I think you will agree with me that it is too difficult for beginner tatters. You may ask: where does the work start, when to turn the work? This is where the difficulty lies.
✼ R: 2 – 1 – 1 – 1 – 1 – 2 + ( to Ring of Row 1) 6 – 2 cl DNR R: 2 + ( to previous Ring) 6 + ( to next Ring of Row 1 ) 2 – 1 – 1 – 1 – 1 – 2 cl rv Ch: 3 – 2 – 2 – 2 DNR R: 2 + ( to previous Chain ) 2 – 2 – 2 – 2 – 2 – 2 – 2 cl DNR Ch: 2 + ( to previous Ring ) 2 – 2 – 3 rv R: 5 + ( to Ring of Row 1 )5 cl rv Ch: 3 – 2 – 2 – 2 DNR R: 2 + ( to previous Chain ) 2 – 2 – 2 – 2 – 2 – 2 – 2 cl DNR Ch: 2 + ( to previous Ring ) 2 – 2 – 3 rv Repeat from ✼ 3 times.
In my opinion, there is no need to write “close” at the end of each Ring. After all, we see at the beginning of the combination that we need to make a ring. Thus, this Ring will be closed anyway. Perhaps you know of any cases where the ring is not closed? But will this element then be called a ring? However, these instructions indicate at the end of each element whether or not to reverse the work. This is a plus, no doubt.
✼ R: 2 ds, p, [1ds, p] 4 times, 2ds, jp to Ring of Row 1, 6 ds, p, 2ds, cl R: 2ds, jp to previous Ring, 6ds, jp to next Ring of Row 1, 2 ds, p, [1ds, p] 4 times, 2ds, cl C: 3ds, p, [2 ds, p] 2 times, 2ds R: 2ds, jp to previous Chain, [2ds, p] 6 times, 2ds, cl C: 2ds, jp to previous Ring , 2ds, p, 2ds, p, 3ds, rv R: 5ds, jp to Ring of Row 1, 5ds, cl C: 3ds, p, [2 ds, p] 2 times, 2ds R: 2ds, jp to previous Chain, [2ds, p] 6 times, 2ds, cl C: 2ds, jp to previous Ring , 2ds, p, 2ds, p, 3ds, rv Repeat from ✼ 3 times.
This tutorial is good too, no doubt! Have you noticed that the instructions we reviewed were NOT accompanied by graphical diagrams? Of course, you can look at the photo of the finished snowflake and follow the instructions. But I prefer to combine instruction and graphical diagram in my tutorials.
Aren’t you tired yet? Be patient, because now the fun begins (because this will be my instruction, haha!)
Abbreviation: R – Ring; PVR – previous Ring; C – Chain; PVC – previous Chain; p – picot about 4 mm; sp – picot about 1 mm; jp – join picot; 1S – first shuttle; 2S – second shuttle; TS – two shuttles; tw – turn work.
Row 1
⚫ – beginning row
1S 1, 2, 3. R: 5, sp, 2, p, 2, sp, 5;
4. R: 5, sp, 2, p, 2, sp, 5, tie and cut.
This row consists of four identical rings. Pay attention to the different lengths of the picots. As a result, you should have a flower like in the photo.
Row 2 ⚫ – beginning row 1S
R: 2, p, 1, p, 1, p, 1, p, 1, p, 2, jp to second sp of R2 (Row1), 6, sp, 2;
R: 2. jp to sp of PVR, 6, jp to first sp of R1 (Row1), 2, p, 1, p, 1, p, 1, p, 1, p, 2, tw; TS
Repeat from 1 to 5 3 times, connecting the elements according to the graphic diagram.
Attention! Attach last Chain to beginning Row, tie and cut.
Congratulations! Your Snowflake is ready!
You can take screenshots and save this pattern to your collection. Or you can also download the PDF file from the link. In this file on page 3 there is a graphic chart showing the number of double stitches for more advanced tatters or for those who don’t like to type a lot! 🙂 https://drive.google.com/file/d/1OihtIvhBgnU7ecCThETRcDmefzX_HMa6/view?usp=sharing
So, we looked at several options for How to read tatting patterns. Write to me in the comments which option you like more. Perhaps you would suggest making changes or additions to my instructions. I would be grateful for any comments. Thank you for your support! Please subscribe to my blog and my YouTube channel: https://www.youtube.com/watch?v=5nOMsstL15w&list=UU3dn4_9pp7tIKA2k564wLBQ
FAQ
Q: How do you read numbers in tatting instructions? A: Numbers usually show the number of double stitches between picots or joins. For example, “R 5–5–5–5 cl” means three picots separated by 5 double stitches each.
Q: What do lines mean in tatting diagrams? A: Lines usually represent chains, while circles show rings. The direction of the line helps you follow the working order of the lace.
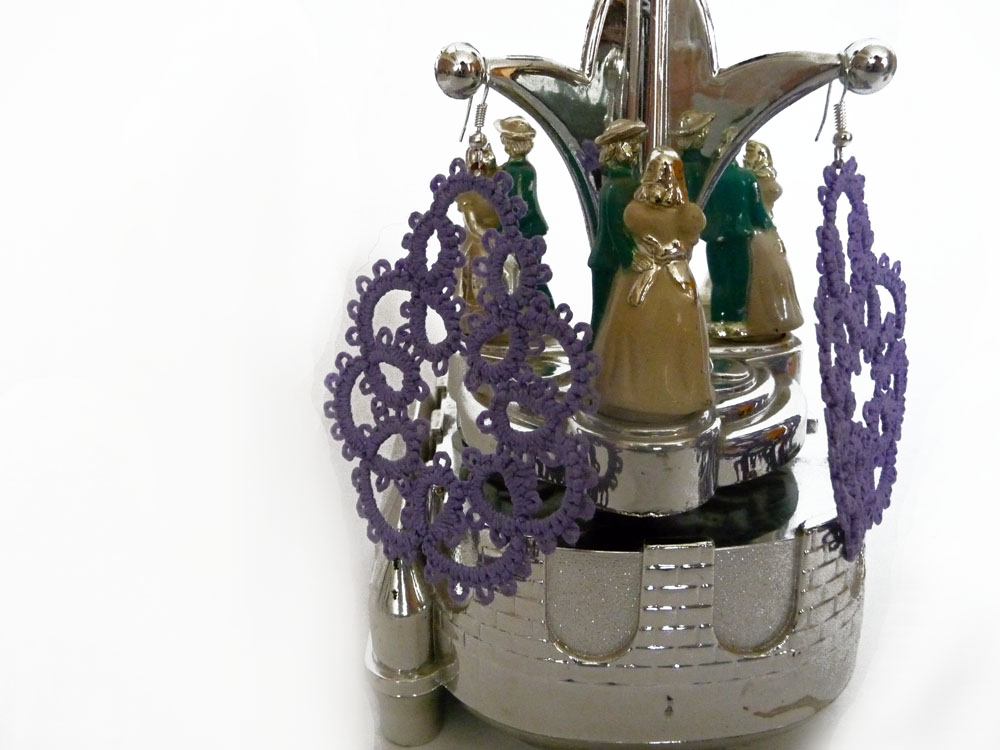
Last time I drew for you a pattern of simple, but graceful tatting earrings. And then you read the detailed instructions on how to do this (did you really read? I hop! ). But the last time we were carried away by the shuttle tatting only. So today I’m trying to fix this shortcoming. So, special for the tatter needle!
I will not repeat the graphic pattern and the first version of weaving. Because the needle and shuttle methods in this case are nearly identical. But note that you need beginning tat from the back side. When making the double stitches on the back side, make the second half of the second stitch fixture and the first half of the double stitch next.
So let’s look at the second option right away.
Abbreviation:
R – ring; SR – split Ring; C – chain; p – picot; jp – join picot; tw – turn the work; numbers indicate the number of double stitches.
Beginning work – green circle. (We beginning tat from the back side, do you remember?) 1. R: 2, p , 2 , p , 2 , p , 2 , p , 2 , p , 2 , p , 2 , p , 2, tw; 2, 4, 6, 8, 10, 12, 14. C: 2 , p , 2 , p , 2 , p , 2 , p , 2 , p , 2, tw; 3, 5, 7, 9, 11, 13. R: 2 , p , 2 , p , 2, jp to previous Ring (according to the diagram), 2 , p , 2 , p , 2 , p , 2 , p , 2, tw; 15. R: 2 , p , 2 , p , 2, jp to previous Ring (according to the diagram), 2 , p , 2 , jp to R1 (according to the diagram), 2, p , 2 , p , 2 . Do NOT CUT thread.
16. SR: [ Tat of the ball thread: 2, p , 2 , p , 2 , p , 2 ], here we turn the work ( photo 1) and un-thread the needle, [tat next 8 double stitches using the needle thread, that was just un-threaded, passing the double stitches over the eye end of the needle ( photo 2 and 3): 2, p , 2 , p , 2 , p , 2 ], re-thread the needle (photo 4), and close the ring as usual (photo 5);
17. C: 2, p, 2, p, 2, p, 2, small picot for earrings hook, 2, p , 2, p, 2, p, 2; 18. R: 2, p, 2, p, 2, p , 2, ( joining to Element 1 according to the diagram), 2, p, 2, p, 2, p, 2, tie and cut.
Attach the hook for the earring. We make the second earring in the same way. And your earrings special for needle tatters ready!