Posted on 4 Comments

Split ring again

Long dark blue tatting earrings with beads and round natural stones on hand, fully made with split rings (SR), handmade by FairyLacefromElena

Split ring again, or how to embrace the immensity.

Hello, everyone! I was very pleasantly surprised by the popularity of my post and video on the topic How to make a split ring. Thank you all for your comments, kind words and questions. Therefore, your support helps keep my blog useful and interesting, I hope!

You may ask why there are so many different ways of weaving a split ring. Of course, all the time we can weave patterns only a ring and a chain in different combinations. I do not want to offend anyone, in any case. Of course, there is a special charm and appeal in simple patterns. But what about the desire for development and improvement? Don’t be afraid to learn and master new techniques. Perhaps you are not planning to make special lace right now. But the more techniques you master, the wider your range of possibilities will be. Therefore, you will be able to perform work of any complexity.

So what’s in my second split ring video. Hope you find it interesting!

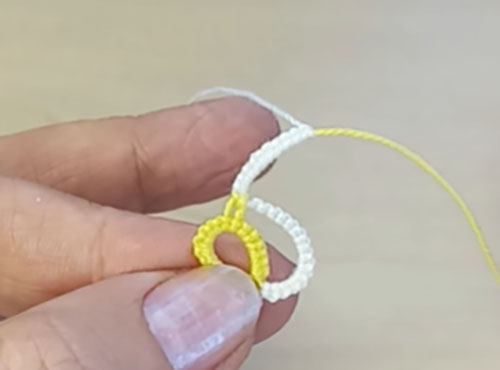
1. Two shuttles for ring

First, you will see how to make a split ring with two shuttles and threads in two different colors. And I could not deny myself the pleasure of showing once again how I hide the threads at the beginning of work. Oh yes, I hate thread tails! In addition, you can swap the threads of the first and second shuttles. In this case, you will end up with a colored “snake”.

2. One shuttle

Then I decided to show Dora Young’s absolutely unique method for one shuttle. I really liked this method. Because the application of a split chain for the second half of a split ring is very interesting! Many thanks to the talented tatting master Muskaan. She told me where I can get acquainted with this method.

3. Shuttle and ball

The next method I call “false split ring”. Oh, just don’t throw stones at me! Ha ha! Perhaps I am far from the first master who applies this method. But maybe there is a special term in English for this method. It’s very easy! You will be surprised. I used arcs instead of rings, that’s all! You just need extra paper clips.

Split ring again
Split ring again

4. Tatting needle

And at the end of the video, you will see another way for tatting needles. In the comments on FB, I was asked to show how to make a two-color split ring with a needle. I am always happy to help! By the way, pay attention to this nuance: You can get identical rings or mirrored ones. It depends on whether you are making a knot when closing a ring or not.

Subscribe to my blog to keep abreast of updates. Also don’t forget to visit my store, I’ve made some new patterns! https://fairylace.kozinenko.com/
Like my video, comment and subscribe, please! Thanks! https://www.youtube.com/watch?v=5nOMsstL15w&list=UU3dn4_9pp7tIKA2k564wLBQ

Posted on 8 Comments

Tatting Split Ring

White La Rosa dei venti tatting doily with yellow rose on black background, edge made of split rings (SR), handmade by FairyLacefromElena

Tatting split ring , or why I love using this technique.

Hello, everyone! I want to thank everyone who read my blog posts, commented and followed me on YouTube. Trust me, I am making these video tutorials for you. Because I endlessly love tatting and try to promote this art to the best of my ability.

Today I want to talk about the split ring.
How is a split ring indicated in patterns? It is usually written like this: SR: [ 8 ], [ 8 ].
This means you have to sew 8 double stitches in the normal way (this is the first section in square brackets), and then make 8 double stitches with “pearl weave” (this is the second section in square brackets). By the way, in my new video tutorial I am making this very ring. But the number of double stitches in brackets may vary depending on the pattern. Also, picots can be contained in brackets. For example : SR: [ 3, p, 3, p, 3 ], [ 3, p, 3, p, 3 ]. And in graphical diagrams, such a ring can be drawn with a dotted line in the middle, or the halves of the ring can be highlighted in different colors.

When are split rings used? Oh, the application is unusually wide. It all depends on your imagination, of course!

It could be a simple bookmark.

Or a summer bag.

You can use the split ring to create earrings or bracelets. The chain for a medallion of split rings also looks very delicate

It is very common to use a split ring when making doilies. Pay attention to the beige squares. This pattern is made up of a combination of split rings.

Using Tatting Split Ring as an auxiliary element

This is my favorite way to use a split ring. Yes, it is the split rings along with the split chains that help me weave a multi-row doily WITHOUT cutting the threads between the rows.

This way I avoid endlessly hiding the thread tails. Are you still hiding the threads at the end of each row? Then try my method! You’ll like it!

I made a video tutorial in which I collected five methods for making a split ring: two methods for two shuttles, one method for one shuttle, one method for a needle and one method for a hook. Perhaps you know another way. Write about it in the comments, please. I hope you enjoy my video and choose one of the methods that is convenient for you. Welcome : https://www.youtube.com/watch?v=PuweruFd6Kw&list=UU3dn4_9pp7tIKA2k564wLBQ

And my new pattern from the collection “Romantic Geometry” is based on the use of split rings. Each square is woven without cutting the thread from beginning to end. It is very interesting and exciting!

I will be very glad for your comments, questions and new subscribers! Thank you !

Posted on Leave a comment

How to make a triple picot

Close-up of a tatting ring with triple picot on hand, handmade by FairyLacefromElena, from video tutorial

How to make a triple picot, or Romantic Geometry.

Hello, everyone! I recently started a new project – creating a collection of small squares. Of course, everyone knows that a square is a geometric figure. And tatting lace, it seems to me, is a very delicate and romantic art. So I decided to name my collection Romantic Geometry.

Geometry (from the Ancient Greek: γεωμετρία; geo- “earth”, – metron “measurement”) is, with arithmetic, one of the oldest branches of mathematics. It is concerned with properties of space that are related with distance, shape, size, and relative position of figures.

Originally developed to model the physical world, geometry has applications in almost all sciences, and also in art, architecture, and other activities that are related to graphics. Of course, I could not help but use a beautiful geometric shape – a square. In addition, you can assemble a large doily of any size from small squares. To do this, you just need to attach the squares to each other. By the way, from several squares you can make a rectangle too, try it. I’m sure you will like it!

In two new patterns, I use a triple picot. So, You can watch a detailed video tutorial on my channel on how to make a triple picot, welcome:
https://www.youtube.com/watch?v=5RkPaIOA9JQ&list=UU3dn4_9pp7tIKA2k564wLBQ

And, of course, six patterns with detailed instructions and graphical diagrams are already available in my store. Welcome! https://fairylace.kozinenko.com/product-category/patterns-tutorials/

I am always glad to receive your comments and new subscribers. This means I’m not blogging for nothing. Your support is very inspiring to me. Thank you!

Posted on 4 Comments

Tatting for beginners, base knot

Corner of a white tablecloth with tatting lace edging and large square inserts, handmade by FairyLacefromElena, showing base knot technique

Tatting for beginners, base knot

Hello, everyone! I’m sure many of my readers are not new tatters. And some very famous and skilled craftsmen of this handicraft. By the way, I am very proud of each of my subscribers! I am also grateful to everyone for supporting my blog.

I also have a YouTube channel, you can subscribe to keep abreast of updates. And today I just added a new video: Tatting for beginners, base knot. https://www.youtube.com/watch?v=ISTEQI1ud1k&list=UU3dn4_9pp7tIKA2k564wLBQ&index=1

Oh, why repeat the same thing, you ask. Of course, I don’t argue. So many videos show how to make a basic tatting node. Each master shows his favorite technique. Some people like the shuttle, others prefer the needle. Everyone may have a different method of tying the knot. I know many newbies can get confused not knowing what to choose. Therefore, I decided to collect in one video 4 methods of how to make a double stitch tatting.

Base knot with shuttle

The first method is for the shuttle. This method is the most ergonomic in my opinion. You will have to hold the shuttle with only two fingers at all times. Therefore, this method is convenient for small and lightweight shuttles. Or you have to take a break from work if your fingers get tired 🙂

The second method is also for the shuttle. But you can use this method with a netting needle quite successfully.

Base knot with needle

The third and fourth methods are for tatting with a needle. The only difference is the use of different fingers to form a knot on the needle.

You can choose any method, of course. But I advise you to learn everything. The more you know, the wider your possibilities are!

Don’t forget to check my store. By the way, the 10% discount for all patterns on the Coupon Code is still valid. Coupon Code: OFF10HAPPYPATTERN
Welcome!
https://fairylace.kozinenko.com/product-category/patterns-tutorials/patterns-and-tutorials/

Subscribe to my blog to keep abreast of updates. Likes, comments and sharing are welcome! Thank you!

Posted on 2 Comments

The perfect start to two-tone lace

Perfect start for two tone lace

The perfect start to two-tone lace, or how to hide the threads at the beginning of work.

Hello, everyone! In today’s post, I want to tell you how I hide the threads at the beginning of working with two colors.

I’m sure you all know that in the beginning we may have several options. It all depends on the pattern, of course! With a product of one color, everything is simple. This is either a shuttle – a ball, or two shuttles. Although there may actually be three, four shuttles or more, I’ve tried it! But let’s not delve into the impenetrable forest, ha ha!

If we start working with threads of two colors, we usually tie two threads.

Perhaps, if the threads are very thin, this initial knot is almost invisible. But I know about him! Ah, my perfectionism does not let me get bored! At the end of the work, I tried to untie this connecting knot in order to tie, hide and cut two pairs of threads. So instead of three nodes, I got only two. But I didn’t like that either. In addition, hiding FOUR ends of a thread at once is not for me, I sooooooo really don’t like hiding threads. But of course you will not find “tails” of threads sticking out in all directions anywhere in my products, lol! Because I love the option when the threads are hidden during the weaving process. By the way, you can watch my video on this topic.

I made this video for three tatting methods: shuttle, needle and cro-tatting. I hope you come back here after watching this video and read the post to the end: https://www.youtube.com/watch?v=K_fWxN3THBc&list=UU3dn4_9pp7tIKA2k564wLBQ&index=26

Ah, Mozart’s music is perfect for creating creative projects, isn’t it? Please write in the comments if you are hiding threads during work or only after the completion of the project.

But I’m a little distracted. Our theme is how to make the perfect start to two-tone lace. So, I don’t do the connecting knot at the start. I also hide both tails of the threads at once. At the end of the work, I connect the last element to the beginning with a crochet hook or needle. And in the end, I only have two tails of threads at the end of the work, which I hide with a sewing needle. Voila!

I showed the beginning of the process of weaving a tatting in two colors in my new video, welcome!
I will be glad to new subscribers, your questions and comments. https://www.youtube.com/watch?v=oZkXevylGAc&list=UU3dn4_9pp7tIKA2k564wLBQ&index=1


Also don’t forget to visit my store:

https://fairylace.kozinenko.com/product-category/patterns-tutorials/patterns-and-tutorials/

Posted on 3 Comments

Happy Birthday Polina!

Silver earrings with blue stones, handmade by Polina, showcasing delicate design and craftsmanship

Happy Birthday Polina, or all life in details.

Hello, everyone! I’m sure all of my readers love jewelry. Because we are “girls”! And of course, we are pleased to meet the creators of jewelry. Even if this is not a personal acquaintance, but only an article on the Internet. Therefore, today I want to talk a little about my wonderful friend, amazing lady and talented jewelry designer Polina Rofman. She also has a kind nature and a great sense of humor. You can feel it in the Jewelry that Polina creates for fans of elegant and contemporary style.

In addition, today Polina is celebrating her birthday. Dear Polinochka, please accept my sincere congratulations and best wishes!

Tell us a little about yourself, your family, and how did you got started on Etsy?


I live in Toronto, Ontario . I love this city, it’s new and old at the same time. For me it’s constant inspiration. I work full time and devote my spare time (which I almost don’t have) to my small jewelry business. It’s my passion. I started creating jewelry and accessories in 2011 . I’m completely self-taught. I love beadweaving and complex techniques ,but due to lack of time I don’t make time-consuming pieces very often.

When and how did you become interested in jewelry making?

I have always liked crafting , and I started making simple earrings and stringing necklaces when I couldn’t find affordable and beautiful jewelry for myself. But I didn’t know where to look for supplies, so I went to Dollar stores and bought some cheap headpins and threads. Also I repaired my own broken jewelry and my friends’ jewelry as well. A lot of what I made , I gave to my friends. Oh, I found myself beading every night! So, I became a beadaholic. Of course, I needed to sell , in order to buy new supplies. I think this was my creativity overflowing.

 What is your inspiration for each idea and where do you get the ideas?  

I get my inspiration from the beautiful nature in Canada. Leaves, flowers, the bluest sky in the world…I love Czech glass beads and use them for my art deco pieces.I love semiprecious gemstones. My favorite style is boho. My friends ask me for some specific design , and I use these ideas in my next pieces.I make jewelry for my two beautiful daughters.

How many hours do you spend every day on beading?


I mostly make jewelry on weekends, as I work till late hours every day.

How did you feel when you sold your first jewelry item on Etsy?


I felt extremely happy! It gave me a boost to make more!

What tools do you use for your craft that you cannot live without?


I use all the tools for making jewelry : different kinds of pliers , wire of all colors and material and leather,and chain.

Do you have another talent or hobby?


Haha, I have no time for more activities than I already perform. I used to sing but now I only sing in the shower.

Your favorite color and shape?


My favorite colors are blue and turquoise. Recently I fell in love with red. My favorite shape is teardrop.

Make a comment here of what ever you would like to say.


My life is full – I do the things I love. I love my family – the name of my shop is a blend of their names – Liza and Iris. My husband supports me.

I admire Polina’s jewelry. Because in my opinion these products are perfect. Color, shape, material, sense of style, harmony of proportions – all this is inherent in Polina’s products. You can see for yourself by visiting her store: https://www.etsy.com/shop/lyrisgems

In honor of my friend, I created earrings and named them “Polina”. These earrings are simple at first glance. But I think they are perfect, like my dear friend! https://fairylace.kozinenko.com/product/earrings-polina-tatting-pattern/

Please do not hesitate to congratulate Polina in the comments and visit her store, you will have great pleasure! 🙂

Posted on 4 Comments

How much does handmade cost

US dollars representing the cost and value of handmade tatting and artisan creations, by FairyLacefromElena

How much does handmade cost, or how to calculate the cost of a finished product.

Hello everyone! I know a lot of my readers are in the business of making amazing handcrafted items for sale. Of course, you know how to evaluate your work. And I’m absolutely sure each of you has heard these terrible words: why is it so expensive? I understand that we must be patient and tolerant with customers. And so I don’t want to answer: if this is dear to you, then do it yourself. (Ha ha!) But let’s calculate together how much any handmade product actually costs.

How much does handmade

How much materials and tools cost

For example, you are knitting a sweater. Do you remember how much money you paid for threads of such a beautiful color and for the set of knitting needles that are most comfortable for you? I remember, but not always! LOL Therefore, you can take the average cost at the moment. Do you agree? And also don’t forget to add the shipping cost. Or the cost of gasoline, if you yourself went to the posh Hobby Lobby store (this is not an advertisement, but a metaphor!). Likewise, you can calculate how much money you spent on thread and embroidery fabric. Or how much does clay and glaze for ceramics cost. Etc. Sewing, crocheting, knitting, embroidery, painting, tatting and much more … Well, you get the point, I hope.

How to pay for work time handmade correctly

I remember how 10 years ago, on a large internet site for selling handmade products, managers instructed us: you must value your work and “pay yourself” at least $ 40 for every hour. But this is absolutely the wrong approach. After all, you want your products to be sold, and not lying at home, creating a warehouse. Did I guess? Of course, you can pay yourself $ 600 an hour. But will such a price be competitive? In this case, I suggest taking into account the average wage in your country. Or the salary that you want to receive.

How to evaluate the creativity of a handmade product

This is the most difficult thing, it seems to me. How can I appreciate the “pangs of creativity”? Or how much is originality worth? How interesting is the technique I used to bring my idea to life? And here we must also take into account the latest fashion trends. Oh, fashion is such a windy lady! But I hasten to assure you that handmade are always in fashion. In evaluating this criterion, you will have to “follow the competition”. It’s a shame if you see that a similar brooch (ring, dress, painting …) has already been made by another master. And then you have two choices: either abandon your idea, or make your brooch even cooler! That is, think of how your product can stand out from the crowd. Ah, you and I have come to the concept of a brand, a master’s handwriting, a recognizable style. Right?

How recognizable and distinctive is your master’s handwriting? Unfortunately, I do not have an exact formula for calculating this component. But if you constantly improve your skills, and master new methods, you will definitely gain your admirers and regular customers! Consequently, your brand rating will increase as well!

How much does handmade

This is not knitting, this is tatting!

Finally, I want to explain why tatting is so much more expensive than knitting. There is such a definition. The fewer people can do a certain job, the more valuable that job is. Therefore, for example, the work of Leonardo da Vinci is estimated at hundreds of millions of dollars, in contrast to the primitive oil stains of a beginning artist. And do you know how many people in the world know the tatting technique? Have you heard about The Radcliffe Red List of Endangered Crafts? You can read an article on this topic on Wikipedia: https://en.wikipedia.org/wiki/HCA_Red_List_of_Endangered_Crafts

Hooray, tatting has ceased to be considered an endangered type of needlework. But the danger has not passed, unfortunately. Take a look at this page.

I don’t want to offend knitters in any way, but sooooo many people knit, even tough bikers!

How much does handmade

And on the contrary, very few people know about the art of tatting, alas. Following the theory I just wrote about, tatting should be valued far more than other currently viable crafts. I think this is fair. Thanks to all experienced and budding tatters for promoting and reviving this amazing art! I really hope that my modest contribution to this cause will not go unnoticed.

Subscribe to my blog, comment, ask questions. I’m always happy to help.
Welcome to my store: https://fairylace.kozinenko.com/

Best name for tatting doily
Posted on 2 Comments

Viva l’Italia!

Outline of Italy colored in white, red, and green stripes, representing the Italian flag, by FairyLacefromElena

Viva l’Italia, or as Italy celebrates its national holiday today!

Today, May 2, Italy celebrates its national holiday – Republic Day (Festa della Repubblica).

From Italy with love #Italyformene team © La Repubblica columnist Ezio Mauro writes about how Italy can celebrate Republic Day with its head up:

“It is clear that now, at the time of the coronavirus, there are practically no folk festivals in honor of the Republic. … Citizens hidden behind protective masks remain in the unknown: when will this many-month nightmare end? The fear has not gone away, especially now that we seem to have found freedom again. But if you look back, then one thing should be admitted: if our country, which became a sad pioneer in terms of the spread of the pandemic among the Western countries, managed to resist, then this happened only due to the unexpected cohesion of society. Cohesion in an era of unrest and inequality, and also thanks to a spontaneously arising sense of community, which surprisingly survived under the shrill screeching of the prophets of selective and exclusively national egoism. “

Viva l'Italia!
Viva l’Italia!

Eurovision

Yes, we remember the difficult days and months Italy went through over the past year. And the more valuable is the optimism and steadfastness of this people! Perhaps it was these qualities that helped the Maneskin group to take first place. I’m sure , you watched Eurovision 2021. Of course, I admire the energy and outrageousness of the Italian team. Bravo! This is a great gift for the Republic Day.

Salone del Mobile. Milano.

I want to share with you a little family secret. Italy is the favorite country of our youngest son. He has been there several times and was a participant in the world famous Salone del Mobile exhibition. This year, the traditional spring exhibition was postponed due to the coronavirus. So, we can visit Salone del Mobile.Milano 2021 in autumn, 09/05/2021 – 09/10/2021. Therefore, I made a small photo collage. You can see here some of our son’s designs from the Milan 2017 show. We are proud!

I also want to invite my readers to a wonderful group on FB “Il Grand Bazaar del Chiacchierino“. This group is for those who love tatting! Join us! https://www.facebook.com/groups/2531779106837324/

Ah, I cannot stay away! And so I made some patterns with Italian translation. Because Italian is sooooo beautiful! Difficult though 🙂 So check my Italian patterns please: https://fairylace.kozinenko.com/?s=italian&post_type=product

And as usual, I will be very glad for your comments, questions and new subscribers!

Posted on 10 Comments

Large lace tablecloth Maestro

Large round lace tablecloth “Maestro”, handmade in tatting lace, 1.5 meters diameter, photo with author for scale by FairyLacefromElena

Large lace tablecloth Maestro, or how to decorate your life.

Hello, everyone! I recently created a new tutorial for a chic lace tablecloth. You probably read about it in my posts from social networks. Yes, I had a painstaking and very exciting job! By the way, if you haven’t subscribed to my blog yet, do it now! Because this way you will always be aware of my updates. Believe me, I try to make my blog interesting and useful. And your comments, questions and feedback help me a lot in this, thank you!

So, the tablecloth is ready, the graphical diagrams are drawn, the instructions are written. What’s next, you ask? Oh yes, now the most important – I need to take a spectacular photo. To do this, I must “turn on” my fantasy and imagination. Write in the comments how you take photos of your products? Perhaps you have completed photography courses or have a long practice in the art of photography. Or you use the services of professional photographers. Or maybe your family or friends are helping you. Sometimes my husband helps me. In “especially difficult cases”! Oh, I was not born to be a fashion model, ha ha! But I really liked the result of our joint efforts. And do you like this photo?

Also, you can buy this tutorial with a discount right now! https://fairylace.kozinenko.com/product/tatting-tutorial-tablecloth-maestro/

This chic tablecloth can be a great gift for a wedding or anniversary. But not only the holidays need beautiful decorations. Decorate your daily life! Let an amazing family heirloom be kept in the most conspicuous place in every home.

Tatting tutorial tablecloth Maestro

I am sure that many fans of tatting know about the Polish master Jan Stawasz. Yes, I admire his work, his skill. I also really appreciate his contribution to the revival of tatting. I created the tablecloth in memory of this talented craftsman. Therefore, I named the tablecloth Maestro. But I took a photo of him tatting as a base, adapted and modified for Cro-tatting. Cro-tatting combines needle tatting with crochet. Cro-tatting is most popular in Japan. And while many people find cro-tatting more difficult than tatting shuttle or tatting needle, try this amazing method. I’m sure you will like it. My video tutorials will help you master this unusual technique. You can also subscribe to my YouTube channel to keep abreast of updates, welcome! https://www.youtube.com/watch?v=HKBg6xUGZL8&list=UU3dn4_9pp7tIKA2k564wLBQ&index=43

So, I look forward to your comments and questions. Also I will be grateful to like and share!

Posted on 2 Comments

Summer soon

Large bouquet of wildflowers collected in summer fields, symbol of Summer Mood collection, photo by FairyLacefromElena

Summer soon, or how I enjoy the sun and warmth.

Hello, everyone!

Ah, finally it has warmed up here. I am immensely happy about the beginning of this spring. I know it was snowing in some places recently. Whoa! Perhaps some of my readers love snow, but not in the month of May, HA HA!

Attention! Read this post until the end, for a pleasant surprise awaits you! 🙂

So, summer is coming, hurray! I think the wonderful lines of the poet Edel T. Copeland will tell better than me about this wonderful time of the year.

Rippling crystal waters shine like silver to reflect summer’s glow.
Soothing and calming in rhythm, echoing its lyrical flow.
Magical music of nature, a symphony of splendid delight.
Skies like blue oceans in paradise, birds soaring to grasp full flight.

Gentle swans glide gracefully, elegant yet proud and strong,
Birds and bees in unison, the joyful hum of nature’s song.
Rolling summer meadows shimmer, like jewels in Mother Nature’s crown.
Embellishing fields of emerald green draped in its golden gown.

Light sweet air blows softly, scented by sweet cherry blossom in bloom.
Delicate, pretty petals lifting to dance in harmony with summer’s tune.
The sounds and scents of summer, its melody light and free.
Sands of gold that glisten, embracing waves of a warm and whispering sea.

By the way, I have added a detailed video to each tutorial from the Summer Mood collection (each video is about 35 minutes long). And now you can watch a short video on my channel. https://youtu.be/9t4sa1Aq5eo

Ta-Daa!!! Surprise:

An excellent collection of seven videos and PDF tutorials “Summer Mood”. Now you can buy with a 10% discount. Just use Coupon Code: SUMMERSOON
Welcome! https://fairylace.kozinenko.com/?s=Summer+Mood&post_type=product

Subscribe, comment, ask questions! I’m always happy to help!

Summer soon