Posted on 4 Comments

Free tutorial tatting earrings Nancy

Free tutorial tatting earrings Nancy, or a continuation of my gratitude jewelry collection.

Hello everyone! I named these earrings after my dear friend, amazingly touching lady with a big heart. She lives in a nature reserve and cares deeply about animals and pets. I greatly appreciate our friendship and correspondence. Thank you for your support, sympathy, help and prayers, my dear Nancy!

You can follow my written instructions along with watching the video. The PDF file can be downloaded for free by following the link: https://drive.google.com/file/d/1nm9DK5De9Yo66s9WUlfHvYY_OhullmKf/view?usp=sharing

I wrote a detailed list of the necessary materials and tools at the beginning of the video lesson. I used my favorite light purple color, of course! But you can take threads and beads of any color you like!

To perfectly connect the rows, I used an embroidery needle. You can watch a short video of how it works: https://www.youtube.com/shorts/PzSGJ5vIBEY But you can make the Catherine Wheel Join, or another connection convenient for you. I just chose the fastest and easiest!

I also used a pearl knot to create a sharp angle at the top of the earrings. Video available, please: https://www.youtube.com/watch?v=3Z4e9CiW4uY&list=UULF3dn4_9pp7tIKA2k564wLBQ&index=54

So, watch the detailed video on my channel. I hope you enjoy making these earrings with me, welcome: https://youtu.be/unUGan77IaU

You can support my channel with likes, reposts and comments!
Thanks in advance to everyone who donates to my PayPal: fish20085@gmail.com
Thank you!

Tatting pattern doily Peony

Tatting pattern doily Peony in red thread – round lace doily handmade with tatting shuttle, PDF pattern

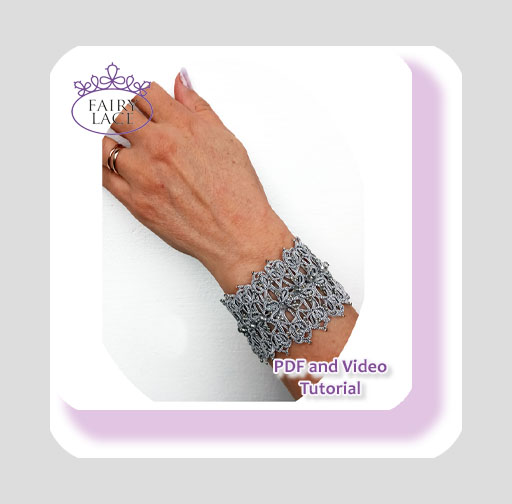
Tatting pattern doily Peony.

🌸 This beautiful tatting pattern allows you to create a delicate and romantic round doily inspired by the gentle petals of a blooming peony 🌺.
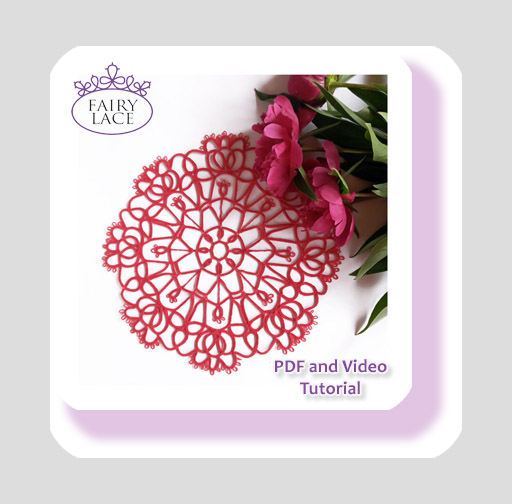
It’s a digital file that includes written instructions in English, a graphic diagram, clear photo, and a video tutorial to guide you through the most intricate part of the design.

So, you will need Adobe Acrobat or any other PDF reader to access the file. The PDF consists of 9 pages and is about 4.748 MB in size.
📽️ You can watch a helpful video tutorial for the most complex element on my YouTube channel. Don’t forget to subscribe to stay updated!
👉 https://www.youtube.com/shorts/kt84E3z2QP4

🎯 Who is Tatting pattern doily Peony for and Why?

At first glance, this doily may seem simple. However, it’s full of clever and elegant details that will surprise and delight any tatter! ✨
In particular, you’ll explore twisted picots, floating rings, and a creative way of connecting rows using long decorative picots.
These techniques not only add texture and depth to the piece but also make the process engaging and rewarding.

So, if you’re looking for a project that’s both meditative and technically satisfying — this one’s for you! 🌿

💎 What Makes This Pattern Special?

This pattern offers two levels of difficulty, giving you flexibility depending on your skills and preferences:

🔹 Advanced Level — Master the entire set of techniques: Ring, Floating Ring, Chain, Split Ring, Split Chain, Twisted Picot, Join Picot. The best part? You won’t need to cut threads between rows!
🔹 Intermediate Level — Focus on essential techniques like Ring, Floating Ring, Chain, Twisted Picot, and Join Picot. After each row, you’ll need to cut and hide threads — a small trade-off for a slightly simpler path.

This approach allows you to grow your skills or stick with what’s familiar. Either way, you’ll end up with a gorgeous result! 🌟

🧶 Materials, Tools & Finished Size

I used rich red #10 mercerized cotton thread, but feel free to choose your favorite color — the pattern looks beautiful in any hue! 🎨
With this thread, the finished doily will be approximately 9 inches (23 cm) in diameter.

You can work this pattern using two tatting shuttles, as originally intended.
However, if you prefer needle tatting, I’ve got you covered — keep reading! ⬇️

📚 Adapting the Pattern doily Peony for Tatting Needle

Although this pattern was created for shuttle tatting, you can absolutely use it with tatting needles too!
To help you with this, I’ve written a detailed article in my blog.
🌐 Read the full article here

It includes tips and tricks on how to convert techniques smoothly, so your results will still be fabulous — whatever your preferred tool!

🛍️ Want More Doily Patterns?

Looking for more tatting patterns to suit any mood, style, or level of difficulty?
Explore my curated collection of round doilies and lace designs — whether you’re a beginner or a seasoned tatter, there’s something for you! 🧡
🌐Browse all doily patterns and ready-made lace here: https://fairylace.kozinenko.com/product/tatting-pattern-doily-peony/

💌 Treat Yourself or a Fellow Tatter!

This PDF tatting pattern makes a thoughtful gift for a friend who loves lacework — or a perfect indulgence for your own creative heart.
Don’t miss the chance to bring the timeless beauty of tatting shuttle art into your home 🏡💕

🛒 Add the Peony Doily Pattern to your cart today and let your shuttles bloom!

📧 Attention!

You do not need to download the file yourself!
After confirming the payment, please check the email you provided in the order.
📩 I will send the Tatting pattern doily Peony within 10–12 hours.

📌 Note: My message may end up in the Spam folder if I’m not in your contacts — please check all folders just in case!

⚠️ Please note:
This is not a finished item.
You are purchasing a digital PDF pattern with instructions — not a physical product.!

🖋️ Respect the designer
If you share your finished lace made from this pattern, please give credit to the designer 💜It means a lot and helps support independent artists 💕 Use the tag: #FairyLacefromElena

📲 Let’s stay connected!
Follow me for more inspiration, patterns, and tutorials.
Click below to follow me into the world of lace dreams!

Bracelet Merrilyn tatting pattern

Merrilyn tatting bracelet with beads, full top view

Bracelet Merrilyn tatting pattern , PDF and video tutorial Celtic tatting  bracelet .

💫 Introducing the Bracelet Merrilyn – a Celtic-style tatting pattern with a touch of elegance and sparkle! ✨
This is a PDF and video tutorial that will guide you through creating a unique lace bracelet using the tatting technique.

This item includes written instructions in English, a detailed graphic diagram, clear step-by-step photos, and a video tutorial.
So, you will need Adobe Acrobat or any other PDF reader to open the file. The pattern consists of 9 pages and weighs about 2.82 MB.

🧶 Moreover, the PDF contains a link to an exclusive assembly video, and I’ve added an extra page showing the stitch counts for every element of the design. Handy, right?

🌷 This pattern is perfect for tatting lovers who enjoy working with beads and adore unusual, elegant accessories. 💎
In particular, it’s a lovely choice for ladies named Merrilyn – but of course, you can gift this bracelet to any beautiful soul with any name! 💕

My step-by-step PDF and helpful video will guide you with ease.
🧵 Skill level: Intermediate. Therefore, you should be familiar with:

  • Ring

  • Split Ring

  • Chain

  • Picot

This bracelet features three elegant layers, joined in a special way to create volume and richness.
✨ The process of connecting all the elements is shown in detail in the extra video – you’ll love how everything comes together!

Why not make this for a romantic occasion or as a precious handmade gift? After all, lace speaks the language of love 💌

💖 What Makes Bracelet Merrilyn Special?

I created this pattern in honor of my dear internet friend Merrilyn. She lives far away, in sunny Australia, but her warmth and kindness cross oceans 🌏
She adores animals and loves soft, feminine shades – especially pink. That’s exactly why I chose this color for the model. Isn’t that sweet?

💡 This bracelet is part of my exclusive “Thank You Jewelry Collection” – a tribute to people who touch my heart 💕
This pattern is made for shuttle tatting, but if you use a needle, don’t worry! You can read how to adapt the design in my blog:
🔗 https://fairylace.kozinenko.com/shuttle-tatting-for-needle/

🧵 Materials & Size for Bracelet Merrilyn tatting pattern

To create this delicate bracelet, I used:

  • Pink polyester thread #50

  • 2×4 mm pink crystal beads

  • 6 mm Czech crystal beads

  • A thin sewing needle

  • Scissors ✂️

🧶 The finished bracelet is approximately 1.5 inches (4 cm) wide.
You can easily adjust the length to fit your wrist perfectly!

Of course, you can use threads in any color you love – create your own romantic palette 💗

🎬 Demo Video

Want to take a peek before you start?
🎥 Watch the demo video here:
🔗 https://www.youtube.com/watch?v=_BNosWXupBs

🌟 Don’t miss your chance to create something truly meaningful and beautiful.
Click Buy Now and let your hands weave magic through lace 💫

📧 Attention!

You do not need to download the file yourself!
After confirming the payment, please check the email you provided in the order.
📩 I will Bracelet Merrilyn tatting pattern within 10–12 hours.

📌 Note: My message may end up in the Spam folder if I’m not in your contacts — please check all folders just in case!

⚠️ Please note:
This is not a finished item.
You are purchasing a digital PDF pattern with instructions — not a physical product!

🖋️ Respect the designer
If you share your finished lace made from this pattern, please give credit to the designer 💜It means a lot and helps support independent artists 💕 Use the tag: #FairyLacefromElena

📲 Let’s stay connected!
Follow me for more inspiration, patterns, and tutorials.
Click below to follow me into the world of lace dreams!

Celtic Bracelet Gwendoline

Elegant silver color filigree bracelet handcrafted in modern Celtic tatting technique. A graceful accessory with beads and intricate lace knots. Perfect for adding charm to any outfit.

Celtic Bracelet Gwendoline ✨  – Handmade Lace Jewelry ✨
Looking for a unique accessory that reflects grace, strength, and timeless beauty? 💫
Celtic Bracelet Gwendoline is a delicate, hand-tatted lace bracelet crafted with silver threads and shimmering beads. It’s created in the modern Celtic tatting technique that combines old-world charm with a contemporary twist.
You can watch a short demo video on my YouTube channel:
👉 https://www.youtube.com/shorts/J5WHevlFYq0 🎥

💖 This bracelet will perfectly suit a woman with refined taste — maybe even someone named Gwendoline, Gwen, or Gwendolyn.
But of course, you can buy this bracelet for a lovely lady with any name! 💕 It will be a wonderful gift for a birthday, anniversary, or simply to say “thank you” to someone special.

🌟 What makes this bracelet special?


I created this bracelet in honor of my dear internet friend Gwen. This design continues my heartfelt “thank you” jewelry collection. Gwen is a woman of many talents. But above all, it is her kindness and radiant soul that inspired me.

While researching her name, I discovered something beautiful:
Gwendoline is a Welsh name meaning “fair,” “blessed ring,” “shining,” and “radiant.” Isn’t that magical? 🌈 The shimmering silver and delicate Celtic knots of this bracelet are a perfect match for this luminous meaning.

The combination of filigree lacework, beaded accents, and a symbolic Celtic pattern transforms this bracelet into wearable art. It’s lightweight, elegant, and absolutely one-of-a-kind. 🧵✨

📏 Size

The width of the bracelet is approximately 1.75 inches (4.5 cm), and the length is about 7.5 inches (with clasp).
💌 Need a custom size? I’ll be happy to make a bracelet tailored to your wrist — just message me before ordering!

🧶 Materials and tools

  • Polyester thread #50 in silver

  • Czech crystal beads and 1 mm silver seed beads

  • Tatting shuttles, scissors, metallic clasp
    ✨ Want this bracelet in another color? Contact me before purchase, and we’ll make it happen!

📦 Shipping

Ready to ship! 🎉 Your order will be carefully packed and shipped within 5 business days after payment.
I use standard AVIA shipping with a tracking number, so you can monitor your bracelet’s journey from my hands to yours.

Your Celtic Bracelet Gwendoline will arrive in a handmade eco-friendly box with my FairyLace logo — perfect for gifting! 🎁

Estimated delivery time is 4–6 weeks, depending on your location. Please note, delivery may take longer during holiday seasons.
Want it faster? Choose express shipping here:
👉 https://fairylace.kozinenko.com/product/express-shipping/
In this case, you’ll receive your order in 10–14 business days after dispatch.

🔗 Pattern also available!

Are you a tatter and would love to make this bracelet yourself? 🪡
Get the step-by-step tutorial for this design here:
👉 https://fairylace.kozinenko.com/product/bracelet-gwendoline-tatting-tutorial/

📲 Let’s stay connected!
Follow me for more inspiration, patterns, and tutorials. Also you can contact me by email – fish20085@gmail.com
Click below to follow me into the world of lace dreams!

Bracelet Strong Ukraine tutorial

Tatted lace bracelet in blue and yellow colors, inspired by the Ukrainian flag. Shuttle tatting pattern with beads. Includes PDF and video tutorial.

Bracelet Strong Ukraine tutorial.

Bracelet Strong Ukraine is a shuttle tatting tutorial created to support and celebrate the spirit of Ukraine 💙💛.
This listing includes written instructions in English, a graphic diagram, clear photo, and a detailed video.
So, you will need Adobe Acrobat or any other PDF reading software to open the file.

The pattern file consists of 6 pages and weighs approximately 3.00 MB.
To make your journey even easier, I’ve included a special link to a video tutorial that shows how to work with beads and recreate the most interesting details.

👉 Watch the demo video here:
https://youtube.com/shorts/AXOdL_o1MR8
Don’t forget to subscribe to stay updated with my newest lace ideas! 😊

💎 This pattern is ideal for crafters who enjoy tatting with beads and love creating meaningful, one-of-a-kind accessories.
Moreover, it’s perfect for anyone who wants to express support for Ukraine’s resilience and beauty.

📌 Level: Intermediate.
You should be able to make Ring, Chain, Picot, and Pearl Knots.

So, whether you’re crafting for yourself or as a heartfelt gift — this bracelet will become a striking and powerful symbol.

🌻 What makes it special?

This design is inspired by the national flag of Ukraine.
The blue stripe on top stands for our clear peaceful skies, while the yellow stripe below symbolizes the golden wheat fields that nourish our land.
These two colors hold deep meaning, especially today.

To bring this bracelet to life, you’ll need two shuttles and a ball.
But don’t worry — the second part of the video is specially made for needle tatters too.
So no matter what method you prefer, you’ll find everything you need here 🧵💪

📏 Materials and Size Bracelet Strong Ukraine

To create the Strong Ukraine bracelet, I used:

  • #50 polyester threads in blue and yellow

  • 3 mm crystal beads in matching colors

  • A total of 136 beads are woven into the design, not sewn on – which makes the lace look neat and elegant ✨

The finished bracelet, including the clasp, measures around 7.5 inches (19 cm).
Of course, you can easily adjust the size by adding or removing rows and elements.
Also, feel free to experiment with other thread colors or beads to make your own bold statement!

🔗 Want more?

Looking for more tatting bracelet patterns or lace accessories of any style and level?
Check out my full selection here:
👉 https://fairylace.kozinenko.com/?s=bracelet&post_type=product

Interested in adapting this pattern for needle tatting?
Read my blog article with step-by-step suggestions here:
👉 https://fairylace.kozinenko.com/shuttle-tatting-for-needle/

📧 Attention!

You do not need to download the file yourself!
After confirming the payment, please check the email you provided in the order.
📩 I will send the Bracelet Strong Ukraine tutorial within 10–12 hours.

📌 Note: My message may end up in the Spam folder if I’m not in your contacts — please check all folders just in case!

⚠️ Please note:
This is not a finished item.
You are purchasing a digital PDF pattern with instructions — not a physical product.!

🖋️ Respect the designer
If you share your finished lace made from this pattern, please give credit to the designer 💜It means a lot and helps support independent artists 💕 Use the tag: #FairyLacefromElena

📲 Let’s stay connected!
Follow me for more inspiration, patterns, and tutorials.
Click below to follow me into the world of lace dreams!

Bracelet Gwendoline tatting tutorial

Elegant handmade lace bracelet Gwendoline in tatting technique — step-by-step PDF tutorial

Bracelet Gwendoline tatting tutorial, PDF and video tutorial Celtic tatting  bracelet .

Discover the Bracelet Gwendoline Tatting Tutorial — a beautiful PDF and video tutorial for creating a Celtic tatting bracelet! 🧵💎

This digital item includes everything you need to craft your own stunning lace accessory:

  • 📘 Written instructions in English

  • 📊 A detailed graphic diagram

  • 📸 Clear step-by-step photos

  • 🎥 An exclusive video tutorial

You will need Adobe Acrobat or any other PDF reading software to open the file. The pattern is 8 pages long and takes up around 2.87 MB. Plus, you’ll get a special video link to guide you through the layered assembly process!

💖 If you adore tatting with beads and have a passion for unique handmade jewelry, this is exactly for you! ✨

In particular, this bracelet is a lovely gift for anyone named Gwendoline, Gwen, or… really, any radiant woman who deserves a bit of lace magic! 🌟

My detailed PDF and video tutorial makes it easy to follow along. 🪡
Skill level: Intermediate. Therefore, you should know how to make Ring, Split Ring, Chain, and Picot.

This three-layer Celtic bracelet may look complex, but don’t worry — the assembly is clearly demonstrated in the video. So even if you’ve never made layered lace before, this is your moment to shine!

🌸 What Makes Bracelet Gwendoline tatting tutorial Special?

I designed this bracelet in honor of my dear internet friend Gwen 💌. She inspired this piece with her warmth, wisdom, and generous heart. This design is part of my “Thank You” jewelry collection, celebrating the beauty of connection.

Did you know? 🧐 The name Gwendoline has Celtic and Welsh origins. It means “fair,” “white circle,” and “blessed ring.” ✨
Even more enchantingly, “Gwen” also means “white,” “radiant,” “shining.” No wonder this bracelet glows with such a special charm!

🧶 This is a tatting shuttle pattern. But if you use a needle, don’t worry! You can read how to adapt it on my blog:
🔗 Shuttle Tatting for Needle: https://fairylace.kozinenko.com/shuttle-tatting-for-needle/

🧵 Materials, Tools & Size Bracelet Gwendoline

To make this elegant Celtic bracelet, I used:

  • Silver polyester threads

  • 💠 Czech seed beads

  • 🔮 Round faceted crystal beads

  • 🔗 Metal fittings

  • 🪡 A thin sewing needle

  • ✂️ A pair of scissors

The finished bracelet is approximately 1.75 inches (4.5 cm) wide.
The length is adjustable, so you can make it perfectly fit any wrist!

You can also use threads in any color you like — let your imagination run wild! 🌈

💡 Watch the demo video here:
🎬 https://www.youtube.com/shorts/J5WHevlFYq0

🛍️ Ready to Create?

Don’t miss your chance to make this radiant piece of lace art! ✨ Whether you’re crafting it for yourself or a special someone, the Gwendoline bracelet is sure to become a treasured keepsake 💝

👉 Grab your tatting pattern today and start your magical journey with lace!

📧 Attention!

You do not need to download the file yourself!
After confirming the payment, please check the email you provided in the order.
📩 I will send the Bracelet Strong Ukraine tutorial within 10–12 hours.

📌 Note: My message may end up in the Spam folder if I’m not in your contacts — please check all folders just in case!

⚠️ Please note:
This is not a finished item.
You are purchasing a digital PDF pattern with instructions — not a physical product.!

🖋️ Respect the designer
If you share your finished lace made from this pattern, please give credit to the designer 💜It means a lot and helps support independent artists 💕 Use the tag: #FairyLacefromElena

📲 Let’s stay connected!
Follow me for more inspiration, patterns, and tutorials.
Click below to follow me into the world of lace dreams!

Posted on 8 Comments

Vintage buttons

How to Use Vintage Buttons in Lace

Vintage buttons. Tips for beginner tatters. Part 4 , or how to add a beautiful button to a tatting pattern. Part 3 of my articles for beginning tatters can be read here: https://fairylace.kozinenko.com/tips-for-needle-tatters/

Hello everyone! I’ve recently been organizing my craft supplies. Ah, I have to do this from time to time! To you too? And among the three kilograms of buttons, I found several pieces that interested me.

vintage button

Often I have seen round buttons added to tatting patterns. I made such a heart (this was 12 years ago).

But these are rectangular buttons. Can they be used? Why not?

As usual, I didn’t stop at shuttles only. After all, for those who tat with a needle, it is also interesting to make a small brooches with a vintage buttons. Do you agree?
The pattern is very simple. Because the main thing in this pattern is the rectangular button!

Use a crochet hook when making connections. Choose a hook that will fit easily into the button hole.

I decided it wasn’t worth doing graphic design. Therefore, I simply put numbers indicating the number of double stitches directly on the photo. You can take a screenshot or download a PDF file from the link: https://drive.google.com/file/d/13Oct1mUyQuwGVzr2P08M3uobKR098UNH/view?usp=sharing

Tatting with button
Tatting with button

Educational video on my YouTube channel. Please take a look and come back! https://www.youtube.com/watch?v=ldSiIp_3CeA&list=UULF3dn4_9pp7tIKA2k564wLBQ

Some useful tips for tat with vintage buttons

Of course, if the buttons are dirty, they need to be washed and dried.

As you work, try to tighten the loops inside the button tightly. Otherwise, the button will not be firmly secured in the middle of the pattern. But we don’t want the buttons to “dangle or float” in space!

Another important point. Try to ensure that the threads on the button lie parallel and do not twist with each other. This will make your work look neater.

When watching a video please note that I respect the front and back sides when weaving. It seems to me that in this case the picots look more beautiful.

The two motifs are made with the same threads and the same pattern. But with the shuttle and needle ready, the motif turns out to be of different sizes.

Please don’t forget to subscribe to my blog, comment and share on social media. Your help and support is very important to me.
I will also be grateful for any charitable contribution to my Paypal: fish20085@gmail.com

Patchwork Shamrocks

Patchwork Shamrocks

Patchwork Shamrocks. A set of three Shamrocks using the crazy quilt technique made from silk men’s ties.

These cute set is a wonderful souvenir for St. Patrick’s Day.   Moreover, there are discounts for large orders.

I made this set hearts of silk men’s ties using the patchwork technique, putting my imagination and a piece of my heart into every seam. And I assure you, each cute heart is made in a single version, exact repetition is impossible.

You can choose any combination of colors from shades of green. But you can also choose any other color scheme, nothing is impossible!

I also wrote an article on my blog about how I create patchwork hearts. The entire process for making these leaves is absolutely identical for making hearts. I hope you find it interesting. https://fairylace.kozinenko.com/mission-impossible/

Size

Size about 4 X 4 in ( 10 X 10 cm )

Materials and tools

I create this item from silk ties, double layer of embroidery stabilizer, felt for the reverse side, cotton threads for crocheting loop.

Shipping

FREE SHIPPING!  I sending all items as STANDARD SHIPPING AVIA with tracking number. So you can follow the journey of your ordered items and keep track of the delivery.
I will pack your set Patchwork Shamrocks in handmade eco-friendly cardboard box with my lace logo. 

Usually delivery times vary from 4 to 6 weeks, depending on the country of destination. But please note, during pre-holiday periods, delivery times may increase. Of course, you can buy express shipping here: https://fairylace.kozinenko.com/product/express-shipping/
In this case, you will receive your order in 10~14 working days from the moment the parcel was sent.

I will be glad to see you on my FB page, welcome: https://www.facebook.com/kozinenkoelena

You can contact me by email fish20085@gmail.com or here in comments. Also, feel free to message me if you have any questions. Thanks!

Posted on 7 Comments

Mission impossible

Hearts from used men's ties in patchwork technique recycled

Mission impossible, or the suffering of a perfectionist.

Hello everyone!  Today I want to tell you how I created a small heart with great love. Because for painstaking work, you really need to love your craft, the people for whom you create your products and nature, if we want to save our Earth.

So, I once again decided to “recycle” at least part of my supplies. Because I realized that my craft supplies are filling up faster than I’m using them. I’m sure many craftswomen will understand me! Now it’s the turn of old men’s ties. Oh, I have a collection of about 50 pieces! And I decided to sew small hearts. I counted four reasons to do this. Firstly, it will free up space in my workshop. Secondly, I will give a second life to things (recycling helps us conserve natural resources). Thirdly, no one will wear these ties because they are out of fashion. And fourthly, it’s just beautiful! Oh yes, there is a fifth reason. I don’t like doing the same thing over and over again. So I decided to turn on my imagination 200%! After all, I can change color combinations, finishing stitches, and patchwork patterns as I please.

And then I realized how difficult it is to work with thin small pieces of silk. The edges of the patches literally form a fringe. The fabric “flows” between the fingers. The texture of each tie differs in the interweaving of fibers and density. In other words, “mission impossible”? It looks terrible. Calm down, don’t panic! By the way, I watched all 5 films with Tom Cruise and came to the right conclusions, LOL

Through trial and error, I found an algorithm of actions that led to an almost ideal result.

FIRST STEP

impossible task

Open and iron ties.

SECOND STEP

This is the most pleasant and at the same time the most crucial moment. You need to select the necessary components. Three ties and a piece of matching felt, polyester thread for embroidery, cotton thread for sewing and thread No. 10 for knitting. If all this does not combine well, the result will not please us.

THIRD STEP


Embroider words on felt. I liked “From Ukraine with Love”. It sounds beautiful and conveys my feelings.

FOURTH STEP

Cut the ties into strips and assemble the patterns.

FIFTH STEP

Sew all seams. I used a special clear sewing foot to ensure that the seams ran parallel to the pattern on the pieces of fabric. By the way, in order not to “sew on my fingers,” I use a wonderful tool – a thimble (I don’t know what it’s called correctly). Very convenient and safe!

SIXTH STEP

For the hearts, I made a transparent template from plastic. I cut out the hearts and felt according to the shape of the template with an allowance of about 1 cm on all sides. I glued an embroidery stabilizer to the reverse side of the silk piece with an iron. Alas, it later turned out that this was not enough! So I first applied double sided fabric tape around the edges and then added embroidery stabilizer.

SEVENTH STEP

the mission is possible with the right tools

Now you need to make finishing seams at all joints. It’s so good that my wonderful Bernina performs 1131 decorative stitches! But at the same time it makes it difficult to choose, haha! By the way, I used a special foot to help me stitch exactly into the seam.

EIGHTH STEP

Now you can finally connect the silk piece with the felt lining.

NINTH STEP

mission assistance

This stage consists of several operations. First you need to trim off the excess fabric and felt very close to the stitching. Then sew a medium-density overcast stitch along the edges. If the result is not very good (and I am almost always unhappy!), use a lighter to burn the edge. Here you need to act very carefully so as not to spoil the main fabric and threads. I also had to make sure that my assistant didn’t burn his paws with a hot lighter!

TENTH STEP

Sew an overlock stitch along the edge one more time. But this time the seam must be very tight to get a perfect edge.

ELEVENTH STEP

All that remains is to crochet the cord, tie a bow and sew it to the heart. Of course, you could just take a satin ribbon. But I think a handmade knitted bow gives the composition a special “cuties”!

I liked the first result so much that I decided to make several options. I’m sure no one will say that this “mission impossible”! I hope you like my idea. Ready-made hearts are available in my store: https://fairylace.kozinenko.com/product/from-ukraine-with-love/

Mission impossible
Mission impossible

From Ukraine with love

From Ukraine with love

From Ukraine with love. A set of three hearts using the crazy quilt technique made from silk men’s ties.

These cute hearts are a wonderful souvenir not only for Valentine’s Day. After all, we love our family and friends more than one day a year! Give a small heart to your loved ones and say kind words to them. Trust me, it will make their day! Also, such hearts can become a memorable souvenir for guests at a wedding. Moreover, there are discounts for large orders.

I made this set hearts of silk men’s ties using the patchwork technique, putting my imagination and a piece of my heart into every seam. And I assure you, each cute heart is made in a single version, exact repetition is impossible.

You can choose any combination of colors, it doesn’t have to be yellow and blue. Because if we talk about love, then we choose what we like, right? The photo shows samples of several color options. But you can come up with your own, I have enough ties in stock! Just let me know.

I also wrote an article on my blog about how I create these hearts. I hope you find it interesting. https://fairylace.kozinenko.com/mission-impossible/

Size

Size about 4 X 4 in ( 10 X 10 cm )/

Materials and tools

I create this item from silk ties, double layer of embroidery stabilizer, felt for the reverse side, cotton threads for crocheting a bow.

Shipping

FREE SHIPPING!  I sending all items as STANDARD SHIPPING AVIA with tracking number. So you can follow the journey of your ordered items and keep track of the delivery.
I will pack your set “From Ukraine with love” in handmade eco-friendly cardboard box with my lace logo. 

Usually delivery times vary from 4 to 6 weeks, depending on the country of destination. But please note, during pre-holiday periods, delivery times may increase. Of course, you can buy express shipping here: https://fairylace.kozinenko.com/product/express-shipping/
In this case, you will receive your order in 10~14 working days from the moment the parcel was sent.

I will be glad to see you on my FB page, welcome: https://www.facebook.com/kozinenkoelena

You can contact me by email fish20085@gmail.com or here in comments. Also, feel free to message me if you have any questions. Thanks!