Posted on 4 Comments

Free Antique tatting lace

A fragment of tatting lace and machine embroidery - border on a handkerchief with a monogram.

Free Antique tatting lace, or let’s give new life to old patterns!

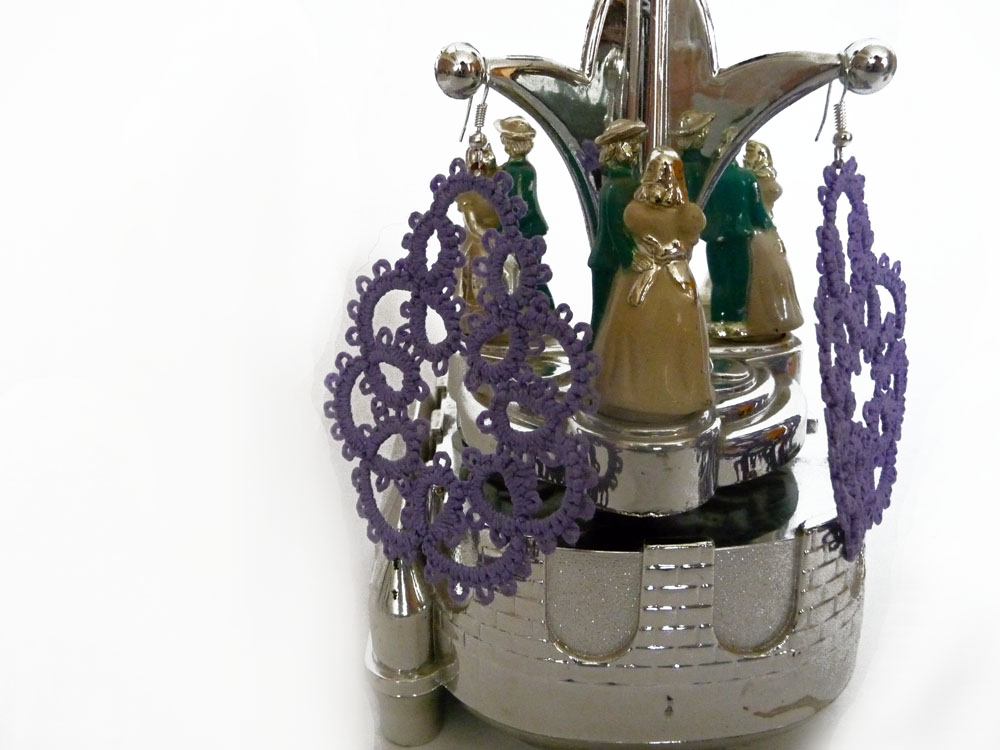
Hello, everyone! Recently, I was commissioned to create a charming collection of handkerchiefs with embroidery and tatted lace. 🪡✨
One of the patterns I used caught my heart immediately — I discovered it in an old booklet printed back in the 1930s! Isn’t that amazing?


Free Antique tatting lace 1

So simple, yet so sweet — this little gem of a design was just asking to be shared. 💖
And how could I resist?

This blog post will be short 🍬 — just a few helpful notes to accompany the video tutorial.
As you probably know, I love adding videos to my posts, and I hope this one brings you both joy and practical tips!

🎥 Watch the tutorial here:
👉 https://youtu.be/-hhM84oTQ2E

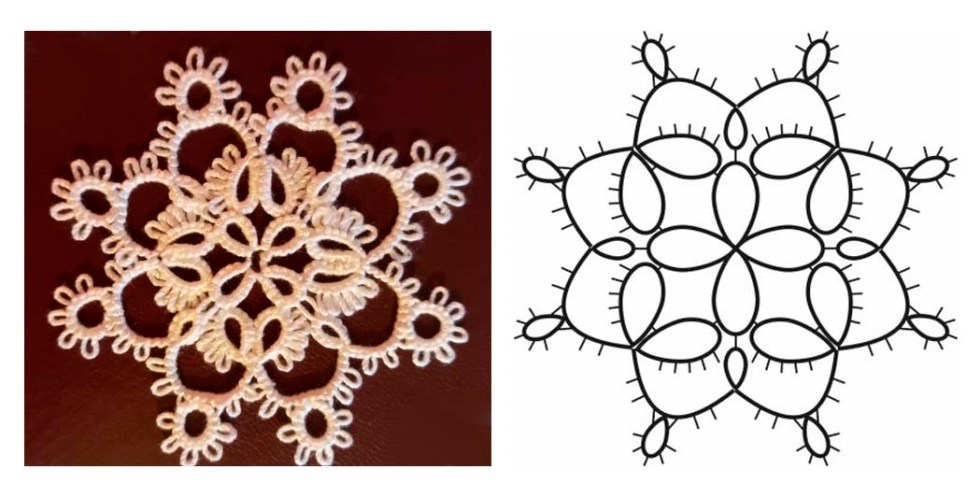
📜 Pattern Diagram & Instructions


First of all, you can take a closer look at the diagram and written instructions right here — just scroll down. ⬇️
Or, if you prefer to keep this vintage treasure in your own collection, feel free to download the file using the link below:

📁https://drive.google.com/file/d/1I-wHpNrNnbFis7yyW3mGncmXkHncOGxT/view?usp=sharing

🔄 Starting from the Back? Yes, Please!

Did you notice that we start from the back side of the work? That’s a very important detail!
Why? Because it allows us to make all the Rings from the front side, which is so much more convenient — and prettier too! 💡✨

You probably also spotted the little “paperclip” icon on the diagram. 🤓
Now, let me share a secret with you:
Personally, when working with fine threads, I much prefer using a short piece of extra thread instead of an actual paperclip.
Why? Well, the clip can leave a rather noticeable hole, and as you may already know —
I’m all about that Perfect Tatting! 💖
(If you’ve read my previous blog posts, I’m sure you saw that coming. 😉)

🧵 A Tiny Twist for Perfect Rings!

Here’s something else to notice in the video:
I add an extra half of a double stitch at the end of each ring, and then pull the shuttle through the loop on my hand before forming the next one. 🔄✨

Now, don’t get me wrong — I’m not saying this is the only way to do it!
As we all know, tatting is not dogma — it’s an art! 🎨🪡

But… if you like your rings to look perfectly symmetrical and neat, this little touch might just become your new favorite trick! 😉

🪡 Needle Tatters, This One’s for You!

If you’re working with a needle instead of shuttles, I’ve got a little tip for you too! 🤫
I’ve actually shared a video about it earlier, but here’s the trick in short:

Before closing the ring, give the thread with the double stitches a single twist.
That’s it!

With this simple move, you won’t need to tie extra knots after each ring. 💡
It’s especially lovely when you make two or three rings in a row — the result looks smooth and seamless! ✨💕

🧵 Want to Add a Corner or a Curved Edge?
If you’d like to turn this lace into a corner or create a curved shape instead of a straight edge — you’ll find extra diagrams and tips in the full pattern available in my shop.
https://fairylace.kozinenko.com/product/antique-border-tatting-pattern/

💬 Let’s Keep in Touch!
If you enjoyed this, don’t forget to subscribe, leave a comment, ask questions, or share it with your tatting friends! 💌
And above all — happy tatting! 🧶✨

Posted on Leave a comment

Beginning of work in graphical diagram

Hexagonal tatting doily made of white and red threads

How to find the beginning of work in graphical diagram, or continue learning how to read a tatting pattern.

Hello everyone! This is the fourteenth lesson in the series “Perfect Tatting”. You can read the previous part here: https://fairylace.kozinenko.com/perfect-tatting-part-13/

My articles are also accompanied by video tutorials. Along with the article, I add them to my YouTube channel.

Please write in the comments what subtleties you would like to learn. Then it will be easier for me to make a lessons plan.

You can also read the article (and download the pattern for free) on the topic How to read tatting patterns, where I talk about different options for instructions for tatting patterns. https://fairylace.kozinenko.com/how-to-read-tatting-patterns/

But today I would like to show you a graphic diagram and tell you about a little trick. I am sure it will be especially useful and interesting for beginners.

Often beginners ask the question: where to find the beginning of the work on the graphic diagram?

You will be surprised, but you can start anywhere! Although usually designers indicate where the beginning of the work is. For example, I put a small red circle on the drawing to indicate the start.

Option 1 beginning of work in graphical diagram

 Beginning of work in graphical diagram-1

Most often we start working with the Ring. Look at this pattern. We start working with the first of three rings in the trefoil. In the video, you can see that I used one shuttle and a ball. Therefore, I had to make one simple knot in places where it was necessary to swap the shuttle and ball threads. The link to the video is at the end of the article.

 Beginning of work in graphical diagram-2

And so we make 6 identical elements: trefoil, chain, ring, chain. We attach each first ring to the third ring of the previous trefoil. And we attach the seventh trefoil to the previous and first trefoil. What do we get? We already have a closed motif. But we need to complete the seventh time Chain – Ring – Chain. And since my motto is “nothing is impossible”, I showed on video how it works. This is the motif I got.

Option 2 beginning of work in graphical diagram

But let’s change the picture just a little bit. Look, I moved the beginning of the work, and now our pattern starts with the combination Chain – Ring – Chain. You will see in the video, I used a paper clip to start. But you can take a short thick thread, for example.

Oh, how I love this way of finishing the work! I attached the last chain to the first one, removing the paper clip. And I just have to make the last trefoil. Believe me, this option is much more convenient. Voila, it’s done!

By the way, this pattern can be made with a needle too. And use this option to start the work. I’m sure you’ll like it!

You can watch the video here: https://www.youtube.com/watch?v=sukHCw-IyCI&list=PLmUVrN61lH3yT7k0vrL0PosljWkYTjM3a&index=14

Don’t forget to comment, like and share my videos and articles on social media, please! Also I thank all my friends, subscribers and followers for their support!

Merry Christmas and Happy New Year!

Posted on 10 Comments

Floating rings

Floating rings

Floating rings, or tatting poetry. Tips for beginner tatters. Part 5. Part 4 of my articles for beginning tatters can be read here: https://fairylace.kozinenko.com/vintage-buttons/

Hello everyone!

In this article I will try to tell in detail how to make Floating Rings. Oh, what a romantic name this element has! And although this verse is not about needlework, there is a mention of these rings here:
Friday Saturday rags of clouds
floating rings driven through the sky
and fluorescent halos
celestial laundry tossed.
Where did I find this? You will not believe! On Amazon, haha. This is a quote from the poetry textbook “Unlocking the poem” by Ottone M. Riccio and Ellen Beth Siegel. Yes, yes, don’t be surprised. Turns out there are textbooks for everything you want to learn. You just need to be able to “enter the correct search words.” That’s what my eldest son says. He is Principal Solutions Architect and Google Cloud Certified Fellow. Therefore you can believe him, I assure you!

So, from the novel, let’s move on to practice. Let’s make a little round motif. For clarity, I made a graphic diagram and filmed a video lesson. And of course, instructions with videos are made for shuttles and needles. That’s right, in plural. Because to perform such an element you will need two shuttles or two needles. By the way, please note that the needles must be the same thickness.

Pattern

You can download the PDF file by following the link: https://drive.google.com/file/d/1kA3-0HMAX-AKjILwTQ5TNidQidNzaM5p/view?usp=sharing
Or just take a screenshot of the screen. But on the screen, the link to the video will be inactive. Oh, I forgot to say. My cat Phil tried very hard and helped me work on the video!

Video: https://youtu.be/76B3p2HPa_M

Please don’t forget to subscribe to my blog, comment and share on social media. Your help and support is very important to me.
I will also be grateful for any charitable contribution to my Paypal: fish20085@gmail.com

Posted on 14 Comments

Happy Valentine’s Day!

Handmade Tatting Lace, Red Heart.

Happy Valentine’s Day, or why I love doing custom orders.

Hello everyone!  Today, on Valentine’s Day, I couldn’t ignore the topic of hearts, of course! We all know that the image of a heart is a symbol of love. This is explained by the fact that love serves as a connecting element in the world. Therefore, by creating a mirror image of the deuce, they get what is considered a symbol of love. The heart is the perfect image of love as the force that binds the world. That is why they speak of two halves of the heart.

Happy Valentine's Day!
red lace heart, embroidery FSL

I really enjoy making lacy hearts. By the way, my patterns are not always symmetrical. But I think it gives a special charm to the hearts.

I also enjoy weaving hearts according to the patterns of other masters. For example, a simple but very cute heart pattern from Handy Hands.

I especially like to weave lace for custom orders. Because when I create a product for a certain client, I think about this customer all the time. I imagine how happy my customer will be when he opens the box with the order. Oh, I always try to please and surprise my customers.

Today I finished solving another problem (ha-ha! not mathematical!).
Given: one pattern and two balls of pink and light green thread, shuttles and scissors.
Required: Make 12 different hearts in the same pattern.
Rate how I coped with this task! Yes, I got 12 different hearts. In addition, I can make 12 more options !

I will be grateful to you for comments and remarks. This will help me make my blog more interesting and useful. You can write comments by returning to the BEGINNING of the post and clicking on the word COMMENTS.

Happy Valentine’s Day! I wish you happiness, love and peace, my dear readers. And also I invite you to watch the video clip on my YouTube channel, welcome! https://www.youtube.com/watch?v=xFztNo5OwL4&list=UULF3dn4_9pp7tIKA2k564wLBQ&index=11

Posted on 18 Comments

New free pattern

New free pattern. Free Tatting Tutorial snowflake.

New free pattern, the results of the outgoing year and my gift for you!

Hello everyone! And so another year comes to an end. It was a very difficult and terrible year for me, my family and my Ukraine. But even in such conditions, Ukrainian masters continue to live, work and create beauty, supporting their army and their country. So, my results.

First of all

This is the most important and most valuable thing – my family and I are alive, our house is intact, my Ukraine continues to fight the enemy for independence and freedom!

Secondly

I made 153 sales on Etsy and 304 sales on my WordPress store. This is a small part of the packages that I sent to my dear customers.

Thirdly

I transferred UAH 23,750 to the Ukrainian Army Fund. And this became possible only thanks to you, who made purchases in my stores or transferred funds to my personal PayPal.

Fourth

I have 1006 subscribers on my YouTube chan nel. Visit and subscribe to my channel, I plan many new and useful videos, welcome: https://www.youtube.com/@ElenaKozinenko

Fifth

I created 25 new patterns. Alas, it is very little. But I didn’t have the opportunity or the inspiration to do more. Often you have to make lace without electric lighting. But I have a battery operated headlamp. I look fantastic, don’t I?!

I am deeply grateful to everyone who has been with me during this difficult year. Your prayers, kind words of support and sympathy, your help and support are infinitely valuable to me. I have cried many times from overflowing feelings of gratitude to you, my dears! What a pity that I cannot write ALL your names here. Oh, that would be a very long post! But I keep in my heart the memory of each of you, believe me!

And I decided today to give you a new pattern. You can see in the previous photo how I make this snowflake, haha. Therefore, perhaps the photos in the master class are not of very high quality.

New free pattern

You can download the PDF file new free pattern from the link: https://drive.google.com/file/d/1fOMcCDLqk2xuWGwch0Nw8ETNn-YvcioF/view?usp=share_link

I sincerely hope for your help and support in the future.
God bless you all,
Glory to Ukraine!
Thousand hugs, Elena https://fairylace.kozinenko.com/

Posted on 24 Comments

Shuttle tatting for needle

Shuttle tatting lace motif for needle tatting, handmade by FairyLacefromElena, perfect for tutorials and learning new techniques

Shuttle tatting for needle. Free snowflake sample.

I am often asked if it is possible to use patterns for a shuttle when working with a needle, or vice versa. Yes, of course, such patterns have very small differences. And now I will try to show you these differences.

I created a snowflake especially for this article. The pattern is free, of course. And you can download the PDF file by following this link: https://drive.google.com/file/d/1De4s0JAmXflqJ9K_hlU-kVw_OQto4dRG/view?usp=share_link

Hopefully this will be a nice gift for all tatters (no matter what tool you use!)

So, you’ll need a white thread (thread thickness doesn’t really matter, but I used # 40), a shuttle or needle (whichever you prefer), a crochet hook (for easy and neat connection), and scissors. You can also use a 4, 6, and 8 mm picot gauge. Also, you may be interested in reading an article on my blog about which picot gauge I use.

I have divided the page into three columns, as you will see next. In the left column there is an instruction for the shuttle, in the right one for the needle. The central column is occupied by graphic diagram and photo of process. Thus, you will clearly see that the same pattern is used for both methods.

How to make tatting with shuttle and needle

By the way, I didn’t think of a name for this snowflake. Please write your options in the comments!

Shuttle tatting for needle

If you have any questions, I will answer in the comments without fail.

Shuttle or needle tatting

Hopefully this makes it easier for you to navigate the patterns. After all, we examined in detail the topic this theme!

Now you can check out my store, what if you like a design that you previously thought was impossible ?! https://fairylace.kozinenko.com/product-category/patterns-tutorials/

My social media pages:

My YouTube channel, welcome: https://www.youtube.com/watch?v=3Fn-Urybu_A&list=UU3dn4_9pp7tIKA2k564wLBQ

Happy tatting! Happy Holidays!

Posted on 18 Comments

How to read tatting patterns

Tatting snowflake pattern — example for learning how to read tatting diagrams by FairyLacefromElena

How to read tatting patterns, or how I write my tatting tutorials

Hello everyone! I recently received an email asking me to help my FB friend learn to read tatting patterns. Oh, this is a very broad topic! Of course, I’ll try not to tire you too much! But I have prepared several versions of instructions that are in the books on tatting by different authors. So, the diagram we are going to look at today is very simple. I created this snowflake specifically for this post.

How to read tatting patterns

Before we start weaving, let’s take a look at a few example instructions. Of course, before starting work, you must carefully learn the Abbreviation. Some terms may differ from another author, but the basic elements are always the same. These are Ring, Chain and Picot. I am not covering more complex elements in this pattern. I will not name the authors who I took as templates for writing instructions for ethical reasons. You will need: two shuttles or a tatting needle, white thread # 10, a crochet hook, scissors and a good mood!

Example 1.

Abbreviation: Number = number of double stitches between the picots, R = ring, C = chain, + = joining, 1 X 4 = 1 – 1 – 1 – 1, 2 X 6 = 2 – 2 – 2 – 2 – 2 – 2, – = picot
Number of shuttles: One, and second thread
Row 1
Shuttle 1: R: 5 – 2 – 2 – 2 – 5. Repeat 3 times.


Row 2


Shuttle 1:R: 2 – 1 X 4 – 2 + 6 – 2. R: 2 + 6 + 2 – 1 X 4 – 2.
Shuttle 2: C: 3 – 2 – 2 – 2. R: 2 + 2 X 6 – 2. C: 2 + 2 – 2 – 3.
Shuttle 1: R: 5 + 5.
Shuttle 2: C: 3 – 2 – 2 – 2. R: 2 + 2 X 6 – 2. C: 2 + 2 – 2 – 3.
Repeat 3 times.

I really like these instructions for their brevity. But I think you will agree with me that it is too difficult for beginner tatters. You may ask: where does the work start, when to turn the work? This is where the difficulty lies.

Example 2.

Abbreviations: R = ring, cl = close, Ch = chain, – = picot, rv = reverse work, DNR = do not reverse, + = join
Row One:
R: 5 – 2 – 2 – 2 – 5 cl DNR
Repeat 3 times.


Row Two:


✼ R: 2 – 1 – 1 – 1 – 1 – 2 + ( to Ring of Row 1) 6 – 2 cl DNR
R: 2 + ( to previous Ring) 6 + ( to next Ring of Row 1 ) 2 – 1 – 1 – 1 – 1 – 2 cl rv
Ch: 3 – 2 – 2 – 2 DNR
R: 2 + ( to previous Chain ) 2 – 2 – 2 – 2 – 2 – 2 – 2 cl DNR
Ch: 2 + ( to previous Ring ) 2 – 2 – 3 rv
R: 5 + ( to Ring of Row 1 )5 cl rv
Ch: 3 – 2 – 2 – 2 DNR
R: 2 + ( to previous Chain ) 2 – 2 – 2 – 2 – 2 – 2 – 2 cl DNR
Ch: 2 + ( to previous Ring ) 2 – 2 – 3 rv
Repeat from ✼ 3 times.

In my opinion, there is no need to write “close” at the end of each Ring. After all, we see at the beginning of the combination that we need to make a ring. Thus, this Ring will be closed anyway. Perhaps you know of any cases where the ring is not closed? But will this element then be called a ring? However, these instructions indicate at the end of each element whether or not to reverse the work. This is a plus, no doubt.

Example 3.

Abbreviations: Ds – double stitch, R – ring, cl – close, Ch – chain, p – picot, jp = join
Row One:
R: 5ds, 2ds, p, 2ds, p, 2ds, p, 5, cl
Repeat 3 times.


Row Two:


✼ R: 2 ds, p, [1ds, p] 4 times, 2ds, jp to Ring of Row 1, 6 ds, p, 2ds, cl
R: 2ds, jp to previous Ring, 6ds, jp to next Ring of Row 1, 2 ds, p, [1ds, p] 4 times, 2ds, cl
C: 3ds, p, [2 ds, p] 2 times, 2ds
R: 2ds, jp to previous Chain, [2ds, p] 6 times, 2ds, cl
C: 2ds, jp to previous Ring , 2ds, p, 2ds, p, 3ds, rv
R: 5ds, jp to Ring of Row 1, 5ds, cl
C: 3ds, p, [2 ds, p] 2 times, 2ds
R: 2ds, jp to previous Chain, [2ds, p] 6 times, 2ds, cl
C: 2ds, jp to previous Ring , 2ds, p, 2ds, p, 3ds, rv
Repeat from ✼ 3 times.

This tutorial is good too, no doubt! Have you noticed that the instructions we reviewed were NOT accompanied by graphical diagrams? Of course, you can look at the photo of the finished snowflake and follow the instructions. But I prefer to combine instruction and graphical diagram in my tutorials.

Aren’t you tired yet? Be patient, because now the fun begins (because this will be my instruction, haha!)

Example 4.

So, I am showing you what my tutorials look like. Also, don’t forget to check out my store. Because I added some new patterns. https://fairylace.kozinenko.com/product-category/patterns-tutorials/

Abbreviation:
R – Ring;
PVR – previous Ring;
C – Chain;
PVC – previous Chain;
p – picot about 4 mm;
sp – picot about 1 mm;
jp – join picot;
1S – first shuttle;
2S – second shuttle;
TS – two shuttles;
tw – turn work.

Row 1

⚫ – beginning row

1S
1, 2, 3. R: 5, sp, 2, p, 2, sp, 5;

4. R: 5, sp, 2, p, 2, sp, 5, tie and cut.

This row consists of four identical rings. Pay attention to the different lengths of the picots. As a result, you should have a flower like in the photo.

Row 2
⚫ – beginning row
1S

  1. R: 2, p, 1, p, 1, p, 1, p, 1, p, 2, jp to second sp of R2 (Row1), 6, sp, 2;
  2. R: 2. jp to sp of PVR, 6, jp to first sp of R1 (Row1), 2, p, 1, p, 1, p, 1, p, 1, p, 2, tw;
    TS
  3. C ( R ) C: 3, p, 2, p, 2, sp, 2 ( 2S: 2, jp to PVC, 2, p, 2, p, 2, p, 2, p, 2, p, 2, sp, 2 ) 2, jp to PVR, 2, p, 2, p, 3, tw;
    1S
  4. 5, jp to p of R1 (Row1), 5, tw;
    TS
  5. C ( R ) C: 3, p, 2, p, 2, sp, 2 ( 2S: 2, jp to PVC, 2, p, 2, p, 2, p, 2, p, 2, p, 2, sp, 2 ) 2, jp to PVR, 2, p, 2, p, 3, tw;

This part of the pattern looks like this:

Repeat from 1 to 5 3 times, connecting the elements according to the graphic diagram.

Attention! Attach last Chain to beginning Row, tie and cut.

Congratulations! Your Snowflake is ready!

You can take screenshots and save this pattern to your collection. Or you can also download the PDF file from the link. In this file on page 3 there is a graphic chart showing the number of double stitches for more advanced tatters or for those who don’t like to type a lot! 🙂 https://drive.google.com/file/d/1OihtIvhBgnU7ecCThETRcDmefzX_HMa6/view?usp=sharing

So, we looked at several options for How to read tatting patterns. Write to me in the comments which option you like more. Perhaps you would suggest making changes or additions to my instructions. I would be grateful for any comments. Thank you for your support!
Please subscribe to my blog and my YouTube channel: https://www.youtube.com/watch?v=5nOMsstL15w&list=UU3dn4_9pp7tIKA2k564wLBQ

FAQ

Q: How do you read numbers in tatting instructions?
A: Numbers usually show the number of double stitches between picots or joins. For example, “R 5–5–5–5 cl” means three picots separated by 5 double stitches each.

Q: What do lines mean in tatting diagrams?
A: Lines usually represent chains, while circles show rings. The direction of the line helps you follow the working order of the lace.

Posted on 2 Comments

Special for needle tatters!

Lavender needle-tatted earrings on a musical carousel jewelry box, made by adapting a free tatting pattern for needle tatters. #FairyLacefromElena

Special for needle tatters today I write continue of the previous post. https://fairylace.kozinenko.com/2019/10/08/free-tatting-pattern-earrings/

Last time I drew for you a pattern of simple, but graceful tatting earrings. And then you read the detailed instructions on how to do this (did you really read? I hop! ). But the last time we were carried away by the shuttle tatting only. So today I’m trying to fix this shortcoming.
So, special for the tatter needle!

I will not repeat the graphic pattern and the first version of weaving. Because the needle and shuttle methods in this case are nearly identical. But note that you need beginning tat from the back side. When making the double stitches on the back side, make the second half of the second stitch fixture and the first half of the double stitch next.

So let’s look at the second option right away.

Abbreviation:

R – ring; SR – split Ring; C – chain; p – picot; jp – join picot; tw – turn the work; numbers indicate the number of double stitches.

Beginning work – green circle. (We beginning tat from the back side, do you remember?) 1. R: 2, p , 2 , p , 2 , p , 2 , p , 2 , p , 2 , p , 2 , p , 2, tw; 2, 4, 6, 8, 10, 12, 14. C: 2 , p , 2 , p , 2 , p , 2 , p , 2 , p , 2, tw; 3, 5, 7, 9, 11, 13. R: 2 , p , 2 , p , 2, jp to previous Ring (according to the diagram), 2 , p , 2 , p , 2 , p , 2 , p , 2, tw; 15. R: 2 , p , 2 , p , 2, jp to previous Ring (according to the diagram), 2 , p , 2 , jp to R1 (according to the diagram), 2, p , 2 , p , 2 .  Do NOT CUT thread.

16. SR:  [ Tat of the ball thread: 2, p , 2 , p , 2 , p , 2 ], here we turn the work ( photo 1) and un-thread the needle, [tat next 8 double stitches using the needle thread, that was just un-threaded, passing the double stitches over the eye end of the needle ( photo 2 and 3): 2, p , 2 , p , 2 , p , 2 ], re-thread the needle (photo 4), and close the ring as usual (photo 5);

17. C: 2, p, 2, p, 2, p, 2, small picot for earrings hook, 2, p , 2, p, 2, p, 2; 18. R: 2, p, 2, p, 2, p , 2, ( joining to Element 1 according to the diagram), 2, p, 2, p, 2, p, 2, tie and cut.

Attach the hook for the earring. We make the second earring in the same way. And your earrings special for needle tatters ready!

Subscribe to my blog. Comment and ask questions. I will be happy to help with tips! https://fairylace.kozinenko.com/blog/

You can see three tatting methods on my YouTube channel: https://www.youtube.com/watch?v=3U-z6wuzX08&list=UU3dn4_9pp7tIKA2k564wLB

And of course, welcome to my store : https://fairylace.kozinenko.com/

Posted on 6 Comments

Free tatting pattern earrings

Five tatting lace earrings of different colors on a white background, made following a free tatting pattern with a diagram and step-by-step photos. #FairyLacefromElena

Very easy free tatting pattern earrings for tatters! Want to make these earrings yourself? These lace earrings are very simple but spectacular. So for you master class .

I offer two ways of tatting, choose what you personally like!

Abbreviation:

R – ring; SR – split Ring; C – chain; p – picot; jp – join picot; 1S – shuttle; TS – shuttle and bow ( or two shuttles for way 2); tw – turn the work; numbers indicate the number of double stitches.

The first way:

This is very simple, for beginners tatters. Therefore, you should be able only to Ring and Chain. You will need cotton threads №10, one shuttle, scissors, crochet hook and two earrings hooks.

Take the shuttle, wind the thread on the shuttle ( 2 – 2,5 m ), do not cut the thread.

We do it according to the scheme. The scheme consists of two elements: A ( pink color on the diagram) and B (brown color on the diagram).

Element A:

Beginning element – green circle. 1S – 1. R: 2, p , 2 , p , 2 , p , 2 , p , 2 , p , 2 , p , 2 , p , 2, tw; TS – 2, 4, 6, 8, 10, 12, 14. C: 2 , p , 2 , p , 2 , p , 2 , p , 2 , p , 2, tw; 1S – 3, 5, 7, 9, 11, 13. R: 2 , p , 2 , p , 2, jp to previous Ring (according to the diagram), 2 , p , 2 , p , 2 , p , 2 , p , 2, t 1S – 15. R: 2 , p , 2 , p , 2, jp to previous Ring (according to the diagram), 2 , p , 2 , jp to R1 (according to the diagram), 2, p , 2 , p , 2 . Tie and cut.

Element B:

Beginning element – blue circle.

1S – 1. R: 2, p, 2, p, 2, p , 2 ( joining with hook to Element 1 according to the diagram) , 2, p, 2, p, 2, p, 2, tw; TS – 2. C: 2, p, 2, p, 2, p, 2, attach to earrings hook, 2, p , 2, p, 2, p, 2, tw; 1S – 3. R: 2, p, 2, p, 2, p , 2, ( joining with hook to Element 1 according to the diagram), 2, p, 2, p, 2, p, 2, tie and cut.

Second Earring tatted similarly.

The second way:

The second way is more complicated. Therefore, you should be able to Ring, Chain and Split Ring. You will need cotton threads №10, two shuttles, scissors, crochet hook and two earrings hooks.

Take two shuttles, wind the thread on the shuttle ( about 4 m), do not cut the thread between shuttles.

Rings and Chains 1 – 15 are done similarly to Method 1, but after Ring 15 DO NOT CUT the thread!

TS – 16. SR: [ 2, p , 2 , p , 2 , p , 2 ], [ 2, p , 2 , p , 2 , p , 2 ], tw; TS – 17. C: 2, p, 2, p, 2, p, 2, attach to earrings hook, 2, p , 2, p, 2, p, 2, tw; 1S – 18. R: 2, p, 2, p, 2, p , 2, ( joining with hook to Element 1 according to the diagram), 2, p, 2, p, 2, p, 2, tie and cut.

Congratulations! Your earrings ready!

In the next article I will describe in detail how to make these earrings with a tatting needle using method 2. If you are interested, subscribe to my blog. Comment and ask questions. I will be happy to help with tips! https://fairylace.kozinenko.com/blog/

You can see three tatting methods on my YouTube channel: https://www.youtube.com/watch?v=3U-z6wuzX08&list=UU3dn4_9pp7tIKA2k564wLB

And of course, welcome to my store : https://fairylace.kozinenko.com/

Posted on 6 Comments

Free tatting pattern. How to make cute tatting ring.

Hand wearing a pink lace ring made with shuttle tatting technique, on a green background. FairyLacefromElena

Dear fans of Tatting art! So, I bring to your attention free tatting pattern. Want to make one of these cute rings? Because these cute rings will delight lovers of light and unusual jewelry.

It is very easy! Just follow the instructions. 🙂 You will need:

Wind 30-40 cm of thread onto the shuttle; do not cut the thread. (You can replace the shuttle with a needle, the pattern works for needle tatting too).

Now attach the knitting marker ( or paper clip )to the thread.

Then tat according to pattern. The pattern consists only of chains.

Abbreviation:

C – chain;
p – picot;
tw – turn the work;

numbers indicate the number of double stitches.

  1. C: 2, p, 1, p , 1, p, 1, p, 1, p, 1, p, 1, p, 2, attach the second marker, tw;

✩ 2. C: 2, p, 1, p, 1, p, 1, p, 1, p, 1, p, 1, p, 2, attach the Chain to third picot of previous Chain, tw;   Repeat from ✩ to 10 Chain ( or to the length you need ); 10. C: 2, p, 1, p, 1, p, 1, p, 1 (remove the second marker and attach Chain through joining picot, as shown in the pattern), 1, p, 1, p, 2;

Remove the first marker, connect the end work with the beginning work and the fifth picot of the Chain#9 (see pattern);

Tie and cut. Congratulations! Your cute tatting ring is ready! I hope this free tatting pattern comes in handy!

Thanks for reading!

Subscribe to my blog. Because in the next article I will tell you how to fix the shape of the ring. I think you will be interested in my experience. https://fairylace.kozinenko.com/blog/

Comment and ask questions. I will be happy to help with tips!

Join me on FB: https://www.facebook.com/kozinenkoelena