Posted on Leave a comment

Perfect tatting – part 5

Vanilla and chocolate, tatting doily

Perfect tatting – part 5.

Hello everyone! This is fifth lesson in the series Perfect Tatting. You can read previous part here:  https://fairylace.kozinenko.com/perfect-tatting-part-4/

Also my articles will be accompanied by video tutorials. I will add them to my YouTube channel.

Please write in the comments what subtleties you would like to know. Then it will be easier for me to make a lesson plan.

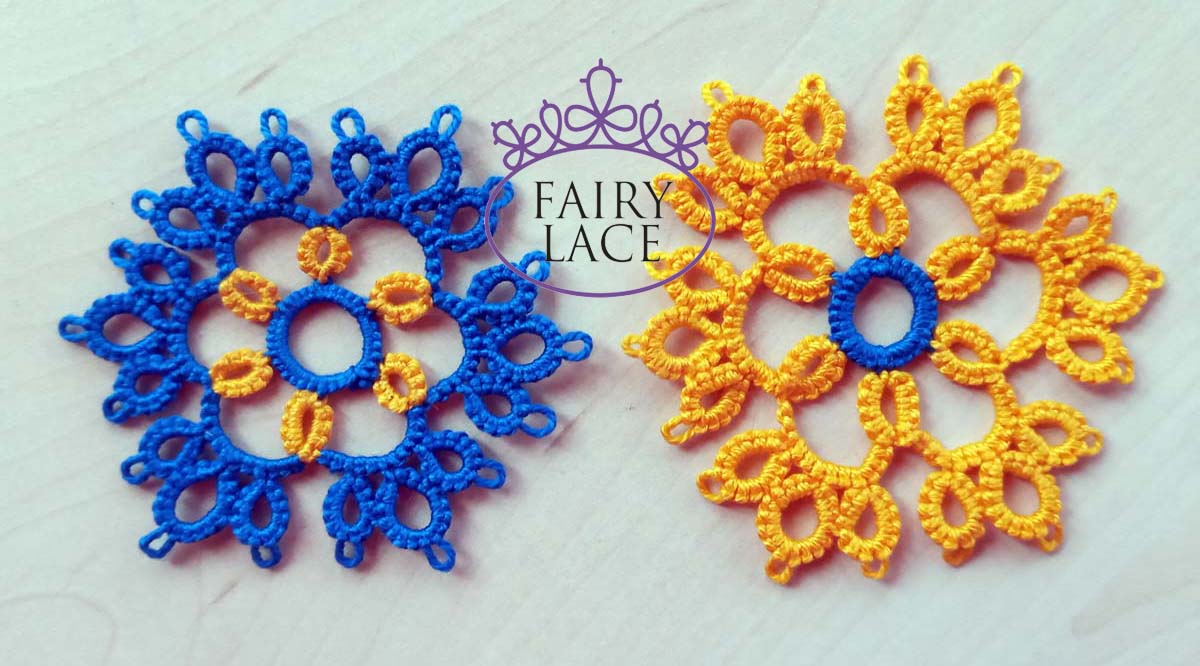
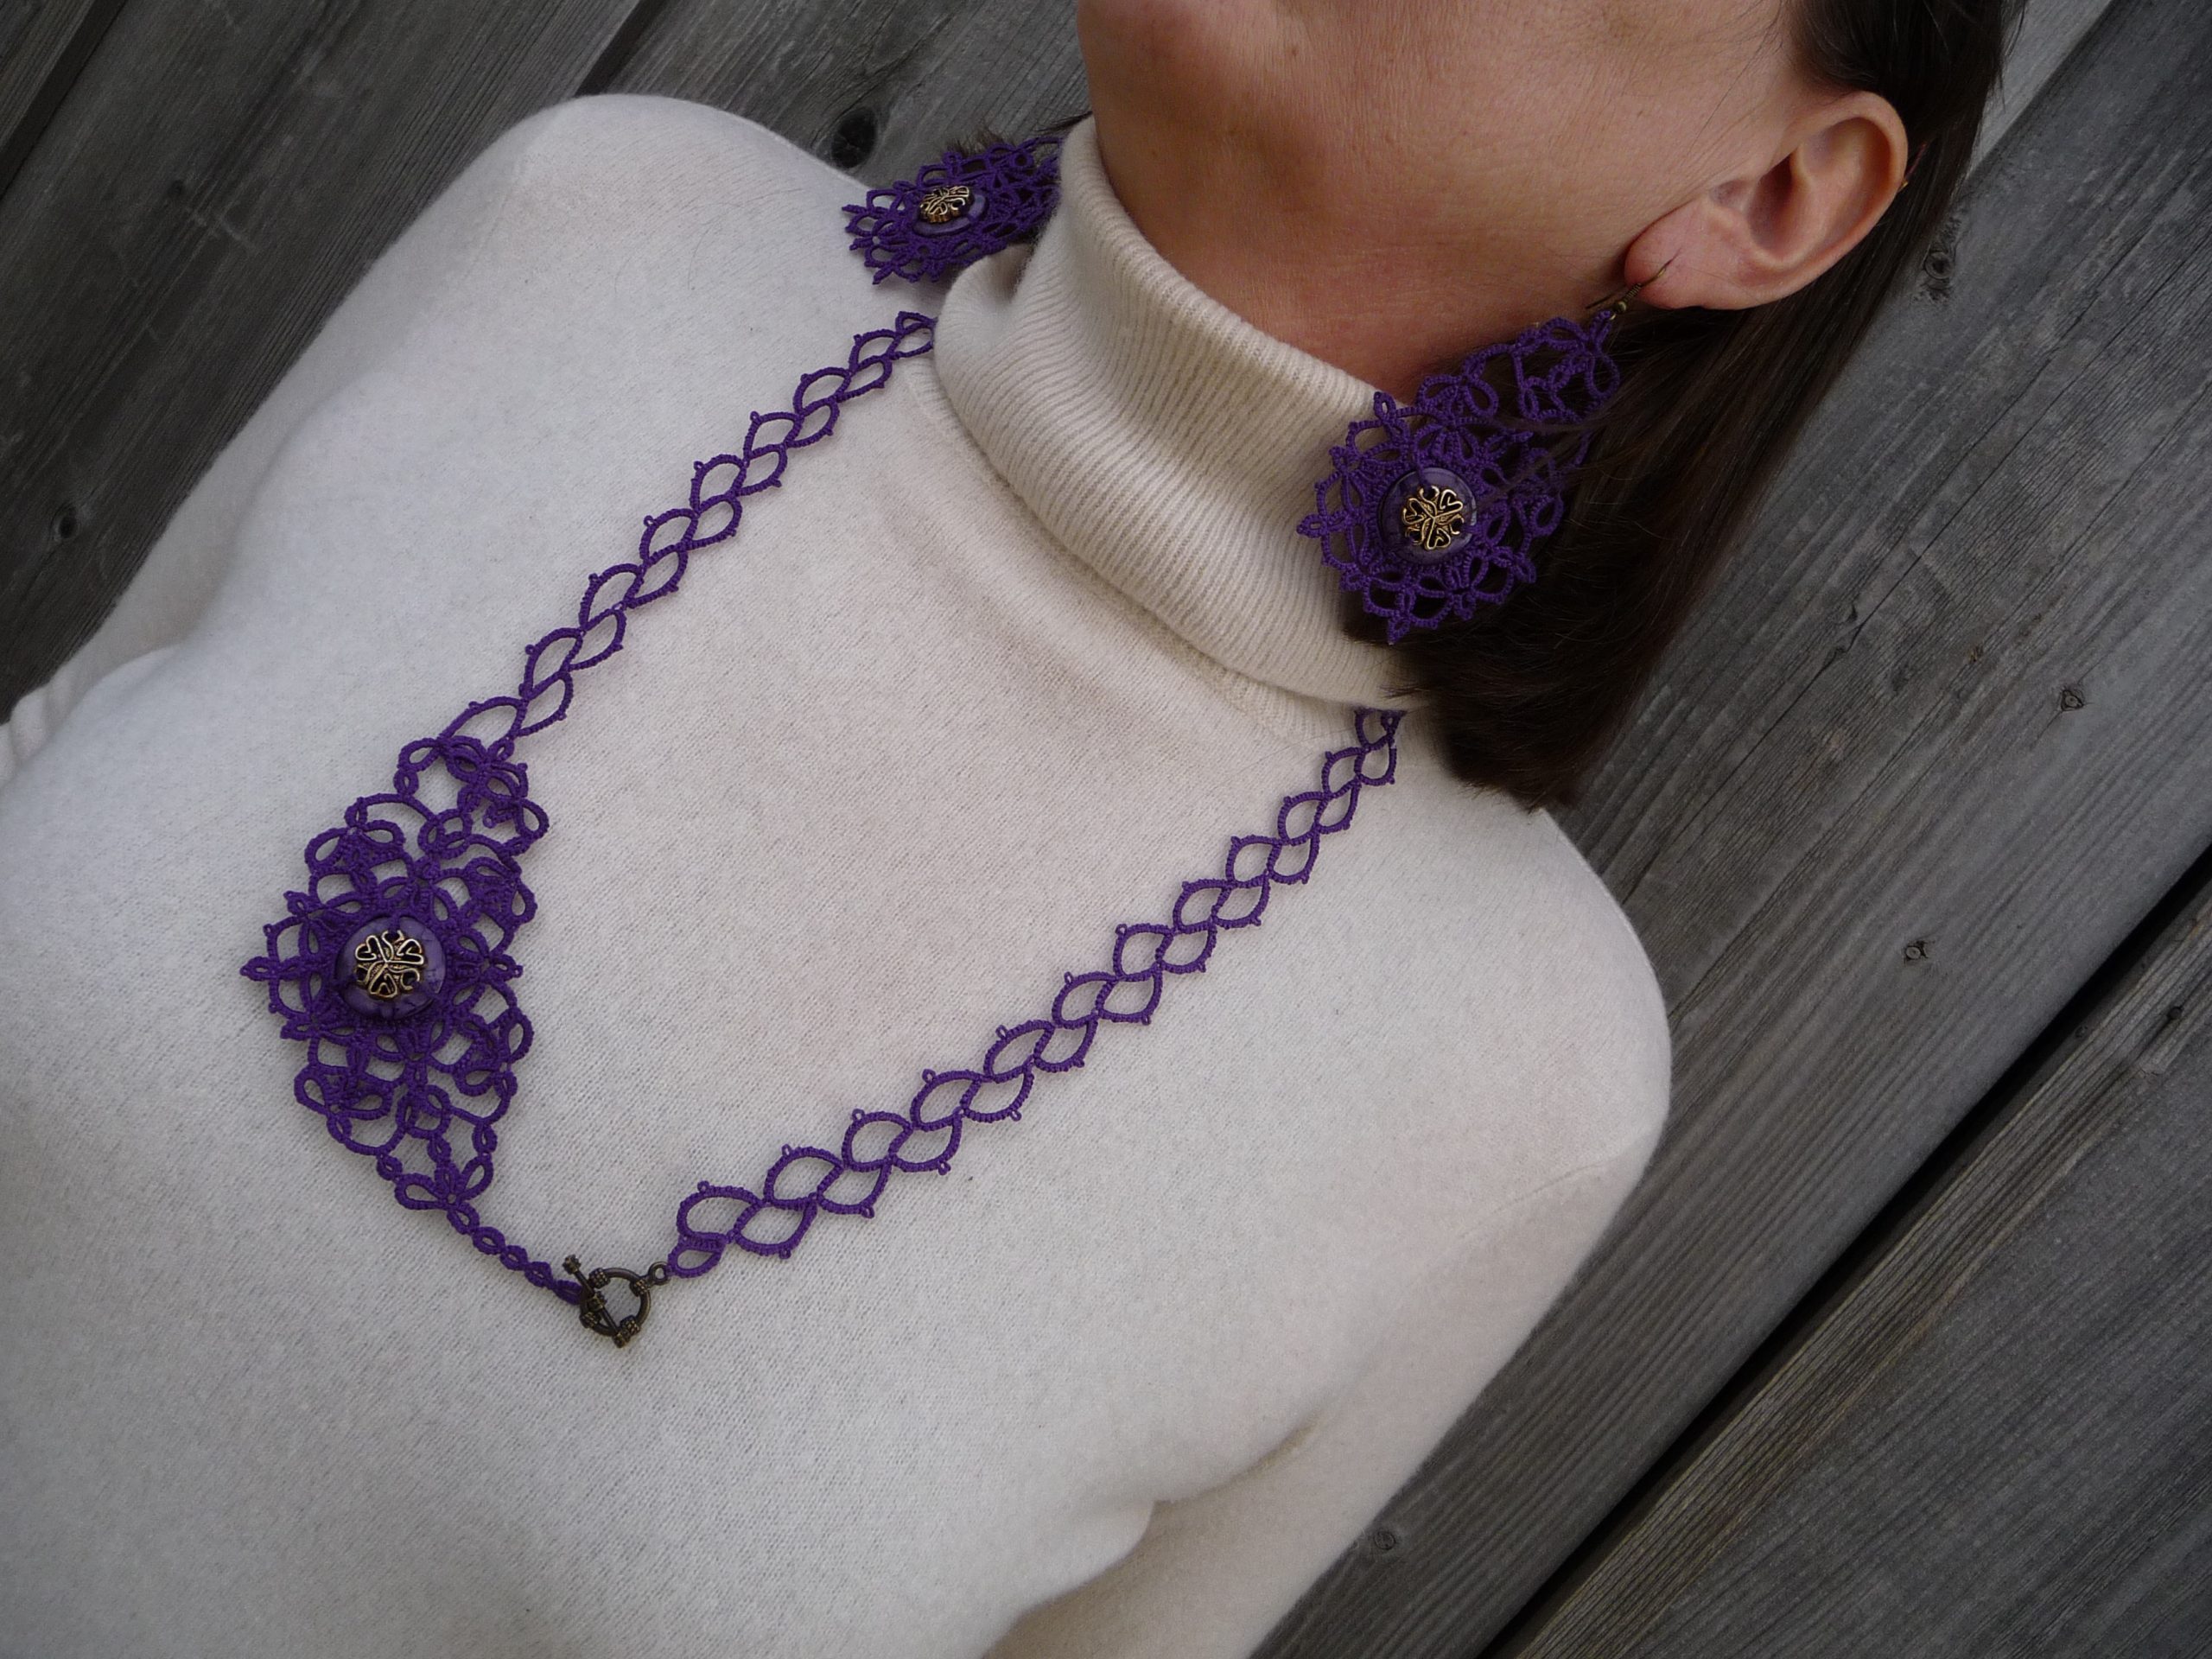
I’d like to thank Patrizia for her comment on one of the previous videos where she suggested we talk about hiding the threads at the beginning of two-color tatting. This is a really interesting topic. Sometimes we can leave the threads at the beginning of the work and tie them to the ends of the work, if it is a closed motif or earrings, for example. But it happens that it is a pattern for a bookmark or a strip of lace. Of course, you can hide all the “tails” after finishing the work. But I really don’t like leaving all these tails “for later”! Therefore, I suggest you look at how you can reliably and easily hide the threads at the beginning of a two-color work.

Today I made a video for two shuttles. We do not make a knot at the beginning of the work. This is especially important if you take two colors of thread. In this case, a two-color knot can look sloppy. But we are striving for the ideal, aren’t we?! https://www.youtube.com/watch?v=Nze8b1Wy_KE&list=UULF3dn4_9pp7tIKA2k564wLBQ

How to make the same perfect start for needle tatting, watch one of my previous videos: https://www.youtube.com/watch?v=bVdn3qXlWFg&list=UULF3dn4_9pp7tIKA2k564wLBQ&index=11

Perfect Tatting – Part 5 is finished! Happy perfect tatting!
I hope my previous blog posts will also be useful and interesting: https://fairylace.kozinenko.com/blog/

Posted on Leave a comment

Perfect tatting – part 4

Perfect tatting – part 4

Perfect tatting – part 4.

Hello everyone! This is fourth lesson in the series Perfect Tatting. You can read previous part here: https://fairylace.kozinenko.com/perfect-tatting-part-3/

Also my articles will be accompanied by video tutorials. I will add them to my YouTube channel.

Please write in the comments what subtleties you would like to know. Then it will be easier for me to make a lesson plan.

So, today we will talk about how to choose the shuttle size and needle thickness depending on the chosen thread.

TATTING SHUTTLES

Perfect tatting – part 4

I took a photo of four different shuttles and four different balls. Although in fact the size of the shuttle does not matter at all when choosing the thickness of the thread. Because, it all depends on your personal preferences and your convenience. The more threads you need to wind, the larger the shuttle you will take. Of course, this is logical. The same applies to beading. You will just need more space to fit more beads on the shuttle.

But you can tat with any threads, using only one shuttle.

PERFECT TATTING NEEDLES

With needles, everything is completely different. Because here the thickness of the needle is extremely important. The accuracy and beauty of your work depends on it.

I found this table on Pinterest.

Ideal tatting

So, this table was compiled and published in the FB group “Sparkling Light Creation Studio – Fibre Art by Gloria Nelson”.

I also found a classification of tatting needles on the website Handy Hands: https://hhtatting.com/product-category/tatting-needles/

Tatting Needles

The Handy Hands metal tatting needles are specially made to our specifications. Unlike sewing needles, these tatting needles are blunt, have a smaller eye, and are not tapered. They are made of steel and are nickel plated.
1.Yarn Needle 0-0 (chunky weight yarns)
2.Yarn Needle 1-0 (worsted weight yarns)
3.Yarn Needle 2-0 (Speed Cro Sheen and most 100% cottons)
4.Tatting Needle 3-0 (crochet cotton size 10, Pearl Cotton 5 and 3, Knit Cro Sheen and smaller yarns)
5.Tatting Needle 5-0 (crochet cotton thread sizes: 10, 20, and Pearl Cotton 8 and 5)
6.Tatting Needle 7-Fine (crochet cotton thread sizes: 50, 40, 30, 20, and Pearl Cotton 12)
7.Tatting Needle 8-Extra Fine (crochet cotton thread sizes: 100, 80, 70, 60, 50)

But there is one obstacle – the thickness of threads is marked differently by different manufacturers. And then it is difficult for us to use these tables. In this case, I suggest you choose the needle for your thread yourself.

I prepared 4 different needles and mercerized threads Madame Tricot No. 10 for the video. Unfortunately, I could not form a ring using the thinnest needle. So I had to choose from the remaining three options. In my opinion, the middle ring looks perfect!

The video is already uploaded on my channel, welcome: https://www.youtube.com/watch?v=JIXGclqrCgI&list=UULF3dn4_9pp7tIKA2k564wLBQ

Perfect Tatting – Part 4 is finished! Happy perfect tatting!
I hope my previous blog posts will also be useful and interesting: https://fairylace.kozinenko.com/blog/

Posted on 2 Comments

Perfect tatting – part 3

Small square tatting doily

Perfect tatting – part 3

Hello everyone! This is the third lesson in the series Perfect Tatting. You can read the second part here: https://fairylace.kozinenko.com/perfect-tatting-part-2/

My articles will be accompanied by video tutorials. I will add them to my YouTube channel.

Please write in the comments what subtleties you would like to know. Then it will be easier for me to make a lessons plan.

Perfect tatting – part 3

Today is a very short article and a short video. Just watch how to make a strong knot that is almost impossible to untie. Of course, if you want to, you can untie everything! LOL! But will the result be worth our efforts? This knot is useful when building up threads or at the end of work. Agree, this is very important. Imagine, knots untied after starching the work. Holes, holes, holes. This can break the heart of any needle crafters!

Surely many of you successfully use this knot in your work. And some of you, perhaps, should practice with me! Oh, I almost forgot to emphasize. No strong knot can cancel out hiding the tails of the threads! But more about that in the next lessons. The video is already uploaded on my channel, welcome: https://www.youtube.com/watch?v=LvIRiqEqOFE&list=UULF3dn4_9pp7tIKA2k564wLBQ

Perfect Tatting – Part 3 is finished! Have a great weekend and happy perfect tatting!
I hope my previous blog posts will also be useful and interesting: https://fairylace.kozinenko.com/blog/

Posted on 2 Comments

Perfect tatting – part 2.

Tatting round doily dark green and orange colors

Perfect tatting – part 2.

Hello everyone! This is the second lesson in the series Perfect Tatting. You can read the first part here: https://fairylace.kozinenko.com/perfect-tatting-part-1/

My articles will be accompanied by video tutorials. I will add them to my YouTube channel.

Please write in the comments what subtleties you would like to know. Then it will be easier for me to make a lesson plan.

Today I want to talk about joining picots. As an example, I took the pattern of the simplest flower made of five identical Rings.

Perfect tatting

You can choose any number of double stitches in the Ring, as you like. I took for the needle: 5, p, 5, p, 5, p, 5. And for the shuttle 3, p, 5, p, 5, p, 3.

Perfect tatting – part 2

I made a ring with three picots of the same size (picot length is about 4 mm).

But after the join picot with the second Ring, there is an extra loop. It looks sloppy.

However, there are patterns where such picots are exactly what is required by the drawing! Usually the designer specifies the length of the picots in such cases. In any case, I try to write in all instructions what length of picots should be made.

Perfect tatting – Small joining picot

In the graphic diagram you can see that the first and third picots of each Ring are joining ones. That’s why I made these picots very small. And as a result, my flower looks neat, doesn’t it? But if you make the joining picots about 8 mm long, you get a very interesting effect. Oh, sorry, I got distracted!

When joining through a picot, please use a crochet hook. Of course, using the “nose” of the shuttle is faster, I agree. But in this case, the small picot will stretch. And we strive for perfection! By the way, the request to use a hook also applies to needle tatters!

I hope you will enjoy watching the video: https://www.youtube.com/watch?v=BlGFuxWyI1g&list=UULF3dn4_9pp7tIKA2k564wLBQ

Perfect Tatting – Part 2 is finished! Thank you for your patience!
I hope my previous blog posts will also be useful and interesting: https://fairylace.kozinenko.com/blog/

Posted on 2 Comments

Perfect tatting – part 1.

Square tatting doily

Perfect tatting – part 1.

Hello everyone!  This article begins a series of lessons “Perfect Tatting”. Tricks, subtleties, error correction, new skills – I share my experience.

My articles will be accompanied by video tutorials. I will add them to my YouTube channel.

Please write in the comments what subtleties you would like to know. Then it will be easier for me to make a lesson plan.

Firstly, I want to emphasize that all the techniques that I will talk about are NOT MANDATORY to implement! Everyone has their own opinion and their own “handwriting”! But I will be glad if my experience is useful and interesting to you.

So, ideal tatting, part 1.

Recently I was asked an interesting question: is it necessary to tie the thread to the shuttle?
Look closely: there is almost always a small hole on the shuttle. What is it for?

I am amazed at the talent of the designer who invented such a shape of tatting shuttles. Everything is very logical, ergonomic and practical!

Perfect tatting.Part1.

If you do not secure the thread to the shuttle, you will have to press the thread with your finger. No big deal – you will say! I agree. But I weave a lot and often use nylon and polyester threads in my work. They look so beautiful in jewelry…

If the thread rubs the skin on your finger all the time, you will get a cut and a scar. Believe me, I know. It is very painful. Take care of your hands!

No injuries, no trouble! I guess I should have called this article “Safe Tatting”! LOL
I often see on video when tatters hold the shuttle thread with their little finger. Try “freeing” your finger. The shuttle is designed to be moved freely, like a space shuttle! And hold the shuttle with only two fingers. It looks very elegant, by the way!

And for a good mood I added a knot on a thread for a tatting needle to the video. Of course you will smile! A spontaneous knot is too much! https://www.youtube.com/watch?v=zS6yj9MYFUk

Perfect Tatting – Part 1 is finished! Thank you for your patience!
I hope my previous blog posts will also be useful and interesting: https://fairylace.kozinenko.com/blog/

Posted on 4 Comments

Free tutorial tatting earrings Nancy

Free tutorial tatting earrings Nancy, or a continuation of my gratitude jewelry collection.

Hello everyone! I named these earrings after my dear friend, amazingly touching lady with a big heart. She lives in a nature reserve and cares deeply about animals and pets. I greatly appreciate our friendship and correspondence. Thank you for your support, sympathy, help and prayers, my dear Nancy!

You can follow my written instructions along with watching the video. The PDF file can be downloaded for free by following the link: https://drive.google.com/file/d/1nm9DK5De9Yo66s9WUlfHvYY_OhullmKf/view?usp=sharing

I wrote a detailed list of the necessary materials and tools at the beginning of the video lesson. I used my favorite light purple color, of course! But you can take threads and beads of any color you like!

To perfectly connect the rows, I used an embroidery needle. You can watch a short video of how it works: https://www.youtube.com/shorts/PzSGJ5vIBEY But you can make the Catherine Wheel Join, or another connection convenient for you. I just chose the fastest and easiest!

I also used a pearl knot to create a sharp angle at the top of the earrings. Video available, please: https://www.youtube.com/watch?v=3Z4e9CiW4uY&list=UULF3dn4_9pp7tIKA2k564wLBQ&index=54

So, watch the detailed video on my channel. I hope you enjoy making these earrings with me, welcome: https://youtu.be/unUGan77IaU

You can support my channel with likes, reposts and comments!
Thanks in advance to everyone who donates to my PayPal: fish20085@gmail.com
Thank you!

Posted on 4 Comments

11 ways add bead in tatting

Close-up side view of the Strong Ukraine bracelet in lace tatting technique. Blue and yellow beads form a layered stripe pattern, symbolizing sky and wheat.

11 ways add bead in tatting, or “maybe it would be easier to sew?”

Hello everyone! I’m sure many tatting masters have used beads at least once to decorate their products. Of course, this adds charm and shine to thread products. Do you agree? There are two directions of tatting, where beads and crystals are used in large quantities. These are Ankars and Beanile. Today I will not dwell on each of them in detail. Because the purpose of my article is different. I want to tell you how to correctly separate the beads between the shuttle and ball threads.

Sometimes people ask me: isn’t it easier to sew on beads? I answer – do as you like! And if we sew on a bead, then this is method 12, ha ha!

First, let’s remember what the threads in tatting are called. These are ball and shuttle threads. By the way, I again strongly advise you to use the link and read detailed information about the terminology on the ABS website. https://abctattingpatterns.com/terms/

In today’s video I use one shuttle and a ball. Therefore, I will not “wander into the thick forest” and talk about options with two shuttles. So, I’m starting!

11 ways add bead in tatting

First way add a bead in tatting

This is the easiest way (like method 2). We simply insert the bead into the picot on the Ring. To do this, we place the bead from the SHUTTLE thread in the loop on the hand. Place the bead between your fingers so that it does not interfere with your double stitches.

Second way

Here we also insert a bead into a picot, but on a Chain. Please note that the bead is located on the Ball thread.

Ways add bead in tatting

Third way to add a bead

This bead is placed on a picot between two Rings (or Chains, it makes no difference). This is where you need a little more skill! First, measure the bead and select a suitable picot meter. Make the first Ring (or Chain) with a picot of the required size (we did measure the required length of the picot, didn’t we?!). Then make part of the second Ring (or Chain) to next picot. This will be a join picot with the previous element. Place the bead on a thin crochet hook, pull the picot through the bead and make a join picot. I’m not sure if I’m explaining this clearly, but the video will help us!

Way four

Bead on the Cord Thread inside the Ring. The bead is located on the SHUTTLE thread. To add a bead in this case, you do not need to move the bead into the loop on your hand. You just need to move the bead to the work in the right place and continue double stitches.

How add bead in tatting ring

Fifth way to insert a bead in tatting

11 ways add beads in tatting

This method is a variant of the previous one. But the bead is located at the base of the Ring. To do this, we need to move the bead from the SHUTTLE thread into the loop on the hand. And when we form the Ring, the bead will be exactly where we planned!

The sixth way

As in the two previous methods, we add a bead to Core Thread, but in the Chain. And pay attention, the bead is located on the SHUTTLE thread, from where we will move it to the place we need.

Add bead in tatting

How to add a bead to tatting, method seventh

This method is convenient when we use one shuttle. Add a bead to the SHUTTLE tharsd BETWEEN the rings. In the photo you can see the ball thread under the bead too. But this is also a possible option!

Eighth method

Add a bead to the BALL thread BETWEEN the two CHAINS. Have you already guessed where this bead was located?

Attention! Aerobatics!

These two options will require your concentration and dexterity. We will add a bead to the center of the Ring and Split Ring! I won’t bore you with a description (thanks for your patience!). But it’s better to watch the video please.

11 way

Add a bead to the middle of the Ring using extra thread. It’s elementary! I like this method.

So, I talked about 11 ways add bead in tatting. I’m sure now you know where to place the beads before starting work, on the shuttle or on the ball! And you will use beads more often and more variably! Look what my new bracelet looks like. I used methods 4 and 8. However, there are also sewn ones! The pattern is available in my store, check: https://fairylace.kozinenko.com/product/bracelet-merrilyn-tatting-pattern/

I almost forgot! Link to video in my channel YouTube I hope you will remember to subscribe, follow my blog and comment, thank you! ): https://www.youtube.com/watch?v=bvmV5zLvNCI&list=UULF3dn4_9pp7tIKA2k564wLBQ

I also added similar detailed video 11 ways add bead in tatting, specialty for needle tatting. I hope it will be useful and interesting: https://youtu.be/ZYxjRfrphOM

Posted on Leave a comment

Tips for needle tatters. Part 6.

Blue tatted lace motif with beads, example for needle tatting tips

Tips for needle tatters, or perfect two-tone tatting lace.

Hello everyone! This is the next part of my advice for beginner tatters. You can read previous parts here: https://fairylace.kozinenko.com/floating-rings/

Tips for needle tatters. Part 6.

Please subscribe to my blog if you find my articles useful and relevant. And of course, I sooooo need your comments. Because it seems to me that I am doing work that no one needs. Perhaps my experience is not enough to give advice? Or am I not able to explain it clearly? This doubt makes me despair. https://fairylace.kozinenko.com/blog/

For filming the video, I specially do a manicure. So that you are pleased to see neat hands in the frame. By the way, I do my own manicure. Here’s another hobby of mine!

On my YouTube channel there is an old video Two tone lace The perfect start. But this video is for tatting shuttles. Today I want to tell and show how to make a two-color pattern with a needle. Of course, you can use the regular method. In this case, you will have ball thread of one color and needle thread of another color. When turning the work over, you will need to make one or two simple knots (I covered this in Part 1 https://fairylace.kozinenko.com/tips-for-beginner-needle-tatters/ ). You will notice this simple knots will consist of interlacing threads of two colors. Of course, this is not a global problem! But this lace does not look very neat.

My assistant Phil was shocked. Mom, two needles again? No, don’t worry, baby! Today we only need one needle.

My favorite method

So, I suggest you another way. Nothing complicated. You will also need needle thread and ball thread in different colors. But the Rings will simply need to be performed on an inverted needle. There is a proverb: it is better to see once than to hear (or read!) a hundred times. Therefore, I will not describe the weaving process in detail. Suffice it to say why I like this method. I don’t need to make knots to secure each element. Because the Rings and Chains are firmly fixed by changing the threads. And a product made using this method looks (in my opinion) just perfect!

By the way, you can hide the tails of the threads at the beginning of weaving, as in this photo. Or close the motif by tying threads of the same color in pairs (this is in the video). Oh, this photo also shows the simple knot at the end of the motif. Ah, it looks sloppy, doesn’t it?

Video Tips for needle tatters, how to make perfect two-tone tatting lace on my YouTube channel: https://www.youtube.com/watch?v=bVdn3qXlWFg&list=UULF3dn4_9pp7tIKA2k564wLBQ

Please don’t forget to subscribe to my blog, comment and share on social media. Your help and support is very important to me.
I will also be grateful for any charitable contribution to my Paypal: fish20085@gmail.com because I transfer part of the funds to the Ukrainian charity fund. Thanks!

Posted on 10 Comments

Floating rings

Floating rings

Floating rings, or tatting poetry. Tips for beginner tatters. Part 5. Part 4 of my articles for beginning tatters can be read here: https://fairylace.kozinenko.com/vintage-buttons/

Hello everyone!

In this article I will try to tell in detail how to make Floating Rings. Oh, what a romantic name this element has! And although this verse is not about needlework, there is a mention of these rings here:
Friday Saturday rags of clouds
floating rings driven through the sky
and fluorescent halos
celestial laundry tossed.
Where did I find this? You will not believe! On Amazon, haha. This is a quote from the poetry textbook “Unlocking the poem” by Ottone M. Riccio and Ellen Beth Siegel. Yes, yes, don’t be surprised. Turns out there are textbooks for everything you want to learn. You just need to be able to “enter the correct search words.” That’s what my eldest son says. He is Principal Solutions Architect and Google Cloud Certified Fellow. Therefore you can believe him, I assure you!

So, from the novel, let’s move on to practice. Let’s make a little round motif. For clarity, I made a graphic diagram and filmed a video lesson. And of course, instructions with videos are made for shuttles and needles. That’s right, in plural. Because to perform such an element you will need two shuttles or two needles. By the way, please note that the needles must be the same thickness.

Pattern

You can download the PDF file by following the link: https://drive.google.com/file/d/1kA3-0HMAX-AKjILwTQ5TNidQidNzaM5p/view?usp=sharing
Or just take a screenshot of the screen. But on the screen, the link to the video will be inactive. Oh, I forgot to say. My cat Phil tried very hard and helped me work on the video!

Video: https://youtu.be/76B3p2HPa_M

Please don’t forget to subscribe to my blog, comment and share on social media. Your help and support is very important to me.
I will also be grateful for any charitable contribution to my Paypal: fish20085@gmail.com

Posted on 8 Comments

Vintage buttons

How to Use Vintage Buttons in Lace

Vintage buttons. Tips for beginner tatters. Part 4 , or how to add a beautiful button to a tatting pattern. Part 3 of my articles for beginning tatters can be read here: https://fairylace.kozinenko.com/tips-for-needle-tatters/

Hello everyone! I’ve recently been organizing my craft supplies. Ah, I have to do this from time to time! To you too? And among the three kilograms of buttons, I found several pieces that interested me.

vintage button

Often I have seen round buttons added to tatting patterns. I made such a heart (this was 12 years ago).

But these are rectangular buttons. Can they be used? Why not?

As usual, I didn’t stop at shuttles only. After all, for those who tat with a needle, it is also interesting to make a small brooches with a vintage buttons. Do you agree?
The pattern is very simple. Because the main thing in this pattern is the rectangular button!

Use a crochet hook when making connections. Choose a hook that will fit easily into the button hole.

I decided it wasn’t worth doing graphic design. Therefore, I simply put numbers indicating the number of double stitches directly on the photo. You can take a screenshot or download a PDF file from the link: https://drive.google.com/file/d/13Oct1mUyQuwGVzr2P08M3uobKR098UNH/view?usp=sharing

Tatting with button
Tatting with button

Educational video on my YouTube channel. Please take a look and come back! https://www.youtube.com/watch?v=ldSiIp_3CeA&list=UULF3dn4_9pp7tIKA2k564wLBQ

Some useful tips for tat with vintage buttons

Of course, if the buttons are dirty, they need to be washed and dried.

As you work, try to tighten the loops inside the button tightly. Otherwise, the button will not be firmly secured in the middle of the pattern. But we don’t want the buttons to “dangle or float” in space!

Another important point. Try to ensure that the threads on the button lie parallel and do not twist with each other. This will make your work look neater.

When watching a video please note that I respect the front and back sides when weaving. It seems to me that in this case the picots look more beautiful.

The two motifs are made with the same threads and the same pattern. But with the shuttle and needle ready, the motif turns out to be of different sizes.

Please don’t forget to subscribe to my blog, comment and share on social media. Your help and support is very important to me.
I will also be grateful for any charitable contribution to my Paypal: fish20085@gmail.com