Tatting Tutorials – step-by-step lessons and helpful tips for learning and improving your tatting skills. Perfect for beginners and experienced tatters who want to master new techniques and patterns.
Hello, everyone! My regular readers know how much I love experiments. I love using new tools or materials. I also really like finding new tatting weaving techniques. When I create my patterns, I always try to make them original, understandable and usable. But I love it when my customers make their own changes and additions to my work. Ah, I keep repeating: creativity is welcome!
My model of earrings is called Snow. These are the white earrings in the photo. And the second photo was kindly provided by Christy. I am delighted with her version! The beads and the color of the threads are reminiscent of the glittering drops of melting snow on the first spring flowers, isn’t it?
And in these photos my 3D Bow pattern and a completely unexpected version of Christy . She combined two bows into an original brooch, bravo!
When I was creating the Mandala doily pattern, I could not even imagine that it could be a wonderful dream catcher! Look at the beauty of Dawn!
Finally, my favorite collar is Sea Glass. Elena made her own version, complementing the collar with large beads and small details along the edge of the collar. It is amazing!
Of course, I can talk about my customers endlessly! These are extraordinarily lovely ladies and very talented tatting masters. But I hasten to tell you about my new video. The topic of the video tutorial is how to make a ring on a chain. And, naturally, I tried to show my creativity and shot 5 ways.
Method 1.
This is the traditional way for two shuttles. In my opinion, in this case, the ring on the chain look perfect.
Method 2.
You can try this motif with one shuttle and one ball. Of course it will look like a chain-ring-chain. But why not?
Method 3.
And this method is for tatting with a needle. I think you will like it. So, if you do not knot after half of the chain and after the ring, it almost looks like a classic ring on a chain. Do you agree?
Method 4.
In this method I used knots and it is very similar to method 2 for the shuttle. But you do not have to cut the thread and change the needle. Of course, this method has its pros and cons!
Method 5.
And this method looks perfect, in my opinion. You can use two needles. By the way, do not forget that both needles must be the same thickness. But you can do this with just one needle. Of course, in this case, after the first half of the chain, pull the thread out of the needle, then weave a ring on this needle. Then pull the thread out of the needle again and weave the other half of the chain. Sounds complicated? It’s actually very simple, you should try it! I say: don’t be afraid to experiment!
How to read tatting patterns, or how I write my tatting tutorials
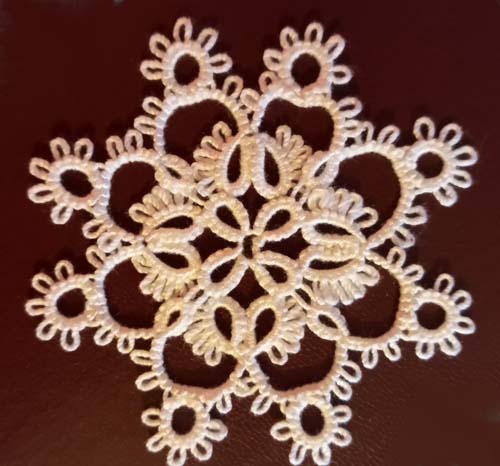
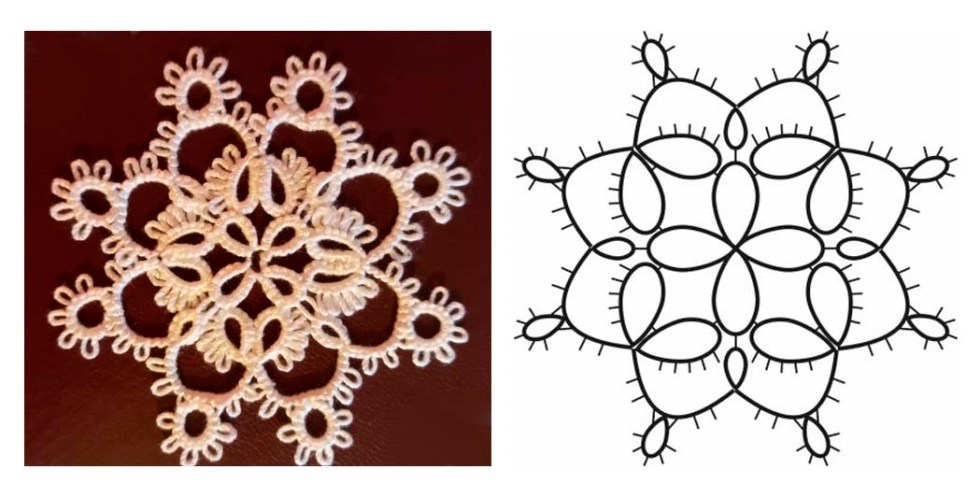
Hello everyone! I recently received an email asking me to help my FB friend learn to read tatting patterns. Oh, this is a very broad topic! Of course, I’ll try not to tire you too much! But I have prepared several versions of instructions that are in the books on tatting by different authors. So, the diagram we are going to look at today is very simple. I created this snowflake specifically for this post.
How to read tatting patterns
Before we start weaving, let’s take a look at a few example instructions. Of course, before starting work, you must carefully learn the Abbreviation. Some terms may differ from another author, but the basic elements are always the same. These are Ring, Chain and Picot. I am not covering more complex elements in this pattern. I will not name the authors who I took as templates for writing instructions for ethical reasons. You will need: two shuttles or a tatting needle, white thread # 10, a crochet hook, scissors and a good mood!
Example 1.
Abbreviation: Number = number of double stitches between the picots, R = ring, C = chain, + = joining, 1 X 4 = 1 – 1 – 1 – 1, 2 X 6 = 2 – 2 – 2 – 2 – 2 – 2, – = picot Number of shuttles: One, and second thread Row 1 Shuttle 1: R: 5 – 2 – 2 – 2 – 5. Repeat 3 times.
I really like these instructions for their brevity. But I think you will agree with me that it is too difficult for beginner tatters. You may ask: where does the work start, when to turn the work? This is where the difficulty lies.
✼ R: 2 – 1 – 1 – 1 – 1 – 2 + ( to Ring of Row 1) 6 – 2 cl DNR R: 2 + ( to previous Ring) 6 + ( to next Ring of Row 1 ) 2 – 1 – 1 – 1 – 1 – 2 cl rv Ch: 3 – 2 – 2 – 2 DNR R: 2 + ( to previous Chain ) 2 – 2 – 2 – 2 – 2 – 2 – 2 cl DNR Ch: 2 + ( to previous Ring ) 2 – 2 – 3 rv R: 5 + ( to Ring of Row 1 )5 cl rv Ch: 3 – 2 – 2 – 2 DNR R: 2 + ( to previous Chain ) 2 – 2 – 2 – 2 – 2 – 2 – 2 cl DNR Ch: 2 + ( to previous Ring ) 2 – 2 – 3 rv Repeat from ✼ 3 times.
In my opinion, there is no need to write “close” at the end of each Ring. After all, we see at the beginning of the combination that we need to make a ring. Thus, this Ring will be closed anyway. Perhaps you know of any cases where the ring is not closed? But will this element then be called a ring? However, these instructions indicate at the end of each element whether or not to reverse the work. This is a plus, no doubt.
✼ R: 2 ds, p, [1ds, p] 4 times, 2ds, jp to Ring of Row 1, 6 ds, p, 2ds, cl R: 2ds, jp to previous Ring, 6ds, jp to next Ring of Row 1, 2 ds, p, [1ds, p] 4 times, 2ds, cl C: 3ds, p, [2 ds, p] 2 times, 2ds R: 2ds, jp to previous Chain, [2ds, p] 6 times, 2ds, cl C: 2ds, jp to previous Ring , 2ds, p, 2ds, p, 3ds, rv R: 5ds, jp to Ring of Row 1, 5ds, cl C: 3ds, p, [2 ds, p] 2 times, 2ds R: 2ds, jp to previous Chain, [2ds, p] 6 times, 2ds, cl C: 2ds, jp to previous Ring , 2ds, p, 2ds, p, 3ds, rv Repeat from ✼ 3 times.
This tutorial is good too, no doubt! Have you noticed that the instructions we reviewed were NOT accompanied by graphical diagrams? Of course, you can look at the photo of the finished snowflake and follow the instructions. But I prefer to combine instruction and graphical diagram in my tutorials.
Aren’t you tired yet? Be patient, because now the fun begins (because this will be my instruction, haha!)
Abbreviation: R – Ring; PVR – previous Ring; C – Chain; PVC – previous Chain; p – picot about 4 mm; sp – picot about 1 mm; jp – join picot; 1S – first shuttle; 2S – second shuttle; TS – two shuttles; tw – turn work.
Row 1
⚫ – beginning row
1S 1, 2, 3. R: 5, sp, 2, p, 2, sp, 5;
4. R: 5, sp, 2, p, 2, sp, 5, tie and cut.
This row consists of four identical rings. Pay attention to the different lengths of the picots. As a result, you should have a flower like in the photo.
Row 2 ⚫ – beginning row 1S
R: 2, p, 1, p, 1, p, 1, p, 1, p, 2, jp to second sp of R2 (Row1), 6, sp, 2;
R: 2. jp to sp of PVR, 6, jp to first sp of R1 (Row1), 2, p, 1, p, 1, p, 1, p, 1, p, 2, tw; TS
Repeat from 1 to 5 3 times, connecting the elements according to the graphic diagram.
Attention! Attach last Chain to beginning Row, tie and cut.
Congratulations! Your Snowflake is ready!
You can take screenshots and save this pattern to your collection. Or you can also download the PDF file from the link. In this file on page 3 there is a graphic chart showing the number of double stitches for more advanced tatters or for those who don’t like to type a lot! 🙂 https://drive.google.com/file/d/1OihtIvhBgnU7ecCThETRcDmefzX_HMa6/view?usp=sharing
So, we looked at several options for How to read tatting patterns. Write to me in the comments which option you like more. Perhaps you would suggest making changes or additions to my instructions. I would be grateful for any comments. Thank you for your support! Please subscribe to my blog and my YouTube channel: https://www.youtube.com/watch?v=5nOMsstL15w&list=UU3dn4_9pp7tIKA2k564wLBQ
FAQ
Q: How do you read numbers in tatting instructions? A: Numbers usually show the number of double stitches between picots or joins. For example, “R 5–5–5–5 cl” means three picots separated by 5 double stitches each.
Q: What do lines mean in tatting diagrams? A: Lines usually represent chains, while circles show rings. The direction of the line helps you follow the working order of the lace.
Split ring again, or how to embrace the immensity.
Hello, everyone! I was very pleasantly surprised by the popularity of my post and video on the topic How to make a split ring. Thank you all for your comments, kind words and questions. Therefore, your support helps keep my blog useful and interesting, I hope!
You may ask why there are so many different ways of weaving a split ring. Of course, all the time we can weave patterns only a ring and a chain in different combinations. I do not want to offend anyone, in any case. Of course, there is a special charm and appeal in simple patterns. But what about the desire for development and improvement? Don’t be afraid to learn and master new techniques. Perhaps you are not planning to make special lace right now. But the more techniques you master, the wider your range of possibilities will be. Therefore, you will be able to perform work of any complexity.
So what’s in my second split ring video. Hope you find it interesting!
1. Two shuttles for ring
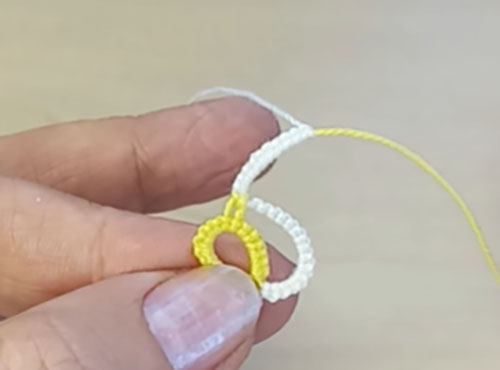
First, you will see how to make a split ring with two shuttles and threads in two different colors. And I could not deny myself the pleasure of showing once again how I hide the threads at the beginning of work. Oh yes, I hate thread tails! In addition, you can swap the threads of the first and second shuttles. In this case, you will end up with a colored “snake”.
2. One shuttle
Then I decided to show Dora Young’s absolutely unique method for one shuttle. I really liked this method. Because the application of a split chain for the second half of a split ring is very interesting! Many thanks to the talented tatting master Muskaan. She told me where I can get acquainted with this method.
3. Shuttle and ball
The next method I call “false split ring”. Oh, just don’t throw stones at me! Ha ha! Perhaps I am far from the first master who applies this method. But maybe there is a special term in English for this method. It’s very easy! You will be surprised. I used arcs instead of rings, that’s all! You just need extra paper clips.
Split ring again
4. Tatting needle
And at the end of the video, you will see another way for tatting needles. In the comments on FB, I was asked to show how to make a two-color split ring with a needle. I am always happy to help! By the way, pay attention to this nuance: You can get identical rings or mirrored ones. It depends on whether you are making a knot when closing a ring or not.
Tatting split ring , or why I love using this technique.
Hello, everyone! I want to thank everyone who read my blog posts, commented and followed me on YouTube. Trust me, I am making these video tutorials for you. Because I endlessly love tatting and try to promote this art to the best of my ability.
Today I want to talk about the split ring. How is a split ring indicated in patterns? It is usually written like this: SR: [ 8 ], [ 8 ]. This means you have to sew 8 double stitches in the normal way (this is the first section in square brackets), and then make 8 double stitches with “pearl weave” (this is the second section in square brackets). By the way, in my new video tutorial I am making this very ring. But the number of double stitches in brackets may vary depending on the pattern. Also, picots can be contained in brackets. For example : SR: [ 3, p, 3, p, 3 ], [ 3, p, 3, p, 3 ]. And in graphical diagrams, such a ring can be drawn with a dotted line in the middle, or the halves of the ring can be highlighted in different colors.
When are split rings used? Oh, the application is unusually wide. It all depends on your imagination, of course!
It could be a simple bookmark.
Or a summer bag.
You can use the split ring to create earrings or bracelets. The chain for a medallion of split rings also looks very delicate
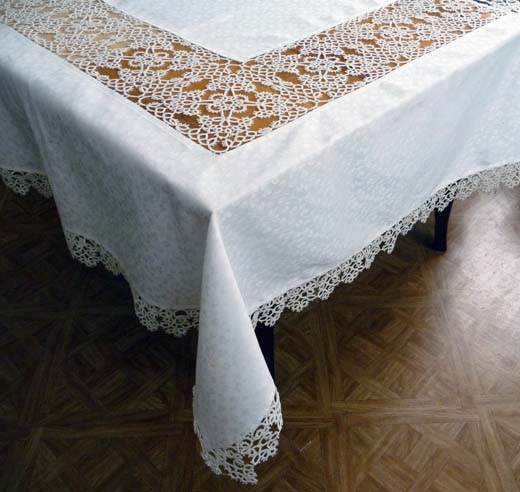
It is very common to use a split ring when making doilies. Pay attention to the beige squares. This pattern is made up of a combination of split rings.
Using Tatting Split Ring as an auxiliary element
This is my favorite way to use a split ring. Yes, it is the split rings along with the split chains that help me weave a multi-row doily WITHOUT cutting the threads between the rows.
This way I avoid endlessly hiding the thread tails. Are you still hiding the threads at the end of each row? Then try my method! You’ll like it!
I made a video tutorial in which I collected five methods for making a split ring: two methods for two shuttles, one method for one shuttle, one method for a needle and one method for a hook. Perhaps you know another way. Write about it in the comments, please. I hope you enjoy my video and choose one of the methods that is convenient for you. Welcome : https://www.youtube.com/watch?v=PuweruFd6Kw&list=UU3dn4_9pp7tIKA2k564wLBQ
And my new pattern from the collection “Romantic Geometry” is based on the use of split rings. Each square is woven without cutting the thread from beginning to end. It is very interesting and exciting!
Hello, everyone! I recently started a new project – creating a collection of small squares. Of course, everyone knows that a square is a geometric figure. And tatting lace, it seems to me, is a very delicate and romantic art. So I decided to name my collection Romantic Geometry.
Geometry (from the Ancient Greek: γεωμετρία; geo- “earth”, – metron “measurement”) is, with arithmetic, one of the oldest branches of mathematics. It is concerned with properties of space that are related with distance, shape, size, and relative position of figures.
Originally developed to model the physical world, geometry has applications in almost all sciences, and also in art, architecture, and other activities that are related to graphics. Of course, I could not help but use a beautiful geometric shape – a square. In addition, you can assemble a large doily of any size from small squares. To do this, you just need to attach the squares to each other. By the way, from several squares you can make a rectangle too, try it. I’m sure you will like it!
I am always glad to receive your comments and new subscribers. This means I’m not blogging for nothing. Your support is very inspiring to me. Thank you!
Hello, everyone! I’m sure many of my readers are not new tatters. And some very famous and skilled craftsmen of this handicraft. By the way, I am very proud of each of my subscribers! I am also grateful to everyone for supporting my blog.
Oh, why repeat the same thing, you ask. Of course, I don’t argue. So many videos show how to make a basic tatting node. Each master shows his favorite technique. Some people like the shuttle, others prefer the needle. Everyone may have a different method of tying the knot. I know many newbies can get confused not knowing what to choose. Therefore, I decided to collect in one video 4 methods of how to make a double stitch tatting.
Base knot with shuttle
The first method is for the shuttle. This method is the most ergonomic in my opinion. You will have to hold the shuttle with only two fingers at all times. Therefore, this method is convenient for small and lightweight shuttles. Or you have to take a break from work if your fingers get tired 🙂
The second method is also for the shuttle. But you can use this method with a netting needle quite successfully.
Base knot with needle
The third and fourth methods are for tatting with a needle. The only difference is the use of different fingers to form a knot on the needle.
You can choose any method, of course. But I advise you to learn everything. The more you know, the wider your possibilities are!
The perfect start to two-tone lace, or how to hide the threads at the beginning of work.
Hello, everyone! In today’s post, I want to tell you how I hide the threads at the beginning of working with two colors.
I’m sure you all know that in the beginning we may have several options. It all depends on the pattern, of course! With a product of one color, everything is simple. This is either a shuttle – a ball, or two shuttles. Although there may actually be three, four shuttles or more, I’ve tried it! But let’s not delve into the impenetrable forest, ha ha!
If we start working with threads of two colors, we usually tie two threads.
Perhaps, if the threads are very thin, this initial knot is almost invisible. But I know about him! Ah, my perfectionism does not let me get bored! At the end of the work, I tried to untie this connecting knot in order to tie, hide and cut two pairs of threads. So instead of three nodes, I got only two. But I didn’t like that either. In addition, hiding FOUR ends of a thread at once is not for me, I sooooooo really don’t like hiding threads. But of course you will not find “tails” of threads sticking out in all directions anywhere in my products, lol! Because I love the option when the threads are hidden during the weaving process. By the way, you can watch my video on this topic.
Ah, Mozart’s music is perfect for creating creative projects, isn’t it? Please write in the comments if you are hiding threads during work or only after the completion of the project.
But I’m a little distracted. Our theme is how to make the perfect start to two-tone lace. So, I don’t do the connecting knot at the start. I also hide both tails of the threads at once. At the end of the work, I connect the last element to the beginning with a crochet hook or needle. And in the end, I only have two tails of threads at the end of the work, which I hide with a sewing needle. Voila!
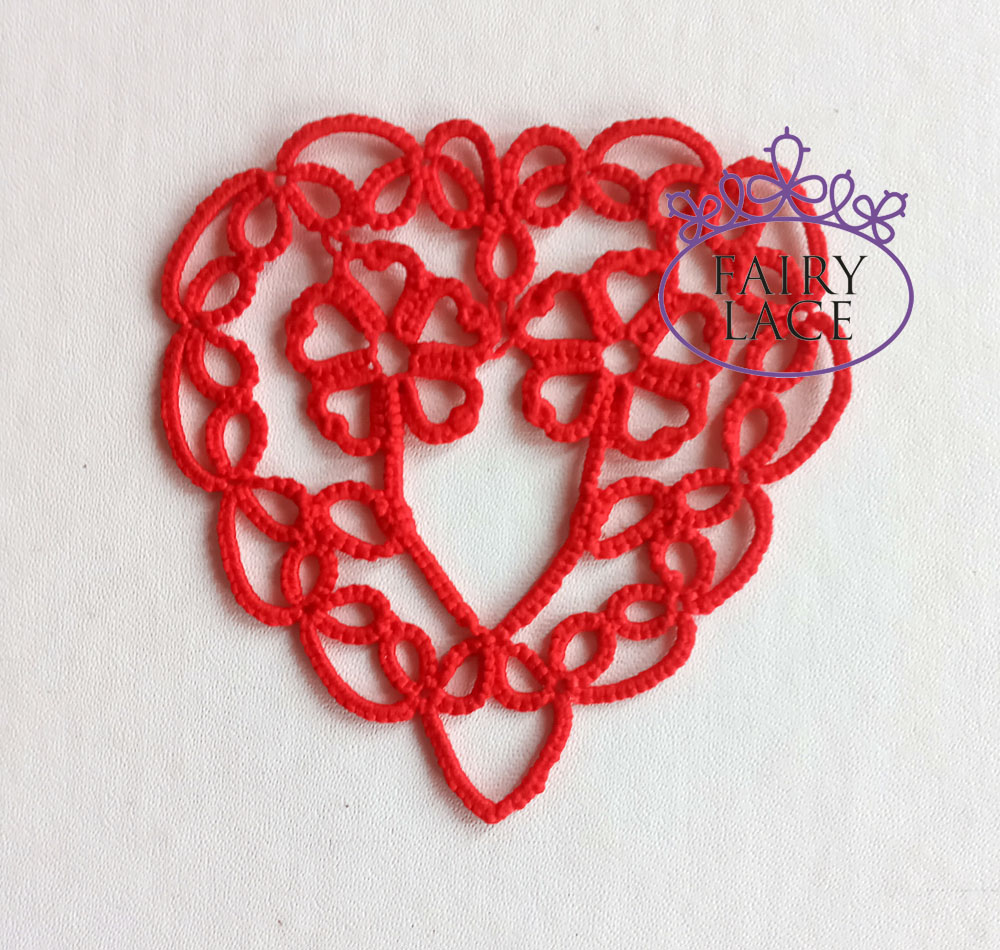
How to make acute angle in chain, or hearts are never too many.
Hello everyone! Thanks for the support of my blog and new subscribers!
I often ask you to write in the comments what you would like to learn new about tatting. This helps me a lot when looking for topics for the next post. Because when I answer your question, I firmly believe that this topic excites you. Here’s one new question from my customer: how to make acute angle in tatting. And as usual, I made a video for three tatting methods: shuttle, needle and hook. Watch my video and come back.(I hope you will continue reading until the end!) https://www.youtube.com/watch?v=3Z4e9CiW4uY&list=UU3dn4_9pp7tIKA2k564wLBQ&index=1
Why do you need acute corner in lace? Oh, I can talk for hours about new methods, new shapes, new tools! Yes, I love to learn new things. And you? Classic tatting patterns of rings and arcs are beautiful (almost always). I agree, of course. But sometimes there is a need for stylization. For example, if I am making a heart pattern, I cannot do without a sharp corner. Otherwise, the pattern will not be perfect.
I have created a collection of hearts. And in my opinion, these hearts look pretty cute 🙂
How to make acute angle in chain
You can buy a pattern for each heart separately in my store. Or buy three patterns together at an attractive price, welcome! https://fairylace.kozinenko.com/shop/
How to make acute angle in chain
Subscribe to my blog, comment, ask questions. Believe me, I try very hard to make my posts interesting and useful!
I try very hard to create a new project every week, do you remember? And now I am very interested in the possibility of combining long picot. Because, this is extremely exciting, believe me!
I plan to create a small collection of patterns using long picots. So, I wrote in a previous post about the first pattern in this series. I called this napkin “Mandala.”
In the next model, I combined picot of different lengths. It turned out interesting. This pattern is not for beginner tatters, of course. But we must always evolve, right? I simply have to try new tricks, new methods. Because I feel how each new knowledge increases my self-esteem. Yes, don’t be surprised. I am also sure that the long picot in the new doily creates lightness and airiness. You know that these properties are especially appreciated in lace. Do you agree with me?
I hope you appreciate my new job. And I would like to know if it is worth creating a collection of such napkins? If you write your opinion in the comments, I will be glad 🙂
So, this is what my new doily looks like. Again, I am at a loss in choosing a name, alas 🙂 I will try to make instructions as soon as possible (maybe by the end of the week). By this time I should come up with a name as well.
Every week I try to make a new project. Alas, this does not always work out. If the project is small, it is quite possible to create a tutorial in one week. But I need to try very hard, I assure you!
Sometimes, to fulfill an idea, I need to come up with new ways, new methods. I also try new unusual tools with pleasure! This week’s project is a small Mandala doily. I recalled all the methods that I know to do perfect join. The lack of extra knots gives this doily absolute openwork and airiness. Do you agree? https://fairylace.kozinenko.com/product/tatting-pattern-doily-mandala/
Perfect join tatting
So, 12 ways to connect a chain with a long picot. You can watch the video on my YouTube channel. Perhaps I am not entirely accurate in terminology. If you know the exact name of each parameter, leave a comment on the post. Also share if you know any other method. It will be interesting and useful! https://youtu.be/qWPPlAbps5I
Method 1, for the shuttle.
This is the easiest way. You pull shuttle thread into a long picot. Pass the shuttle into the new loop and tighten the thread. But the node that is formed by this method, alas, does not suit me.
Method 2, for the shuttle.
This method is similar to the first, but in this case, a loop creates a thread ball.