In this article I will try to tell in detail how to make Floating Rings. Oh, what a romantic name this element has! And although this verse is not about needlework, there is a mention of these rings here: Friday Saturday rags of clouds floating rings driven through the sky and fluorescent halos celestial laundry tossed. Where did I find this? You will not believe! On Amazon, haha. This is a quote from the poetry textbook “Unlocking the poem” by Ottone M. Riccio and Ellen Beth Siegel. Yes, yes, don’t be surprised. Turns out there are textbooks for everything you want to learn. You just need to be able to “enter the correct search words.” That’s what my eldest son says. He is Principal Solutions Architect and Google Cloud Certified Fellow. Therefore you can believe him, I assure you!
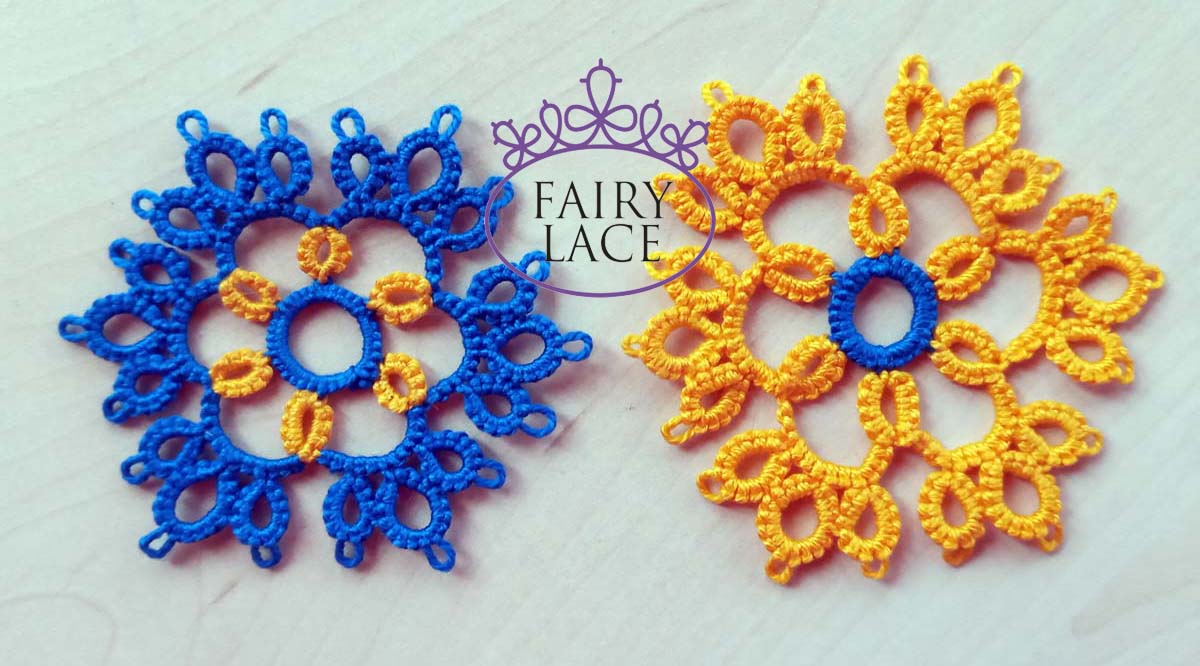
So, from the novel, let’s move on to practice. Let’s make a little round motif. For clarity, I made a graphic diagram and filmed a video lesson. And of course, instructions with videos are made for shuttles and needles. That’s right, in plural. Because to perform such an element you will need two shuttles or two needles. By the way, please note that the needles must be the same thickness.
Please don’t forget to subscribe to my blog, comment and share on social media. Your help and support is very important to me. I will also be grateful for any charitable contribution to my Paypal: fish20085@gmail.com
Vintage buttons. Tips for beginner tatters. Part 4 , or how to add a beautiful button to a tatting pattern. Part 3 of my articles for beginning tatters can be read here: https://fairylace.kozinenko.com/tips-for-needle-tatters/
Hello everyone! I’ve recently been organizing my craft supplies. Ah, I have to do this from time to time! To you too? And among the three kilograms of buttons, I found several pieces that interested me.
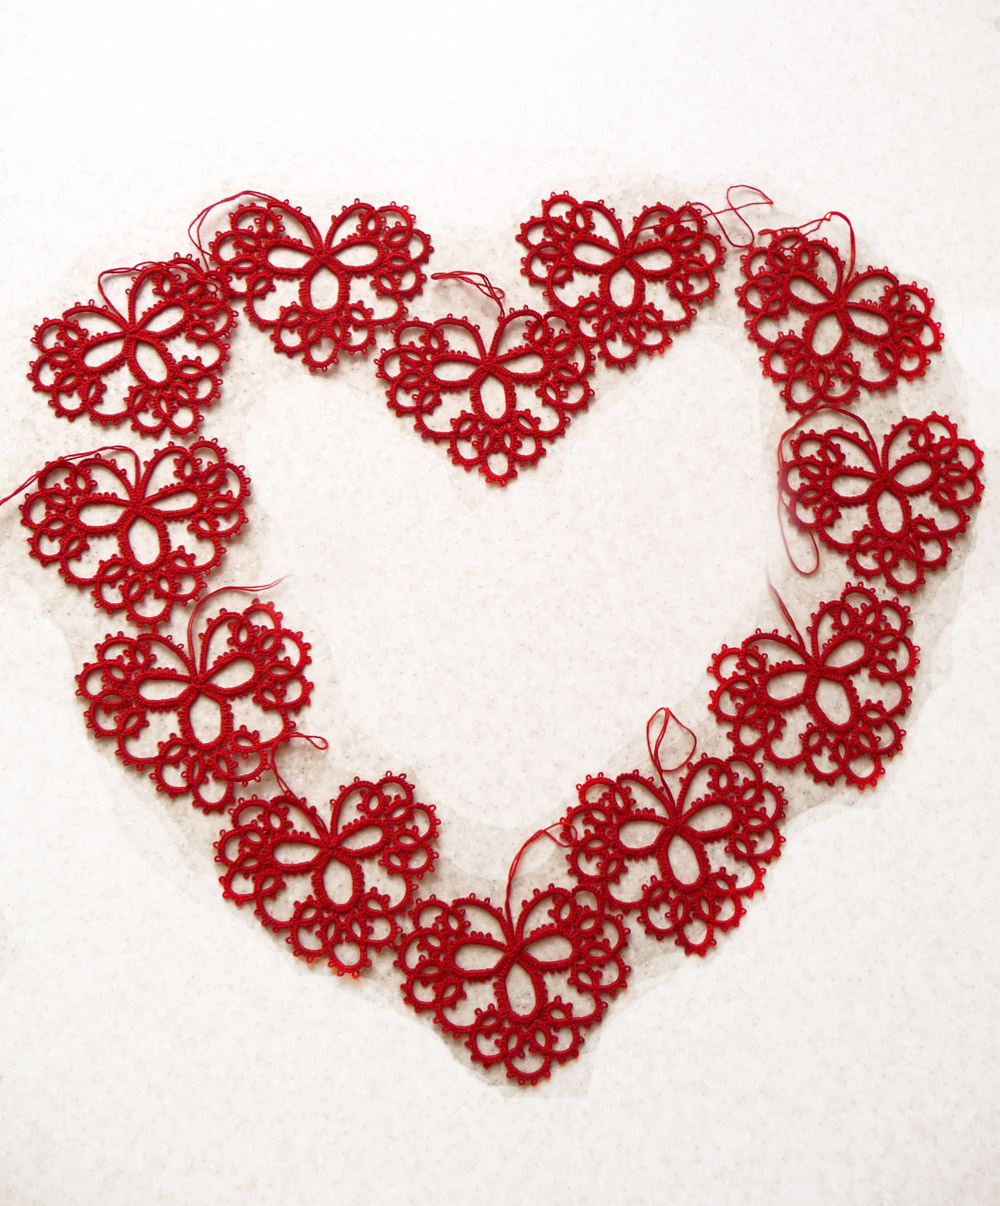
Often I have seen round buttons added to tatting patterns. I made such a heart (this was 12 years ago).
But these are rectangular buttons. Can they be used? Why not?
As usual, I didn’t stop at shuttles only. After all, for those who tat with a needle, it is also interesting to make a small brooches with a vintage buttons. Do you agree? The pattern is very simple. Because the main thing in this pattern is the rectangular button!
Use a crochet hook when making connections. Choose a hook that will fit easily into the button hole.
Of course, if the buttons are dirty, they need to be washed and dried.
As you work, try to tighten the loops inside the button tightly. Otherwise, the button will not be firmly secured in the middle of the pattern. But we don’t want the buttons to “dangle or float” in space!
Another important point. Try to ensure that the threads on the button lie parallel and do not twist with each other. This will make your work look neater.
When watching a video please note that I respect the front and back sides when weaving. It seems to me that in this case the picots look more beautiful.
The two motifs are made with the same threads and the same pattern. But with the shuttle and needle ready, the motif turns out to be of different sizes.
Please don’t forget to subscribe to my blog, comment and share on social media. Your help and support is very important to me. I will also be grateful for any charitable contribution to my Paypal: fish20085@gmail.com
More and more hearts, or how to make a cute gift for Valentine’s Day.
Hello everyone! Valentine’s Day is literally around the corner! I want to congratulate everyone on this lovely holiday. Of course, not all countries celebrate this day. But it seems to me that this is a great opportunity to say words of love and gratitude to everyone who is dear to us!
If you allow, I will share my tricks on how to make a heart neat and symmetrical.
Firstly, don’t make the double stitches very tight, this will make your task easier when tightening the ring. Secondly, you can use the braiding method with a large loop in the middle of the Heart. This is especially useful if you are using thin threads. Third, if you tat with a needle, make the heart in two parts. By the way, for connecting picot in this case it is better to use a hook rather than a needle.
When I made three versions of hearts, I got the idea to connect them together. I made a “braid” from the tails of the threads and got a “Three Leaf Clover” from the hearts. I hope you like this idea!
Today I want to answer one simple question. How to make three rings “without a hole” between them? I write “three rings” because I don’t know how this element is designated in different languages. In Ukrainian, for example, it is called a trefoil.
By the way, if your language is not in the list of built-in translators on my website, write to me in the comments. I will try to add the language you need. And I would also be very interested to know what country you live in when reading my blog. Can you write this in the comments please?
So, excuse the “lyrical digression”, I continue talking about the three rings. Although you can call this element Clover. On the ABC Tatting Patterns website there is a definition of Clover. I copied the paragraph, but you can follow the link and read it yourself. By the way, this is a wonderful resource not only for beginners, but also for experienced tatters. https://abctattingpatterns.com/terms/
Three rings, or Clover
Clover consists of three successive rings grouped together. The central ring may be larger than the side rings. It looks like a shamrock. However, the rings in a shamrock are the same size.
When working with shuttle tatting, this problem does not arise. Of course, if your knots are not “loose” , but neat. And when tatting with a needle, we can get such a picture. Do you see the hole?
Of course, I never tire of repeating that tatting is an art. Therefore, ABSOLUTELY ALL methods and techniques are acceptable. What the end result looks like is the master’s right to self-expression. Perhaps you have come up with a pattern that requires just such a Clover!
However, we are improving all the time, aren’t we? To do this, we must master new skills and techniques. The more “tools” we have in our arsenal, the more opportunities we get to implement our wildest projects! Oh, I just want to say: like it if you agree with me!
With and without rewerce of work
If you read my post about how many simple knots to make in work, you remember that there is a rule for ease of remembering. One knot means rewerce work, two knots means do not rewerce work. When we make three rings in a row, we make two knots after the first ring (do not rewerce work), then two knots after the second ring (do not rewerce work again). And after the third ring we have two pattern options. So, it depends on the design.
If we don’t rewerce work, we make two knots. But after the first knot, you need to pull the needle and thread into the base of the first ring and then make the second knot. If we need to rewerce work after Clover, then we make one knot. But (attention!) Before the knot, you need to pull the needle and thread into the base of the first ring.
I hope you found it useful and interesting to read and watch! Subscribe to my blog. Write in the comments what questions about tatting you would like answered. I will be happy to help with tips!
I admit, I’m a little discouraged. The previous article was read by 156 visitors (according to site statistics). And only ONE left a comment. Perhaps my article was not useful and interesting? Therefore, I doubt whether it is worth continuing this topic.
Or you don’t know how to leave a comment? It’s very simple! Scroll UP the screen. Click on the word “Comments” above the article title.
When you go down, you will see a window for your comment.
Believe me, your feedback is very important to me. Because it helps me make the site more interesting and useful. And also your comments will raise my site in the search rankings. This means that more beginner tatters will be able to find these articles. Sorry for going off topic and thanks in advance for your support!
Front and back sides of tatting
Have you noticed the placement of the “caps” above the double stitches? On the front and back sides their location does NOT match. Although from both sides it looks absolutely identical. I’m sure there are special terms in English for these “things”. But I don’t know them, sorry. I hope you understand what I mean.
Therefore, you can determine the side by picots. It’s very simple. Take a close look at how the two picots are located relative to the chain. The difference is very noticeable, isn’t it? On the left is the picot that is obtained on the front side. On the right is the picot, which is obtained on back side.
If you turn your work over and continue to do double stitches in the usual way, you will end up with a “picot mix.” In this case, it will be completely indifferent which side is which. This is probably not critical! But only as long as you weave with single-color threads.
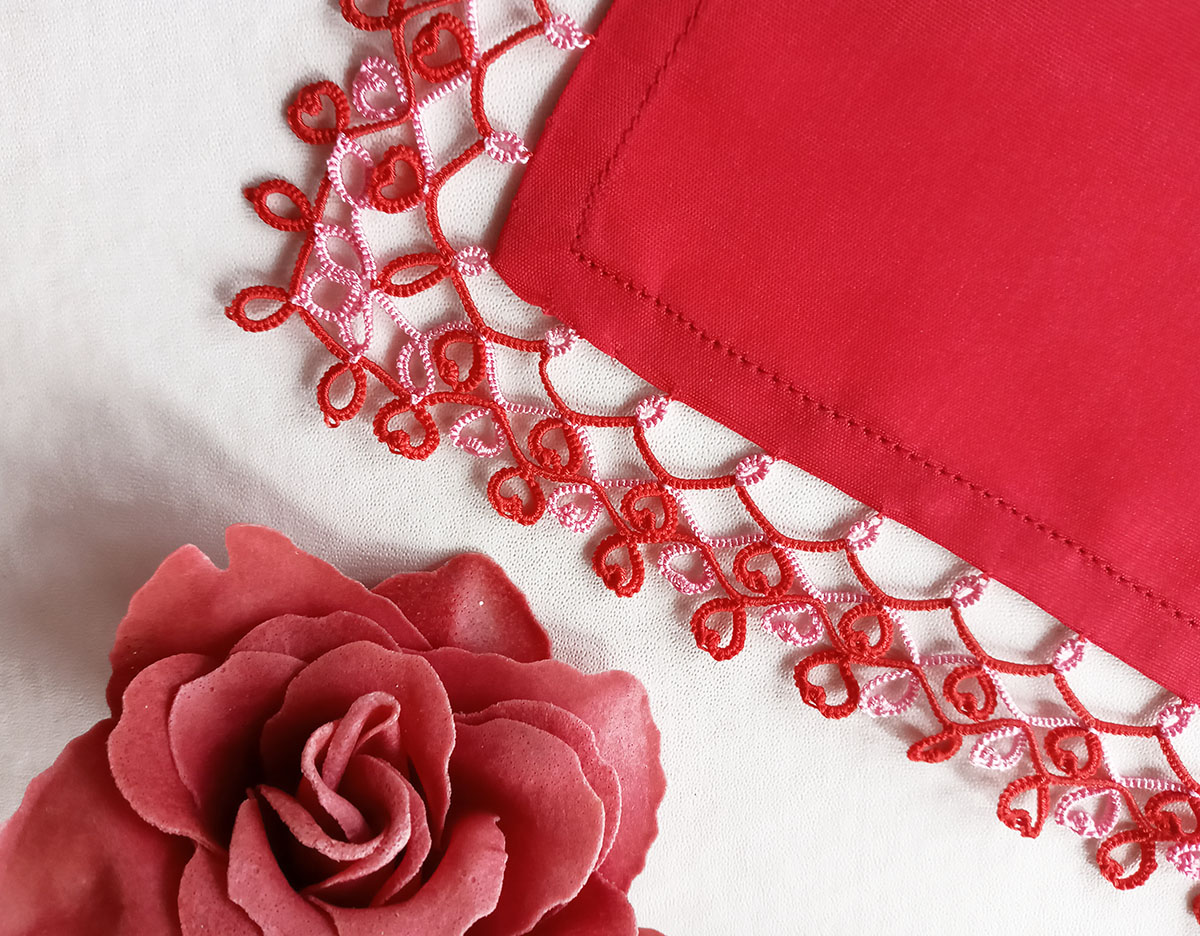
Look what we get when working with threads of two colors. When two rows are joined on one side, small stitches of a different color are obtained. Imagine what your work will look like if small multi-colored stitches peek out from all sides. Again, this is not dogma, but creativity. And any of us can say: I am an artist, I see so! In any case, the choice is yours!
I’ll tell you how easy it is to switch to the front and back method. It’s sooooo simple. When you turn the work to the opposite side (we already know how to distinguish both sides!), you weave double stitches in the reverse order. That is, first you need to do the second half of the stitch, and then the first. As always, I made a short video demonstrating this technique. This video demonstrates the method for needle tatting. But for the shuttle the reception is absolutely identical. https://www.youtube.com/watch?v=QGF8pzR3tJk&list=UULF3dn4_9pp7tIKA2k564wLBQ Please don’t forget to come back after watching and leave a comment!
Tips for beginner needle tatters. Part 1, or simple and clear rule for when and how to reverse the work.
Hello everyone! The most frequently asked questions beginners:
to do or not to make a knot after a ring or chain?
how can I know whether to reverse or not reverse the work?
how can I find out the front and back side of the work?
why do my chains get twisted?
And of course, there are many other points that I will try to talk about in my blog. To achieve this, I plan to write several posts and make additional videos specifically for needle tatters. So subscribe to my YouTube channel and my blog to stay updated. So today we will answer the first two questions.
To do or not to make a knot
Unlike the shuttle, tatting with a needle is not as tight. Therefore, after completing each ring or chain, the needle tatters make a knot that helps “keep the shape” of this element. In the post “Magic Simple Knot” I wrote about ball and shuttle threads (in this case it is more logical to call them ball and needle threads). The names may differ in different languages, but the meaning is the same. And in this post I call a simple knot a magic one because it helps us “solve a lot of problems”! https://fairylace.kozinenko.com/magic-simple-knot/
So, we have decided. The answer to the first question is yes, you need to make a knot!
Reverse or not reverse
Typically, in the instructions for the pattern, designers write, RW or DNRW. Although I only write where I need to turn the work around. It is logical that if nothing is written, then there is no need to do anything. Do you agree? But if you only have a graphical diagram, you will have to decide for yourself where and how to flip, rotate, or expand the work. An impossible task, isn’t it? But we will return to this topic, I promise!
So, you know, the ball thread should ALWAYS be located to the left of the work. But this is only if you are right-handed. For “lefties” it’s the other way around!
If you make one simple knot, you will swap the ball and working threads. And thus the ball of thread will move to the right of the work. Therefore, the work needs to be turned over and each thread will take its place. And if you make two knots, the threads will remain in the same position and there is no need to turn the work over.
So, the golden rule: one knot – turn, two knots – no turn! I find this very easy to remember.
And if you are interested in the topic “Tips for beginner needle tatters”, write me your questions in the comments. I will try to answer them in the following articles.
Mission impossible, or the suffering of a perfectionist.
Hello everyone! Today I want to tell you how I created a small heart with great love. Because for painstaking work, you really need to love your craft, the people for whom you create your products and nature, if we want to save our Earth.
So, I once again decided to “recycle” at least part of my supplies. Because I realized that my craft supplies are filling up faster than I’m using them. I’m sure many craftswomen will understand me! Now it’s the turn of old men’s ties. Oh, I have a collection of about 50 pieces! And I decided to sew small hearts. I counted four reasons to do this. Firstly, it will free up space in my workshop. Secondly, I will give a second life to things (recycling helps us conserve natural resources). Thirdly, no one will wear these ties because they are out of fashion. And fourthly, it’s just beautiful! Oh yes, there is a fifth reason. I don’t like doing the same thing over and over again. So I decided to turn on my imagination 200%! After all, I can change color combinations, finishing stitches, and patchwork patterns as I please.
And then I realized how difficult it is to work with thin small pieces of silk. The edges of the patches literally form a fringe. The fabric “flows” between the fingers. The texture of each tie differs in the interweaving of fibers and density. In other words, “mission impossible”? It looks terrible. Calm down, don’t panic! By the way, I watched all 5 films with Tom Cruise and came to the right conclusions, LOL
Through trial and error, I found an algorithm of actions that led to an almost ideal result.
FIRST STEP
Open and iron ties.
SECOND STEP
This is the most pleasant and at the same time the most crucial moment. You need to select the necessary components. Three ties and a piece of matching felt, polyester thread for embroidery, cotton thread for sewing and thread No. 10 for knitting. If all this does not combine well, the result will not please us.
THIRD STEP
Embroider words on felt. I liked “From Ukraine with Love”. It sounds beautiful and conveys my feelings.
FOURTH STEP
Cut the ties into strips and assemble the patterns.
FIFTH STEP
Sew all seams. I used a special clear sewing foot to ensure that the seams ran parallel to the pattern on the pieces of fabric. By the way, in order not to “sew on my fingers,” I use a wonderful tool – a thimble (I don’t know what it’s called correctly). Very convenient and safe!
SIXTH STEP
For the hearts, I made a transparent template from plastic. I cut out the hearts and felt according to the shape of the template with an allowance of about 1 cm on all sides. I glued an embroidery stabilizer to the reverse side of the silk piece with an iron. Alas, it later turned out that this was not enough! So I first applied double sided fabric tape around the edges and then added embroidery stabilizer.
SEVENTH STEP
Now you need to make finishing seams at all joints. It’s so good that my wonderful Bernina performs 1131 decorative stitches! But at the same time it makes it difficult to choose, haha! By the way, I used a special foot to help me stitch exactly into the seam.
EIGHTH STEP
Now you can finally connect the silk piece with the felt lining.
NINTH STEP
This stage consists of several operations. First you need to trim off the excess fabric and felt very close to the stitching. Then sew a medium-density overcast stitch along the edges. If the result is not very good (and I am almost always unhappy!), use a lighter to burn the edge. Here you need to act very carefully so as not to spoil the main fabric and threads. I also had to make sure that my assistant didn’t burn his paws with a hot lighter!
TENTH STEP
Sew an overlock stitch along the edge one more time. But this time the seam must be very tight to get a perfect edge.
ELEVENTH STEP
All that remains is to crochet the cord, tie a bow and sew it to the heart. Of course, you could just take a satin ribbon. But I think a handmade knitted bow gives the composition a special “cuties”!
I liked the first result so much that I decided to make several options. I’m sure no one will say that this “mission impossible”! I hope you like my idea. Ready-made hearts are available in my store: https://fairylace.kozinenko.com/product/from-ukraine-with-love/
Variations musical and more, or how music inspired me.
Hello everyone! Do you love classical music? Even if you prefer modern popular music, you have heard the name Beethoven anyway. I’m not talking about the famous St. Bernard dog, LOL, but about the great German composer Ludwig van Beethoven. In any case, in the old days, many people had the ringtone “Fur Elise” by Beethoven on their phones. And all beginning pianists try to learn at least the beginning of the “Moonlight Sonata”. The first part of the sonata (Adagio sostenuto) was called “lunar” by the music critic Ludwig Rellstab in 1832 ? By the way, this happened already 5 years after the author’s death – he compared this work to “moonlight over Lake Firwaldstät.” This sonata has No. 14 and is dedicated to Giulietta Guicciardi. Oh, what a sad love story!
Variations musical and more
Amazing Variations musical inSonata 32
Beethoven created 32 piano sonatas. I assure you, EVERYTHING is there! You hear the influence of the Viennese classics in the first sonatas. Then you are amazed at the drama and tragedy conveyed by the composer. But the last sonatas are something incredible (in my opinion)! Oh, I’m just in love with Beethoven’s last sonata. Because we hear many unexpected solutions in it. And I love non-standard and fantasy!
First, this sonata is in two movements, a rare exception in classical sonata form. Secondly, listen to how the definition of tempo sounds: Adagio molto semplice e cantabile. That is, very calm, simple and melodious. Thirdly, Beethoven wrote this sonata in 1821-1822, being already ABSOLUTELY deaf. This is incredible! And fourthly ( icing on the cake! ) – for the second movement Beethoven used a theme with five variations and a coda , ta-daaa! Although, I am sure, the complexity of the form is compensated by the “simplicity” of C major. What am I saying? Romanticism, jazz, swing – everything is here! Or is it just me? Hear for yourself how it sounds! https://www.youtube.com/watch?v=ccyHT1sFmsg
And I also learned an interesting fact. In Thomas Mann’s novel Doctor Faustus, in one of the scenes the hero performs Beethoven’s 32nd Sonata. And then the hero delivers a big monologue about the hidden meaning of this music.
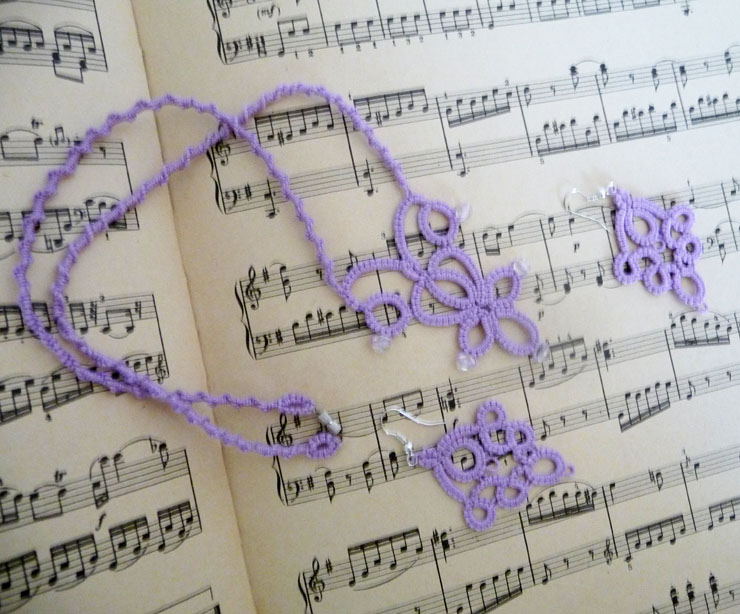
“Variations” garland
Now I’m sure you will understand my delight and inspiration! I called my new project Variations. Of course, I’m not as talented as Beethoven. But I tried to implement non-standard and original techniques and forms in small snowflakes. Did I succeed? What do you think? Write to me in the comments please. And also write, are you interested in learning new things not only about tatting? But also about variations musical and more, and more, and more…
No shaggy tails, or carefully hide the ends of the threads at the end of the work.
Hello everyone! I recently learned that not all beginning taters hide the tails of the threads at the end of the work. They just weren’t taught! Ah, that’s a terrible omission. Yes, usually the instructions say: tie and cut. Where is the word “hide”? Gone, LOL! Therefore, today I invite you to go back to the beginning and talk in detail about this topic.
So, why do you need to hide the ends of the threads? Firstly, shaggy thread tails will look sloppy. And they will become shaggy very quickly, believe me! Secondly, by hiding the tails, we additionally secure the final knot. It is very important. After all, if the knot comes undone, we will get a disaster!
Try to hide your tails in different directions. For example, on different sides of the ring or in two different chains. This will help you avoid unnecessary thickening of the elements. It is also easier to pull one thread through the middle of double stitches rather than two.
I made a description of seven ways to hide the ends of threads. Some differ from each other only in the tool I use. But other options are possible, of course. Therefore, try, create and choose the method that is convenient for you. In addition to the instructions, I made an illustrative video. Hope this is helpful. https://www.youtube.com/watch?v=D8kVsN70EF4&list=UULF3dn4_9pp7tIKA2k564wLBQ
Method 1
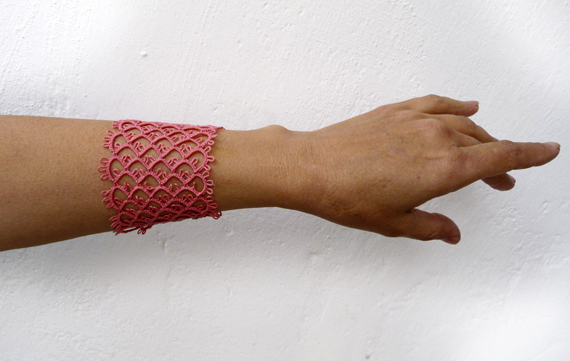
You hide the ends of the threads with a sewing needle, sewing a seam over each double stitch. This method is the simplest, but not very reliable. It can be used if you do not need to wash the product. And, in addition, strong fixation will be required so that the tails do not “crawl out of the seam”. For example, for earrings or bracelets made of thin threads.
Method 2
Here we also use a sewing needle. But we don’t sew stitches, but hide the thread with a needle in the middle of the double stitches. It is enough to insert the needle into 3-4 double stitches. This method is fast. But if your knots are too tight, you will have to use small pliers to pull the needle out of the double stitches.
Method 3
Absolutely identical to the previous one. But we pull the thread with the needle into each double stitch separately (or even half a stitch). If the weaving is very dense, then this method is ideal, although not as fast as the previous one. By the way, don’t forget to protect your fingers with a thimble when handling the needle.
Method 4
For this method, I suggest using a thin wire bent in half. I call this wire the “magic tool”. Using wire, you hide one tail of the thread into the chain. And you “sew up” the second tail using a needle using method 2 or 3. And you can read about additional tools for tatting in my article here: https://fairylace.kozinenko.com/additional-tools-for-tatting/
Method 5
You can do the same thing by using an additional piece of thread instead of wire. In the video you will see how you can quickly and easily hide additional thread inside double stitches using a shuttle.
Method 6
This method is convenient to use if the pattern ends in a ring. In this case, at the beginning of the pattern (if it starts with a chain), you can use a small piece of additional thread or a paper clip. This will make it easier to connect the last chain before starting work. In the first 4-5 double stitches of the ring, hide the first tail (if the tail is long enough, you can tie it to the shuttle, it will be more convenient). Weave wire into the last 4-5 double stitches (as in Method 4). Form a ring and secure the second tail with a knot. And pull this tail through with wire.
Method 7
You hide both tails in one chain (or ring) at the same time. I only recommend using this method if you have weak double stitches. Because it is very difficult to pull two tails through double stitches at once (after all, the tails will be folded in half). And besides, such a chain will look noticeably thicker than the other elements.
I hope my long article did not bore or frighten you. Comments, questions, advice are welcome! Careful tatting and no shaggy tails!
What is cro-tatting, or do tatting masters deserve poems?
Hello everyone! I want to say Wow! No not like this. Wow Wow wow! This is my cry of joy and pride. And we especially need these positive emotions in this terrible time.
I want to thank the editor of Simply Crochet magazineAlison Maney ( link to the magazine website: https://www.gathered.how/magazines-simply-crochet/ ) and blogger Rebecca Parker ( https://beccaparker.journoportfolio.com/ )for their support and help in popularizing cro-tatting. Of course, it was very difficult for me to talk about such a rare, but very interesting type of tatting in a short interview. Because I am equally passionate about three types of tatting and am ready to talk about them for a Thousand and One Days (almost like Scheherazade!). Besides, I always forget that brevity is the sister of talent, LOL!
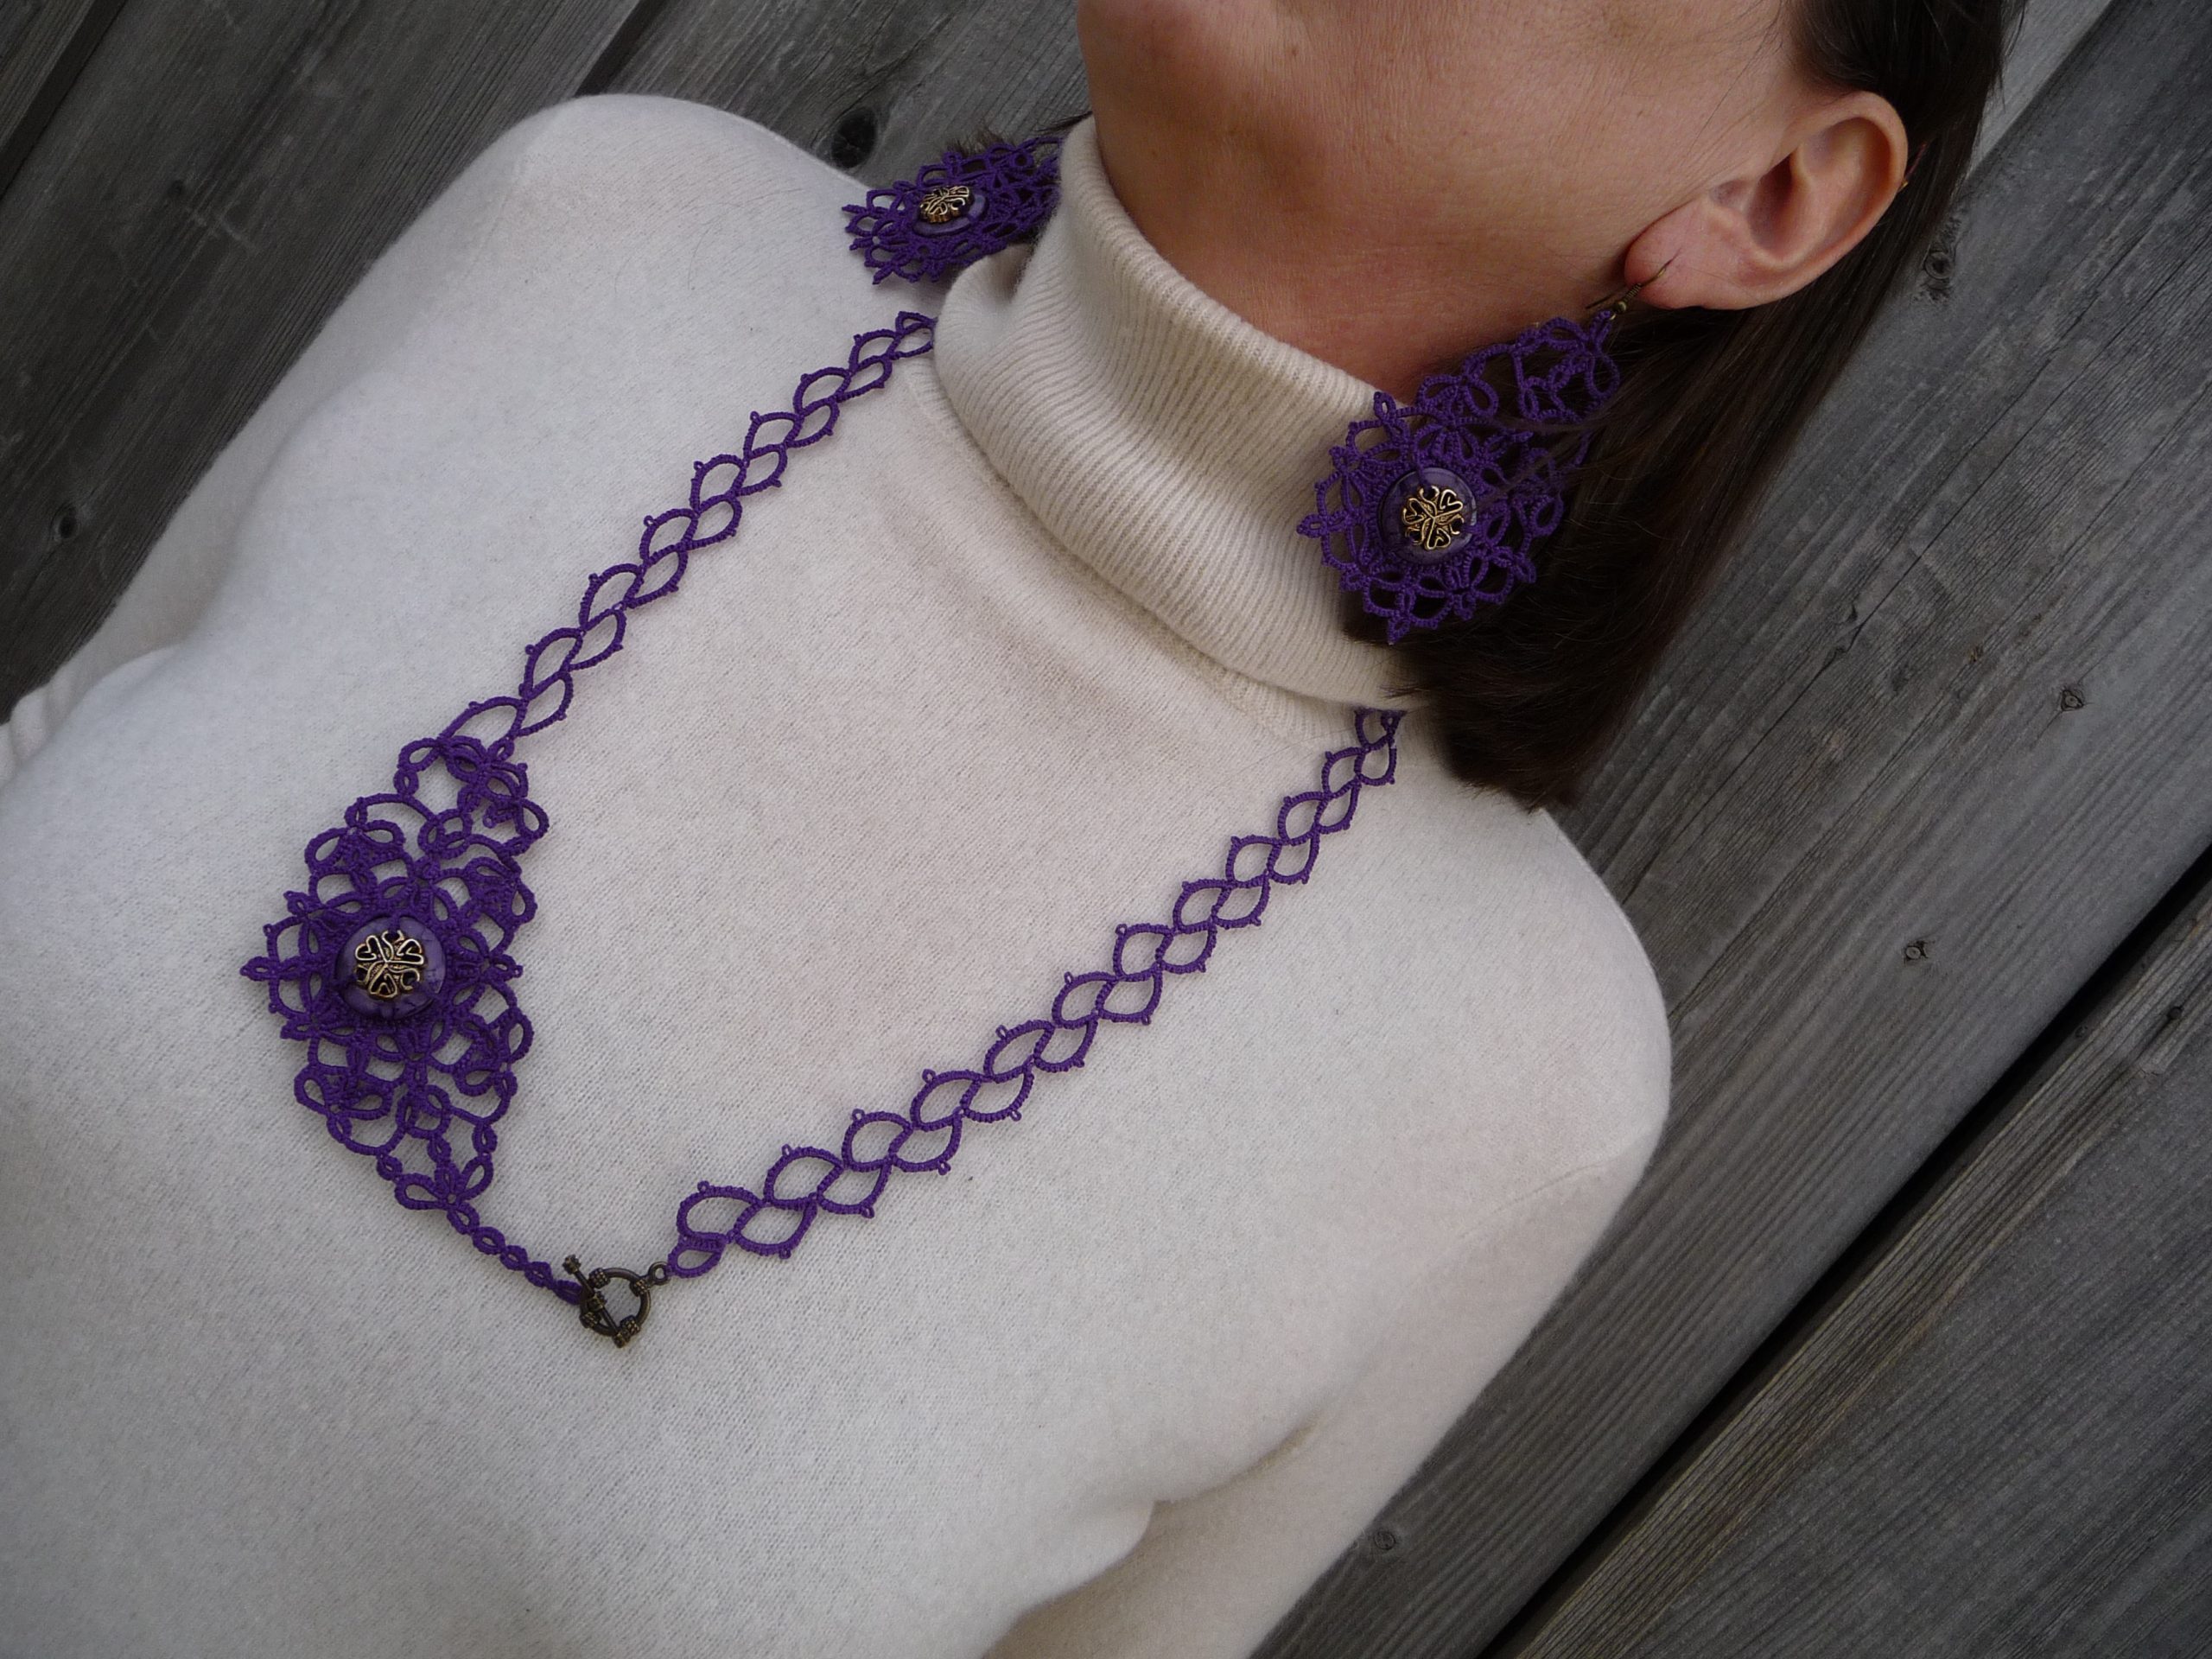
By the way, the article is called Crochet’s Quirky Cousins. You can read about Tunisian, Bosnian crochet and cro-tatting in this article. And also look at photos of the works of talented masters of their craft. You’ll understand why I’m proud. After all, it is a very honor to be in the company of such talents! Also I hope my subscribers recognize photos of my work!
Magazine pages with my cro-tattingworks
What is cro-tatting
I am also glad for this publication because cro-tatting is undeservedly deprived of attention from tatting and crochet masters. So, how can I briefly say what cro-tatting is? This is a symbiosis of crocheting and needle tatting. And it would be fair to put this type of lace making on a par with the rest of its sisters! Do you agree?
And not just publications in magazines. But also poems should be written about tatting! Agree, the lines from Guido Gezelle’s ode to a lacemaker sound very beautiful. “I love to watch you making lace…” I was very interested to learn about the work of this unusual author, a monk who wrote poetry in the Flemish language. And then I thought, maybe there is a poet who will glorify the masters of the shuttle, needle and hook? Alas, I do not have such talent. But for now I can shoot a video where you will see the beauty and grace of this wonderful type of needlework! https://www.youtube.com/c/ElenaKozinenko
I always welcome your comments. Follow me on social networks. And don’t forget to check my store, welcome! https://fairylace.kozinenko.com/