Posted on 6 Comments

How important is the right choice

How important is the right choice

How important is the right choice.

Hello everyone!

Yes Yes! You know, of course, that the right choice is very important in life. Oh, it’s not easy, of course. We are constantly faced with various difficulties and problems. Is not it? What dress to wear? Which movie to watch? And which university to apply to? Or which job should you choose? So many, many, many different questions. Of course, there are significant or simple questions. But we are very afraid to make a mistake. I asked myself a question. Why is the right choice so important? Probably because the final result depends on my choice. I understand that sometimes someone’s life and destiny depend on the right choice. But sometimes the choice doesn’t big really matter. In fact, is there a difference what color of shoes I wear today? Ha ha!

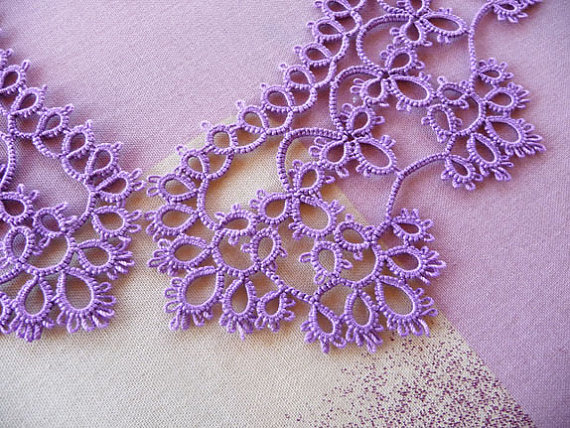
However, imagine that you wanted to order a white tablecloth, and the seller sent you a blue one. However, imagine that you wanted to order a white tablecloth, and the seller sent you a blue one. Will you be delighted in this case? I’m sure you will be upset. Of course, when a master makes a product to order, he discusses all the details with the buyer. And here everything is clear, although sometimes it is not easy! But it often happens that I just embody my idea. I need to materialize my inspiration. And in this case, my choice is very important, I think.

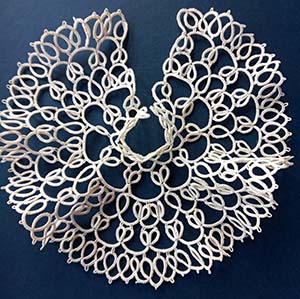
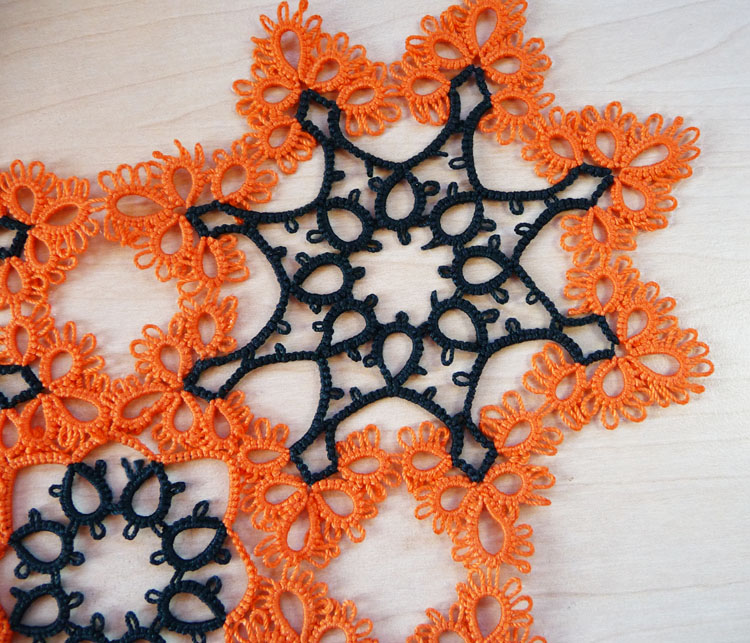
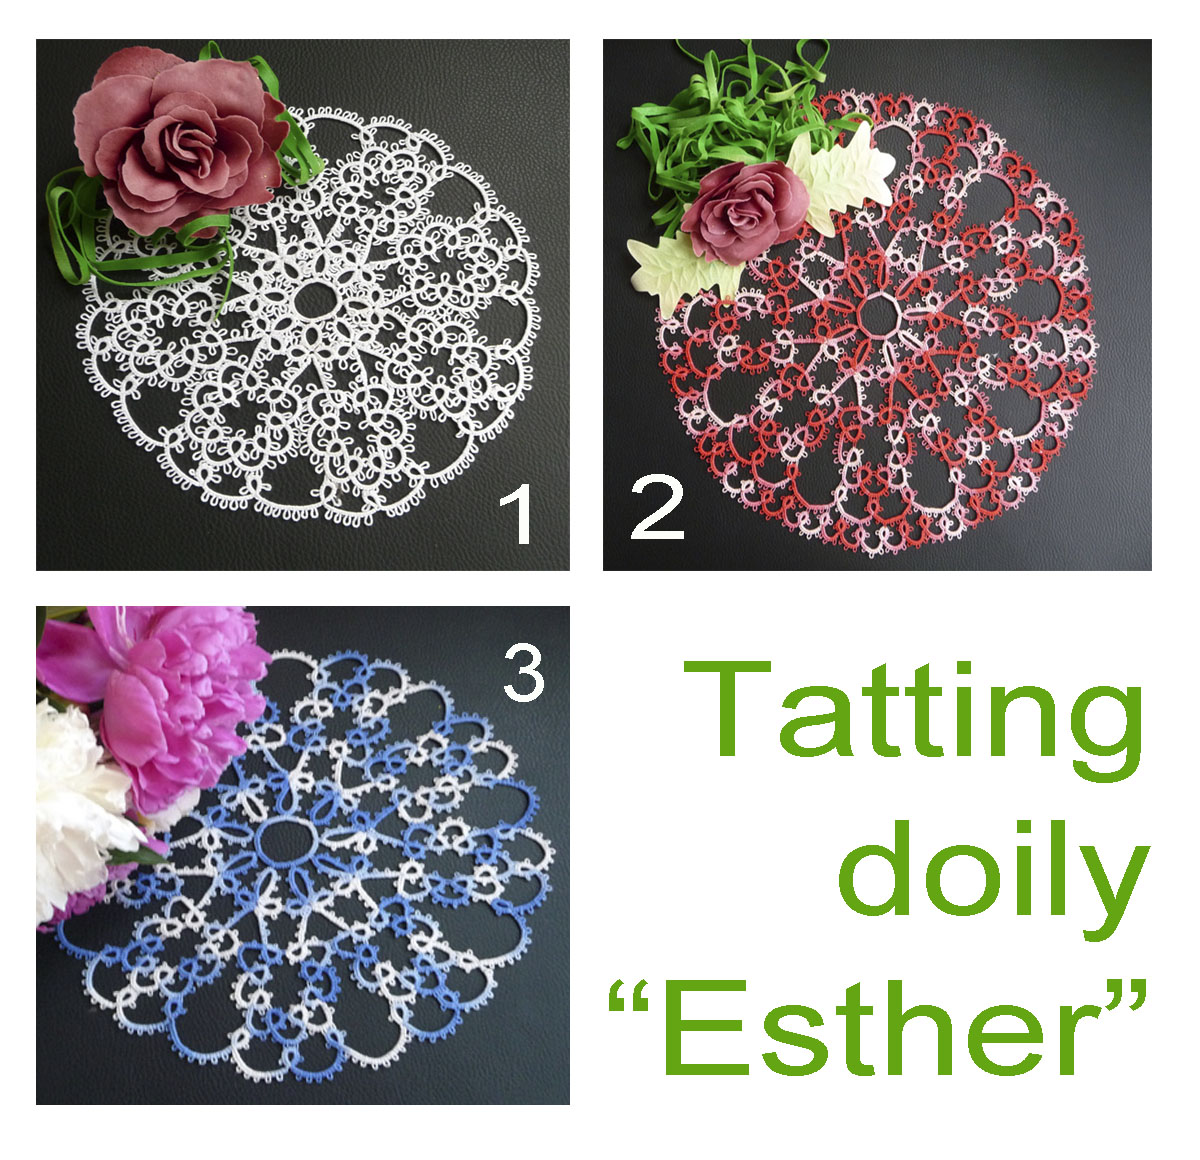
After all, my creation should be liked by “viewers”. Ideally, I would like to cause complete delight, of course! (this is immodest, ha ha!) . But you can’t guess all the tastes. Therefore, I sometimes make several versions of the product. For example, look at Esther’s napkin. Which option do you like best? Write in the comments, this is very welcome!

I suggest you make your own version according to my tutorial. Welcome: https://fairylace.kozinenko.com/product/doily-esther-tatting-pattern/

Also don’t forget to check my YouTube channel: https://www.youtube.com/watch?v=7PTRzbOJEfc&list=UU3dn4_9pp7tIKA2k564wLBQ&index=2

Subscribe to my blog. Comment and ask questions. I will be happy to help with tips! Have a nice weekend! I hope you make the right choice and have fun these days!

Posted on 4 Comments

Long picot in a new doily

Close-up of hands tatting with shuttle and picot gauge, showing the technique for making long picots in a new lace doily — by FairyLacefromElena.

Long picot in a new doily

Hello everyone!

I try very hard to create a new project every week, do you remember? And now I am very interested in the possibility of combining long picot. Because, this is extremely exciting, believe me!

I plan to create a small collection of patterns using long picots. So, I wrote in a previous post about the first pattern in this series. I called this napkin “Mandala.”

And the Mandala pattern is already on sale, welcome: https://fairylace.kozinenko.com/product/tatting-pattern-doily-mandala/

In the next model, I combined picot of different lengths. It turned out interesting. This pattern is not for beginner tatters, of course. But we must always evolve, right? I simply have to try new tricks, new methods. Because I feel how each new knowledge increases my self-esteem. Yes, don’t be surprised. I am also sure that the long picot in the new doily creates lightness and airiness. You know that these properties are especially appreciated in lace. Do you agree with me?

I hope you appreciate my new job. And I would like to know if it is worth creating a collection of such napkins? If you write your opinion in the comments, I will be glad 🙂

So, this is what my new doily looks like. Again, I am at a loss in choosing a name, alas 🙂 I will try to make instructions as soon as possible (maybe by the end of the week). By this time I should come up with a name as well.

Long picot in a new doily

Also you can watch the video and subscribe to my YouTube channel, welcome: https://youtu.be/qWPPlAbps5I

Join my blog to stay informed. Comment and ask questions.

Posted on 2 Comments

Perfect join tatting

Close-up of a delicate purple lace collar on a light lilac background, demonstrating the perfect join technique in tatting — by FairyLacefromElena.

Perfect join tatting

Hello everyone!

Every week I try to make a new project. Alas, this does not always work out. If the project is small, it is quite possible to create a tutorial in one week. But I need to try very hard, I assure you!

Sometimes, to fulfill an idea, I need to come up with new ways, new methods. I also try new unusual tools with pleasure! This week’s project is a small Mandala doily. I recalled all the methods that I know to do perfect join. The lack of extra knots gives this doily absolute openwork and airiness. Do you agree? https://fairylace.kozinenko.com/product/tatting-pattern-doily-mandala/

Perfect join tatting

So, 12 ways to connect a chain with a long picot. You can watch the video on my YouTube channel. Perhaps I am not entirely accurate in terminology. If you know the exact name of each parameter, leave a comment on the post. Also share if you know any other method. It will be interesting and useful! https://youtu.be/qWPPlAbps5I

Method 1, for the shuttle.


This is the easiest way. You pull shuttle thread into a long picot. Pass the shuttle into the new loop and tighten the thread. But the node that is formed by this method, alas, does not suit me.

Method 2, for the shuttle.

This method is similar to the first, but in this case, a loop creates a thread ball.

Method 3, for two shuttles.

I use this method for tat Onion Ring. For example, doily “Honeycomb”: https://fairylace.kozinenko.com/product/honeycomb-doily-pattern/

Method 4, embroidery needle is used instead of a shuttle.

I think every tatter used this method at least once. Because it is a perfect join (in my opinion, of course).

Method 5, for needle.

This method repeats the first method for the shuttle. Only you use the tatting needle in this case. This method does not suit me either.

Method 6, for needle.

This method repeats the second method for the shuttle.

Method 7, for needle.

This method is convenient to use if you have a small ball. Because the ball will need to be passed through the loop.

Method 8, for needle.

This method without knots – perfect join. Yes?

Method 9, for netting needle.

I am delighted with this method! Netting needle is an ideal tool in this case.

Method 10, for cro-tatting.

You use CH (Chain Stitch) for the connection with this method.

Method 11, for cro-tatting.

You use SC (Single Crochet) for the connection with this method.

Method 12, for cro-tatting.

You use DC (Double Crochet) for the connection with this method.

You can choose any method for joining a long picot and chain. And try to create your perfect “Mandala” doily!

Posted on 2 Comments

My perfect wedding anniversary

Anniversary lace for wedding glasses — white tatting skirt displayed on deep blue cloth, by FairyLacefromElena

My perfect wedding anniversary , or how I wanted to become a perfectionist. 🙂

Hello everyone! I hope all my readers and subscribers are healthy too. Take care of yourself! Stay at home!

In January, my husband and I had a wedding anniversary. My handsome man gave me an amazing pair of champagne glasses. These are such beautiful glasses, I was delighted! But there is no limit to perfection. And I decided to surprise my husband. You know that I’m a fan of tatting. And my blog is about this art form (mostly, of course). So I wanted to decorate our glasses with lace. But the lace should be original and unusual, right? Otherwise my perfect wedding anniversary will not be perfect. Such thoughts overwhelmed my incapable head, ha-ha!

Anniversary glasses

Two glasses for the bride and groom look great in “clothes”. It should look like a white lace bride dress and a suit with a bow tie for a man. Of course, I made a very quickly black bow for a “man’s” glass. And I had to work hard on the magnificent skirt of the “bride”.

If you want to make such a 3D bow, the pattern can be bought here: https://fairylace.kozinenko.com/product/tatting-pattern-3d-bow/

I took a small piece of light transparent tulle to make my lace skirt very fluffy.

Then I glued the black and white silk ribbon onto the glasses using double-sided tape. Then I fixed a black bow and a fluffy skirt on glass goblets. And voila! You can see what I got as a result. I heard a lot of compliments from my beloved husband!

My perfect wedding anniversary

Our wedding anniversary is long gone, but you can write your congratulations in the comments. I will be very pleased. And also share what decorations you make for family celebrations.

Also follow me on Pinterest: https://www.pinterest.com/elenakozinenko/boards/

Subscribe to my blog. Comment and ask questions. I will be happy to help with tips!

Posted on 12 Comments

Tatting in resin final

Pair of red tatting lace flower earrings with green stems and leaves, cast in resin, presented on a handmade gift box with lace logo by FairyLacefromElena.

Tatting in resin, final. Hello everyone! I hope you weren’t scared by my long, long, long story of how I do tatting in resin. Because in fact, this process is not so complicated and long. You will need only attention and accuracy for successful execution. And of course, I would really like to see more of your feedback and comments, please.

So, the last time we stopped at the second fill. I usually leave molds with resin for 2 days. Because during this time, the resin completely hardens.

I release frozen products from molds. Unfortunately, not all molds have openings. Therefore, I have to do it myself.

I use a small hand drill and drills with a diameter of 2 mm.

When drilling holes, you must place the product on a flat surface. But be sure to lay a cloth so that your resin does not get scratched. You do not want to spoil this beauty! Yes?

Now that all the products have holes,

I insert paper clips into these holes.

After all, now the time has come to varnish finished products. And it’s very convenient for me to hold the products by a paper clip. I rotate the frozen resin in different directions and apply the protective varnish evenly. Very easy!

Then I hang up the varnished items to dry. By the way, I use my cake molds and long knitting needles. And I MANDATORY hide my products from the sun (I cover it with a cloth again).

I strictly adhere to the instructions of the varnish manufacturer. Therefore, I repeat the process in 2-3 hours. That is, I varnish the product twice!

Look what happens to the resin, which I did not hide from the sun during the work and did not varnish.

Finally, the finishing touch remained! I attach the necessary metal fittings.

And finally, “cherry on the cake”! This is my branded packaging. Next time I will talk about this in detail.

Hooray! I did it! My long story “Tatting in the resin” is over. Ask questions in the comments, subscribe to my blog to be in the know!

As usual, I invite you to check out my store: https://fairylace.kozinenko.com/

And of course, welcome to my YouTube channel: https://www.youtube.com/watch?v=K_fWxN3THBc&list=UU3dn4_9pp7tIKA2k564wLBQ

Posted on 4 Comments

Tatting in resin part 5

Red tatting lace flower with green stem and leaf shown next to a quarter dollar coin for size comparison, part of the Tatting in resin tutorial series by FairyLacefromElena.

Tatting in resin part 5. Hello everyone! Without a long introduction, I continue the story of how I do tatting in resin.

So, our mixture of resin and hardener is ready. We made a transparent, homogeneous substance.

Now I fill the molds with resin using a syringe.

At the very beginning of the work, I calculated the required volume of resin and divided it by 2. Do you remember? Because I fill the molds only to half. I tried to fill completely, but got a sad result. In this case, the lace is deformed and bent in resin.

Then I cover the filled forms with a plastic container. I use forms after cakes, but you may find something else.

And I cover a plastic container with a piece of cloth. I hide tar from the sun, so as not to get terrible yellowed products.

Now I will leave the resin for about 2 hours. I observe the degree of cure of the resin, because this is a very important point. You should get a soft, sticky surface. But the resin does not have to be very liquid. Because then the pieces of lace are deformed. And we will get a sad result. By the way, I tat in advance pieces of tatting .

Then I put pieces of lace and beads in the molds. I do this with tweezers. After all, it turns out neater and more convenient.

After that, I cover the molds with a container and a cloth. I can do other things now! Typically, the resin solidifies completely after 20-24 hours. After that I continue the tatting process in resin.

Tatting in resin part 5. Second fill

So, the next day I repeat the pouring process. That is, I mix the resin and fill the second half of the molds.

I get 2-3 air bubbles in the fill sometimes. And then I easily remove the bubbles with a wooden stick.

And then I put the molds under the container and the fabric again for 20-24 hours.

I hope you are not very tired of reading such a long text. “Tatting in resin part 5” turned out to be the penultimate post about my experience. But now I suggest you have fun and relax. Have a nice weekend! I will finish the topic “tatting in resin” next time necessarily. Thanks for the support and attention to my blog.
Subscribe, ask questions, comment. Your words are very important to me.

Remember to check out new products in my store: https://fairylace.kozinenko.com/

Also follow me on FB: https://www.facebook.com/kozinenkoelena

Posted on 8 Comments

Tatting in resin part 4

Resin casting set with tatting lace flowers: resin and hardener bottles, small plastic cups, wooden sticks, and transparent gloves, part of Tatting in resin tutorial by FairyLacefromElena.

Tatting in resin, part 4.

Hello everyone! First, I want to thank everyone for the great reviews and comments about my blog. Your kind words are very important to me. I am inspired! But soon my topic of tatting in resin will end. What will I write? Again I ask you, dear readers. What do you want to know about? Are there topics that are interesting and important to you? Maybe browsing my store will tell you ideas for my new posts? https://fairylace.kozinenko.com/

Tatting in resin part 4

So, today is the article “Tatting in resin, part 4”. You read carefully my previous posts on this subject, I hope. 🙂 I talked about tools, molds, threads. Thus, gradually we came to the most important moment ( ta-daaaa!). I am sure my advice will help you make the perfect transparent tatting in resin! After all, now I will show how I work with resin.

I start work with mathematical calculations. (Ha ha! That sounds very clever, right?)

Do you remember my table for determining the volume of molds? I talked about this before. Thus, I calculate how much resin and hardener I need. Then I divide the result by 2. This is an important point! Because I do the fill in two steps. It took me a few experiments to come to this conclusion.

Then I pour the resin into a transparent plastic cup. I carefully monitor the volume (everything is exactly according to the calculations!).

Oh God, what terrible hands I have! No, these are just medical gloves! 🙂

Do you see what a cloudy resin from many-many-many bubbles?

Resin manufacturer’s instructions

I do not know which resin you are using. Therefore, I ask you to pay attention to the manufacturer’s instructions. The instructions for my epoxy indicate: put the container with the resin in hot water to completely dissolve the air bubbles. You may not see such an item in your instructions, but try it! This will be your personal experiment.

I take a cup and a kettle of hot water.

And voila, I got the perfect result in 10 minutes!

In the meantime, I prepared the molds for pouring. I already told you the best way to store forms. Therefore, I do not need to wash molds every time. If I notice a speck of dust or a small speck, I wipe the mold with a cotton swab. Because everything must be perfectly clean!

The next step, I pour the hardener into the resin (do not forget about the accuracy)! After that I have to mix the composition thoroughly.

Rules when mixing the resin.

I came up with these rules for myself, but you can use them, of course.

First, I mix the resin and the hardener is NOT FAST. Because with a high mixing speed, I get sooooo many bubbles (alas). Secondly, I DO NOT REMOVE the stick from the solution until mixing is complete. Because it leads to the formation of large air bubbles every time you raise and lower the stick.

Thirdly, I use TRANSPARENT cup to see the state of mixed. Fourth, I leave the solution alone after stirring for 3-5 minutes, so that the small bubbles disappear.

Fifth, I pour the settled mixture into a clean plastic cup MANDATORY!

Oh, how many words I wrote today! I will not abuse your patience, so I will end my story about the filling process in the next post.
Please, make comments, ask questions, drop by my store, join my YouTube channel and, of course, subscribe to my blog to be in the know! https://www.youtube.com/watch?v=K_fWxN3THBc&list=UU3dn4_9pp7tIKA2k564wLBQ

Posted on Leave a comment

Tatting in resin, part 1

Transparent resin keychains with yellow and blue tatting motifs (letters, hearts, flowers), handmade by FairyLacefromElena

Tatting in resin, part 1.

Hello everyone! According to your many requests, I begin to tell how I do tatting in resin. The previous post on tatting in resin you will see here: https://fairylace.kozinenko.com/tatting-in-resin/

I will try to make my story very detailed. So please be patient. 🙂 Because I can not do one post only. In this case, my post will be too long. Subscribe to my blog to keep abreast of the continuation of this topic. And you can ask any questions in the comments. I will always answer with pleasure. I also ask you to pay attention: this is my personal experience. And you can have your own opinion that does not coincide with mine.

Tatting in resin, keychains

Here are a few rules that I have defined for myself. I’m sure some of the rules will appeal to you too. 🙂

1. You must be in a great mood to create beautiful products!

2. You should be careful and not be distracted during the filling process. Otherwise, your “milk will run away”! 🙂

3. Strictly adhere to the resin manufacturer’s instructions. Because epoxy from different manufacturers have differences, but the main points are similar.

4. The temperature in your workshop should be + 25˚ C (in any case, approach this indicator). This is a very important point, because at a lower temperature in the room the resin will not be sufficiently fluid. In addition, it will be very difficult for you to get rid of air bubbles in the solution, alas.

5. Use TRANSPARENT plastic containers to mix resin and hardener. Transparent plastic cups are the most comfortable. Because you can clearly see in such containers the homogeneity of the solution and the presence of air bubbles.

6. Always wear protective gloves. No matter how I try to be careful, when working with resin, my hands get dirty anyway. Maybe you will be more accurate! 🙂

7. I also recommend that you prepare a table mat. For example, an old cutting mat will help you protect workplace from stains. And supply of paper napkins or rags will not hurt you! In any case, for me it is not superfluous.

8. I measure the weight of the components very accurately when mixing the solution. You can use a scale or syringe for this. I will talk about the intricacies of measuring components in the following posts.

I use silicone molds of different shapes and sizes.
Also I want to say that I do not use ultraviolet lamps or other heating devices. Because not all types of resin can be exposed to ultraviolet radiation. And special devices (such as a pressure tank or a vacuum chamber) are best used in large volumes. Anyway, I do without it!

So, my standard set for pouring consists of the following things: old cutting mat, resin, hardener, two plastic cups, disposable gloves, wooden sticks for stirring, scales, two syringes without needles, napkins, molds.

I hope you enjoyed my rules and you will enjoy using some of them. For example, the first rule (about a good mood) is useful to you for all occasions! 🙂 Do you agree? If you were interested, subscribe to my blog, ask questions in the comments. In the meantime, watch my video for a good mood! https://www.youtube.com/watch?v=fHCUs5n3Gw8&t=1s

Do not forget to check my store, welcome! https://fairylace.kozinenko.com/

Posted on Leave a comment

Hiding end threads in tatting

Fragment of lace tatting round doily

Hiding end threads in tatting.

Oh, I already wrote before that I don’t like to hide the ends of threads. Does any of you love this? How terrible it is: to remove a lot of cut ends, worrying so that they do not come apart. Many tatters come up with how to make this process easier. Beginner tatters master the classical methods. In any case, it was so with me. Here you can watch my video, which shows in detail how I did it before. https://www.youtube.com/watch?v=HKBg6xUGZL8&t=939s

I have studied many textbooks and videos on the Internet over ten years of my practice of tatting. Of course, there are many interesting and useful master classes for hiding end threads in tatting. But I did not find any material that combines the three methods of tatting: shuttle, needle and hook. My goal is to promote all kinds of tatting. Therefore I hope you will be interested in my experience!

So, a short review of today’s video. I like make large laced items, such as doily, tablecloths, collars, etc. In this case, I will have to “lengthen” the thread several times. And should try to make the snapping of the thread invisible and durable. After all, it is very important from an aesthetic and practical point of view! If I hide both cut ends in one ring or one chain, I get a thickening. (I don’t even consider the option with four threads at once!) Therefore, it is better to tie a new thread at the junction of two or more elements. Example in the photo.

Hiding end threads in tatting

You can modify and improve my experience, of course. I will be glad if you share in the comments your ways of hiding end threads in tatting. Welcome! https://youtu.be/K_fWxN3THBc

By the way, in conclusion, I want to say sorry-sorry-sorry-sorry! I forgot to activate the payment button for all countries. now this mistake is fixed. So I am extending the term of the action with a 10% discount on all my patterns. Now the PATTERNXMASDECOR coupon is valid until December 15th! Take advantage! https://fairylace.kozinenko.com/product-category/patterns-tutorials/

Subscribe to my blog. Comment and ask questions. I will be happy to help with tips!

Posted on 10 Comments

Front and back side tatting

Bicolored square tatting doily with orange star and green center on white background by FairyLacefromElena

Does front and back side tatting? Oh yes of course! Are you surprised? Often novice tatters do not pay attention to this nuance. However, following this rule will help you make your lace more neat and presentable. Want to test yourself? Look carefully at these photos. Which of these earrings do you think is right? You can write your option in the comments, please!

The correct earrings in photo 1 and 4. Let’s see what is wrong with earrings 2 and 3? All rings in earrings 2 and 3 are made wrong, unfortunately. Therefore, picots at the rings in these cases look messy. Compare lilac earrings with red earrings. The difference is obvious! Do you agree?

I do not get tired of repeating this rule to my students, and I always write this reminder in the instructions for my patterns:

When making the double stitches on the back side, make the second half of the second stitch fixture and the first half of the double stitch next

So, if you are not yet using this rule in your tatting, try it! I am sure you will like the new look of your lace. Such work requires more focus and attention, of course. But it’s worth it. Because the front and back side of your tatting will turn out perfect! But again, each tatter chooses a method that he likes best.

I want to draw your attention to the following fact. I did not come up with this method, of course. This method has existed for a long time. Not everyone pays attention to the differences as a result of the first and second method.
This is an excerpt from Book 6 “Tatting Talk: A Self-Improvement Guide for Tatters” Needle Tatting Basics Part 2 by Georgia Seitz revised 6-21-98:
Remember, if you prefer the all right side up look, just do the half stitches in reverse order.
And, of course, I suggest visiting the blog from Frivole: http://leblogdefrivole.blogspot.com/2016/02/reverse-stitches.html The article is very interesting and reveals deeper terminology (I did not try to make my post so professional).

Subscribe to my blog. Comment and ask questions. I will be happy to help with tips! And of course, do not forget to visit my store, welcome! https://fairylace.kozinenko.com/

And welcome to my YouTube channel: https://www.youtube.com/watch?v=wETpH0sP56o&list=UU3dn4_9pp7tIKA2k564wLBQ&index=1