Posted on 2 Comments

Perfect tatting – part 1.

Square tatting doily

Perfect tatting – part 1.

Hello everyone!  This article begins a series of lessons “Perfect Tatting”. Tricks, subtleties, error correction, new skills – I share my experience.

My articles will be accompanied by video tutorials. I will add them to my YouTube channel.

Please write in the comments what subtleties you would like to know. Then it will be easier for me to make a lesson plan.

Firstly, I want to emphasize that all the techniques that I will talk about are NOT MANDATORY to implement! Everyone has their own opinion and their own “handwriting”! But I will be glad if my experience is useful and interesting to you.

So, ideal tatting, part 1.

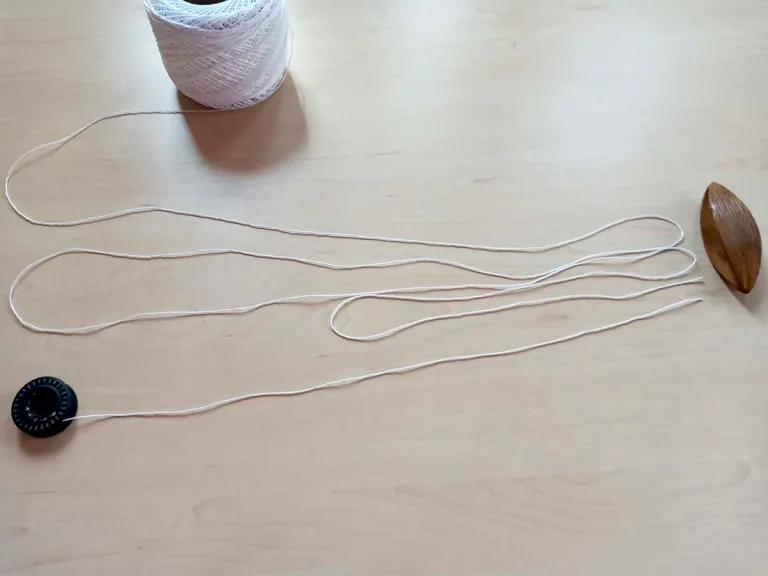
Recently I was asked an interesting question: is it necessary to tie the thread to the shuttle?
Look closely: there is almost always a small hole on the shuttle. What is it for?

I am amazed at the talent of the designer who invented such a shape of tatting shuttles. Everything is very logical, ergonomic and practical!

Perfect tatting.Part1.

If you do not secure the thread to the shuttle, you will have to press the thread with your finger. No big deal – you will say! I agree. But I weave a lot and often use nylon and polyester threads in my work. They look so beautiful in jewelry…

If the thread rubs the skin on your finger all the time, you will get a cut and a scar. Believe me, I know. It is very painful. Take care of your hands!

No injuries, no trouble! I guess I should have called this article “Safe Tatting”! LOL
I often see on video when tatters hold the shuttle thread with their little finger. Try “freeing” your finger. The shuttle is designed to be moved freely, like a space shuttle! And hold the shuttle with only two fingers. It looks very elegant, by the way!

And for a good mood I added a knot on a thread for a tatting needle to the video. Of course you will smile! A spontaneous knot is too much! https://www.youtube.com/watch?v=zS6yj9MYFUk

Perfect Tatting – Part 1 is finished! Thank you for your patience!
I hope my previous blog posts will also be useful and interesting: https://fairylace.kozinenko.com/blog/

Posted on 4 Comments

Organization of space in the craft room

Organized craft room storage with shelves, boxes, and creative workspace

Organization of space in the craft room, or how to store thread supplies.

Hello everyone! Today I organized my polyester thread supplies. I do this periodically. For some reason my thread supply is not decreasing. I think it’s due to frequent visits to the craft store. Ah, my willpower does not work at all when I see beautiful threads, fabrics, beads, accessories… (the list goes on and on!). I’m not a shopaholic, I’m a collector!

Of course, like any master, while working in the studio I have “artistic chaos”! But after finishing the project, I return the tools and the remaining supplies to their places.

Organization of scissors in the craft room

These are not surgical instruments, these are my scissors! (the photo is old, so now there are a little more scissors).

I hung the most frequently used ones on the “scissor tree”! My handsome husband made this organizer for me. The rest of the scissors are in the box. On the shelves in boxes are accessories for jewelry, needle shuttles and hooks for tatting, and various small items.

Organization of threads in the craft room

Sewing threads are always in place. Two organizers for small and large spools were made for me… You already know who!

I store large balls of cotton thread in two wicker baskets. It’s better to put each ball in a plastic bag, so they don’t collect dust.

I always have a problem with polyester balls. These are the threads I use most often in my work. For example, I made this set of bookmarks from polyester threads in all the colors of the rainbow. https://fairylace.kozinenko.com/product/bookmarks-chakras-tatting-patterns/
At first I put the balls in a basket, then I decided to use a plastic container with a lid. But such storage is very inconvenient. And besides, the threads get tangled and intertwined unless I secure the tail of the thread with a piece of tape (and I sometimes forget to do this). It takes a lot of time and patience to unravel this mess!

While making my next thread purchase, I received two transparent thin plastic boxes from the store. They are not very convenient for storage because they are fragile and soft. But I have a large roll of cardboard and skillful hands! (Is it okay that I’m bragging, LOL!?)
I made four cardboard boxes. Each box holds 10 balls. And two plastic boxes magically became four lids. Now each ball lies in its own “nest”. I don’t have to search for a long time for a ball of the right color, because I can see everything through the transparent lid. But I still have some balls left in a white plastic box. I think I need to buy more thread with a clear box…

Do you also praise yourself when you organize your supplies? Or are your threads always in perfect storage? I will be very interested if you share in the comments how you organization of space in the craft room.

Join me on social networks and also subscribe to my YouTube channel, welcome: https://www.youtube.com/c/ElenaKozinenko

Posted on 2 Comments

More and more hearts

Tatting lace edging with hearts

More and more hearts, or how to make a cute gift for Valentine’s Day.

Hello everyone! Valentine’s Day is literally around the corner! I want to congratulate everyone on this lovely holiday. Of course, not all countries celebrate this day. But it seems to me that this is a great opportunity to say words of love and gratitude to everyone who is dear to us!

If you allow, I will share my tricks on how to make a heart neat and symmetrical.

Of course, I made a short video illustrating my tips.
https://youtu.be/37JNFwIOTiE

Firstly, don’t make the double stitches very tight, this will make your task easier when tightening the ring.
Secondly, you can use the braiding method with a large loop in the middle of the Heart. This is especially useful if you are using thin threads.
Third, if you tat with a needle, make the heart in two parts. By the way, for connecting picot in this case it is better to use a hook rather than a needle.

More and more hearts

When I made three versions of hearts, I got the idea to connect them together. I made a “braid” from the tails of the threads and got a “Three Leaf Clover” from the hearts. I hope you like this idea!

Of course, I couldn’t resist making new hearts pattern for Valentine’s Day. And this time I made More and More hearts – a whole fireworks of hearts! The pattern is available in my store. Check, please: https://fairylace.kozinenko.com/product/pattern-edging-fireworks-of-hearts/

Subscribe to my YouTube channel, follow me on social networks. Support my blog by commenting, liking and sharing!
Happy Valentine’s Day!

Posted on 64 Comments

Tips for beginner tatters. Part 2.

12 tatted lace heart

Tips for beginner tatters, or how to distinguish the front and back sides of tatting and is it worth paying attention to this.

Hello everyone! This is the second part of my advice for beginner tatters. You can read the first part here: https://fairylace.kozinenko.com/tips-for-beginner-needle-tatters/

I admit, I’m a little discouraged. The previous article was read by 156 visitors (according to site statistics). And only ONE left a comment. Perhaps my article was not useful and interesting? Therefore, I doubt whether it is worth continuing this topic.

Or you don’t know how to leave a comment? It’s very simple! Scroll UP the screen. Click on the word “Comments” above the article title.

When you go down, you will see a window for your comment.

Believe me, your feedback is very important to me. Because it helps me make the site more interesting and useful. And also your comments will raise my site in the search rankings. This means that more beginner tatters will be able to find these articles. Sorry for going off topic and thanks in advance for your support!

Front and back sides of tatting

Have you noticed the placement of the “caps” above the double stitches? On the front and back sides their location does NOT match. Although from both sides it looks absolutely identical. I’m sure there are special terms in English for these “things”. But I don’t know them, sorry. I hope you understand what I mean.

Therefore, you can determine the side by picots. It’s very simple. Take a close look at how the two picots are located relative to the chain. The difference is very noticeable, isn’t it? On the left is the picot that is obtained on the front side. On the right is the picot, which is obtained on back side.

Tips for beginner tatters

If you turn your work over and continue to do double stitches in the usual way, you will end up with a “picot mix.” In this case, it will be completely indifferent which side is which. This is probably not critical! But only as long as you weave with single-color threads.

Tips for beginner tatters

Look what we get when working with threads of two colors. When two rows are joined on one side, small stitches of a different color are obtained. Imagine what your work will look like if small multi-colored stitches peek out from all sides. Again, this is not dogma, but creativity. And any of us can say: I am an artist, I see so! In any case, the choice is yours!

Tips for beginner tatters

I’ll tell you how easy it is to switch to the front and back method. It’s sooooo simple. When you turn the work to the opposite side (we already know how to distinguish both sides!), you weave double stitches in the reverse order. That is, first you need to do the second half of the stitch, and then the first. As always, I made a short video demonstrating this technique. This video demonstrates the method for needle tatting. But for the shuttle the reception is absolutely identical. https://www.youtube.com/watch?v=QGF8pzR3tJk&list=UULF3dn4_9pp7tIKA2k564wLBQ
Please don’t forget to come back after watching and leave a comment!

Posted on 2 Comments

No shaggy tails

No shaggy tailes

No shaggy tails, or carefully hide the ends of the threads at the end of the work.

Hello everyone! I recently learned that not all beginning taters hide the tails of the threads at the end of the work. They just weren’t taught! Ah, that’s a terrible omission. Yes, usually the instructions say: tie and cut. Where is the word “hide”? Gone, LOL! Therefore, today I invite you to go back to the beginning and talk in detail about this topic.

So, why do you need to hide the ends of the threads? Firstly, shaggy thread tails will look sloppy. And they will become shaggy very quickly, believe me! Secondly, by hiding the tails, we additionally secure the final knot. It is very important. After all, if the knot comes undone, we will get a disaster!

Try to hide your tails in different directions. For example, on different sides of the ring or in two different chains. This will help you avoid unnecessary thickening of the elements. It is also easier to pull one thread through the middle of double stitches rather than two.

I made a description of seven ways to hide the ends of threads. Some differ from each other only in the tool I use. But other options are possible, of course. Therefore, try, create and choose the method that is convenient for you. In addition to the instructions, I made an illustrative video. Hope this is helpful. https://www.youtube.com/watch?v=D8kVsN70EF4&list=UULF3dn4_9pp7tIKA2k564wLBQ

Method 1

You hide the ends of the threads with a sewing needle, sewing a seam over each double stitch. This method is the simplest, but not very reliable. It can be used if you do not need to wash the product. And, in addition, strong fixation will be required so that the tails do not “crawl out of the seam”. For example, for earrings or bracelets made of thin threads.

Method 2

Here we also use a sewing needle. But we don’t sew stitches, but hide the thread with a needle in the middle of the double stitches. It is enough to insert the needle into 3-4 double stitches. This method is fast. But if your knots are too tight, you will have to use small pliers to pull the needle out of the double stitches.

Method 3

Absolutely identical to the previous one. But we pull the thread with the needle into each double stitch separately (or even half a stitch). If the weaving is very dense, then this method is ideal, although not as fast as the previous one. By the way, don’t forget to protect your fingers with a thimble when handling the needle.

Method 4

For this method, I suggest using a thin wire bent in half. I call this wire the “magic tool”. Using wire, you hide one tail of the thread into the chain. And you “sew up” the second tail using a needle using method 2 or 3. And you can read about additional tools for tatting in my article here: https://fairylace.kozinenko.com/additional-tools-for-tatting/

Method 5

You can do the same thing by using an additional piece of thread instead of wire. In the video you will see how you can quickly and easily hide additional thread inside double stitches using a shuttle.

Method 6

This method is convenient to use if the pattern ends in a ring. In this case, at the beginning of the pattern (if it starts with a chain), you can use a small piece of additional thread or a paper clip. This will make it easier to connect the last chain before starting work. In the first 4-5 double stitches of the ring, hide the first tail (if the tail is long enough, you can tie it to the shuttle, it will be more convenient). Weave wire into the last 4-5 double stitches (as in Method 4). Form a ring and secure the second tail with a knot. And pull this tail through with wire.

Method 7

You hide both tails in one chain (or ring) at the same time. I only recommend using this method if you have weak double stitches. Because it is very difficult to pull two tails through double stitches at once (after all, the tails will be folded in half). And besides, such a chain will look noticeably thicker than the other elements.

I hope my long article did not bore or frighten you. Comments, questions, advice are welcome! Careful tatting and no shaggy tails!

Posted on 2 Comments

What is cro-tatting

Yellow jewelry set of earrings and bracelet in the Cro-tatting technique

What is cro-tatting, or do tatting masters deserve poems?

Hello everyone! I want to say Wow! No not like this. Wow Wow wow! This is my cry of joy and pride. And we especially need these positive emotions in this terrible time.

I want to thank the editor of Simply Crochet magazine Alison Maney ( link to the magazine website: https://www.gathered.how/magazines-simply-crochet/ ) and blogger Rebecca Parker ( https://beccaparker.journoportfolio.com/ )for their support and help in popularizing cro-tatting. Of course, it was very difficult for me to talk about such a rare, but very interesting type of tatting in a short interview. Because I am equally passionate about three types of tatting and am ready to talk about them for a Thousand and One Days (almost like Scheherazade!). Besides, I always forget that brevity is the sister of talent, LOL!

By the way, the article is called Crochet’s Quirky Cousins. You can read about Tunisian, Bosnian crochet and cro-tatting in this article. And also look at photos of the works of talented masters of their craft. You’ll understand why I’m proud. After all, it is a very honor to be in the company of such talents! Also I hope my subscribers recognize photos of my work!

Magazine pages with my cro-tatting works

What is cro-tatting
What is cro-tatting

I am also glad for this publication because cro-tatting is undeservedly deprived of attention from tatting and crochet masters. So, how can I briefly say what cro-tatting is? This is a symbiosis of crocheting and needle tatting. And it would be fair to put this type of lace making on a par with the rest of its sisters! Do you agree?

And not just publications in magazines. But also poems should be written about tatting! Agree, the lines from Guido Gezelle’s ode to a lacemaker sound very beautiful. “I love to watch you making lace…” I was very interested to learn about the work of this unusual author, a monk who wrote poetry in the Flemish language. And then I thought, maybe there is a poet who will glorify the masters of the shuttle, needle and hook? Alas, I do not have such talent. But for now I can shoot a video where you will see the beauty and grace of this wonderful type of needlework! https://www.youtube.com/c/ElenaKozinenko

I always welcome your comments. Follow me on social networks. And don’t forget to check my store, welcome! https://fairylace.kozinenko.com/

Posted on 8 Comments

Results of the competition

Results of the competition for the best doily name, or how the wrath of injustice is for us to live.

Hello everyone! The competition for the best name for my new doily is over.
I am eternally grateful to all participants for their extraordinary creativity and activity!
Alas, my holiday mood was very spoiled today. One of the members of the FB group accused me of quackery. She wrote in several groups that I was a liar and was not giving away any prizes. How can you be so unfair? After all, this lady didn’t even try to take part in the competition. I was upset and very offended.
I hope you can share some positivity with me and I will feel better. Please forgive me for being too emotional. Alas, I could not come to terms with such injustice.

Of course, I couldn’t choose one option from the many most unexpected, most imaginative and most beautiful names! You are extraordinary! Thank you very much for your creativity, imagination and support of my blog! I really liked absolutely ALL the options! So I resorted to drawing lots. And I made a short video report. You can watch on my YouTube channel how I chose the winner: https://www.youtube.com/watch?v=03JPh1vhfjM&list=UULF3dn4_9pp7tIKA2k564wLBQ

So, Results of the competition!

The winner of Connie’s competition with the name for doily Galaxy Flower. Congratulations!
I send her the pattern by email.
To celebrate all participants of the competition, I am providing a 30% discount coupon for the purchase of this pattern to ALL participants. Please check your emails.

Now the doily pattern with a wonderful name is available in my store, please check it out! https://fairylace.kozinenko.com/product/galaxy-flower-tatting-pattern/?removed_item=1
Thank you again for your active participation and support!

Follow my blog because I am planning some more contests with exciting prizes!

Posted on 90 Comments

Easier done than said

Fragment of a round doily in the tatting technique

Easier done than said, or a new competition for tatters.

Hello everyone! Of course, you know the expression “Easier said than done”. So I’ll tell you honestly, this is not about me! It’s easier for me to do than to come up with words to describe my work. I mean, it’s easier for me to do than say! LOL

Besides, I don’t speak English well enough. I have already asked my friends on social networks and subscribers for help several times. I need a nice name for my new doily. Help! And I just remembered the competition that I held for my followers. What wonderful names you came up with for my doily Honeycomb . I was impressed by your imagination. I promise I couldn’t have come up with a better name! I wrote about this competition and the winners on my blog. https://fairylace.kozinenko.com/2020/06/

I am sure you will be happy to take part in the new competition for the best name for this doily! After all, the winner will receive a doily pattern as a gift. And the first 20 participants will receive a discount on the purchase of this pattern in my store.

Easier done than said
Easier said than done

And I will definitely add a video lesson on my YouTube channel, as well as a video report on choosing the winner. So don’t forget to subscribe to my YouTube channel to stay updated! https://www.youtube.com/c/ElenaKozinenko

So, the conditions of the competition:

  1. Subscribe to my blog if you haven’t already.
  2. Come up with a name for my new doily and write it in the comments to this post. ATTENTION! Only titles written on the blog, not on social networks, will participate in the competition!
  3. The winner will be announced on September 15th.

I wish you all good luck and look forward to your wonderful doily names!

Posted on 2 Comments

Once I caught a fish alive

Once I caught a fish alive

Once I caught a fish alive, or how to quickly and easily wind the threads in several layers.

All plans go to hell when the air raid signal goes off…
It scares me terribly. Because the consequences of the bombing are always unpredictable and terrible. And every time I seem to crumble into small pieces. This is a very unpleasant feeling, believe me. Each time it becomes more and more difficult “to collect yourself as a whole”. But your kind words, your prayers and thoughts about me and my country help me.
Today, the third time, an air alert has been declared throughout Ukraine. Everyone get to cover now! I managed to shoot material for the video in my studio. And I can mount the video and write an article anywhere (even sitting in the basement, which I don’t have, unfortunately…).
Sorry for such a sad start. I thought for a long time if I could write about the war in my needlework blog. Tatting, sewing, embroidery, knitting, macrame, all my creativity is my life. But this terrible reality is now also my life, alas.

I caught a fish alive

So, I wanted to remind you of a nursery rhyme. Probably, in every language, children count one-two-three-four-five, read a poem or sing a song.

Once I caught a fish alive

One, two, three, four, five,
Once I caught a fish alive.
Six, seven, eight, nine, ten,
Then I let it go again.

Why did you let it go?
Because he bit my finger so.
Which finger did it bite?
This little finger on my right.

Surely you will be surprised and ask me: why a nursery rhyme? We’ve come to wind the threads! The fact is that winding threads in 2, 3, 4, 5 and even 6 layers is as easy as singing a song.

So, all you need is a ball of thread that you need to rewind, and an empty spool from the sewing machine. I was lucky, on my Bernina the bobbin reel is enlarged. Therefore, more thread is wound on this bobbin. I’ll be honest with you, I don’t like working with multiple layers of thread. But sometimes I just don’t have threads of the right color with the right thickness. For example, for jewelry set Danuta, I wound metal embroidery threads in three layers. The pattern for this set is available in my store: https://fairylace.kozinenko.com/product/tatting-pattern-set-danuta/

So, step one:

Wind the threads from the ball onto the spool. I do this on a sewing machine.

Two layers

It’s elementary, Watson! Two threads in one.

Three layers

I caught a fish alive

You only need a ball. Make a loop, forming three strands. Tie the end of the thread and loop to the shuttle. Gradually winding three threads on the hook, thread the ball of thread into the loop. Ah, I’m not sure I can explain clearly. Therefore, it is better to watch the video, please (link at the end of the article).

Four layers

In this case, you need to go back to winding in three layers and simply add thread from the spool. Thus, in one step you get 4 layers at once, hooray!

Five layers

 caught a fish alive

You only need a ball threads. We do the same as winding in three layers. But now we need two loops of different lengths. Oh, I won’t even try to write how to do it. And again, I suggest watching the video.

Accordingly, for six layers, you need a winding option for five layers plus one thread from the spool. And this “song” can go on forever!

I am very grateful to you for your patience! Now finally a link to the video. Don’t forget to subscribe to my YouTube channel. And also I will be very grateful for following my blog and comments. https://youtu.be/q53Ejc9gI60

Thanks!

Posted on 6 Comments

Why you need Tatting Split Ring

Why you need Tatting Split Ring

Why do you need Tatting Split Ring, or how laziness becomes the engine of progress.

Hello everyone! Sometimes I hear bewildered questions from beginner tatters: why should I learn Split Ring? It’s complicated, troublesome and not useful to me. I can list several reasons why you need this. So, first, the Split Ring is cool! Secondly, you can make the Ring two-tone. Thirdly, a lot of modern tatting patterns often use this method (for example, my Celtic bracelets).

Split Ring

Little trick with Split Ring

But the most important thing for me is the ability not to cut the threads between the rows using the Split Ring. I have already said many times how much I sooooo hate to hide the threads after the end of the work. So, I guess I’m a classic lazybones! Because I’m trying to come up with a new way to “make my life easier.” This is how new useful devices are born. I am deeply convinced that the remote control was invented by a classic lazy person. Just him did not want to get up from a warm chair to change TV channels! Haha, I’d be a millionaire if I came up with something like that!

I don’t even know which tatting master first came up with the idea of using the Split Ring to move to the next row. Alas, not all patterns can use this trick. But that would be perfect, mind you. Because I don’t need to cut and hide the threads in the middle of the work several times. As a result, I hide only two (or sometimes even one) threads at the end of the work ALWAYS! But so far this is unrealistic.

In the end, I liked this trick so much that I decided to create a doily pattern, where all 5 rows are weaved without breaking the thread. This is doily Azure Sky. https://fairylace.kozinenko.com/product/doily-azure-sky-tatting-pattern/

Why you need Tatting Split Ring

So, in conclusion of the post, I want to offer you a video. You will see how to use the split ring to move to the next row of a round doily without cutting the thread. Please support my blog and my YouTube channel with likes, subscriptions and comments! Thanks! https://www.youtube.com/watch?v=wETpH0sP56o&list=UULF3dn4_9pp7tIKA2k564wLBQ&index=50