Posted on 2 Comments

DIY fabric

Christmas Table Decor - Placemat

DIY fabric, or creating a unique pattern from pieces of fabric.

Hello everyone! I am very pleased to read your comments and feedback on my new work. Thank you so much to everyone who supports me during this difficult time!
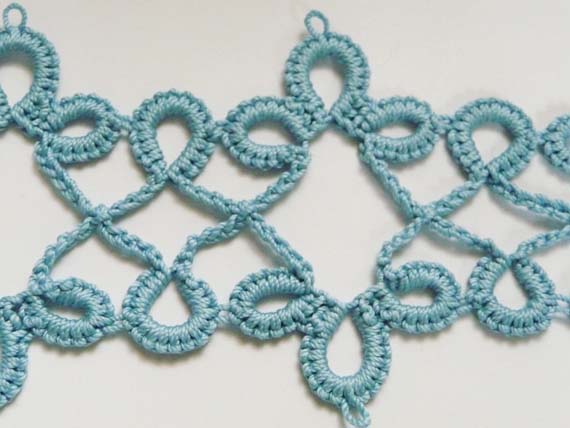
You know that my first and main hobby is tatting. But there are still many types of needlework that I can do well (as it seems to me!).

DIY fabric

One of my favorites is patchwork. I’m sure you’ve heard of the pizza technique. Oh, it’s not about the food! Although I heard Italian housewives say: “I put everything I have left after dinner on pizza for breakfast in the morning!” Very economical and creative, in my opinion. So why not use practical advice in needlework ?! So, we use everything that remains from previous projects. And I used not only pieces of fabric, but also pieces of lace.

So, step by step we go to the ideal result. And I hope our pizza turns out “delicious” enough!

Step one

First determine the size of the placemat you need. I made 24×36 cm. Cut out a rectangle from the main fabric (I have it red-orange), adding 4 cm to the size of the placemat on each side. We also need rectangles of synthetic winterizer and adhesive double-sided interlining 24X36 cm. But you can make a non-woven rectangle 4 cm smaller. Also prepare a piece of 20X 32 cm from nylon, or mesh, or organza. It can be any fairly transparent fabric.

Ah, I almost forgot the most important thing! Prepare ANY pieces of fabric.

Step two

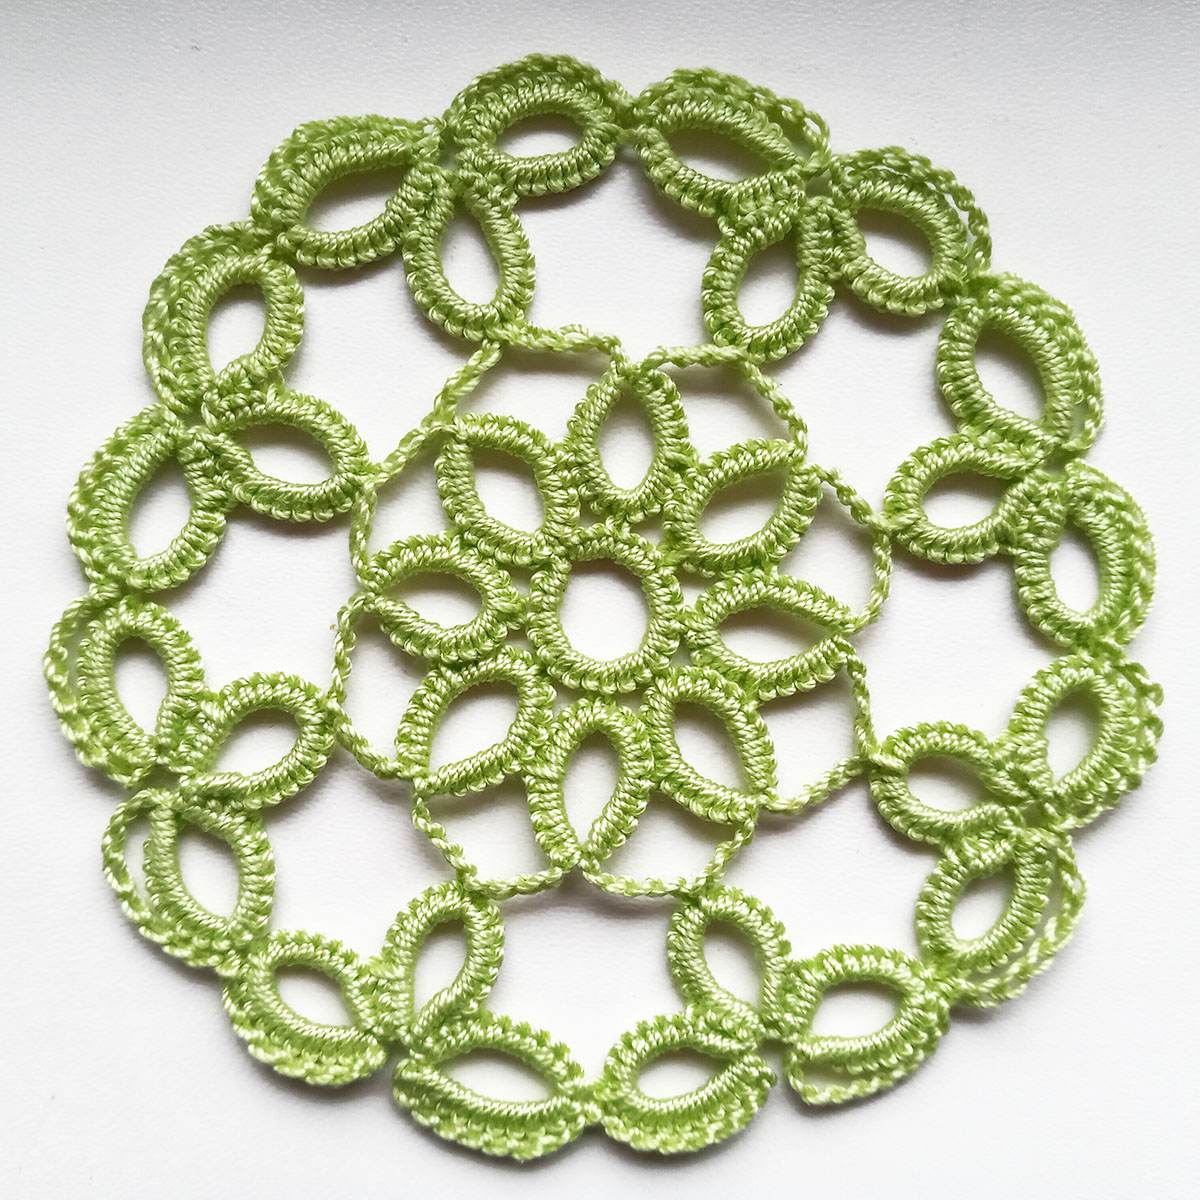
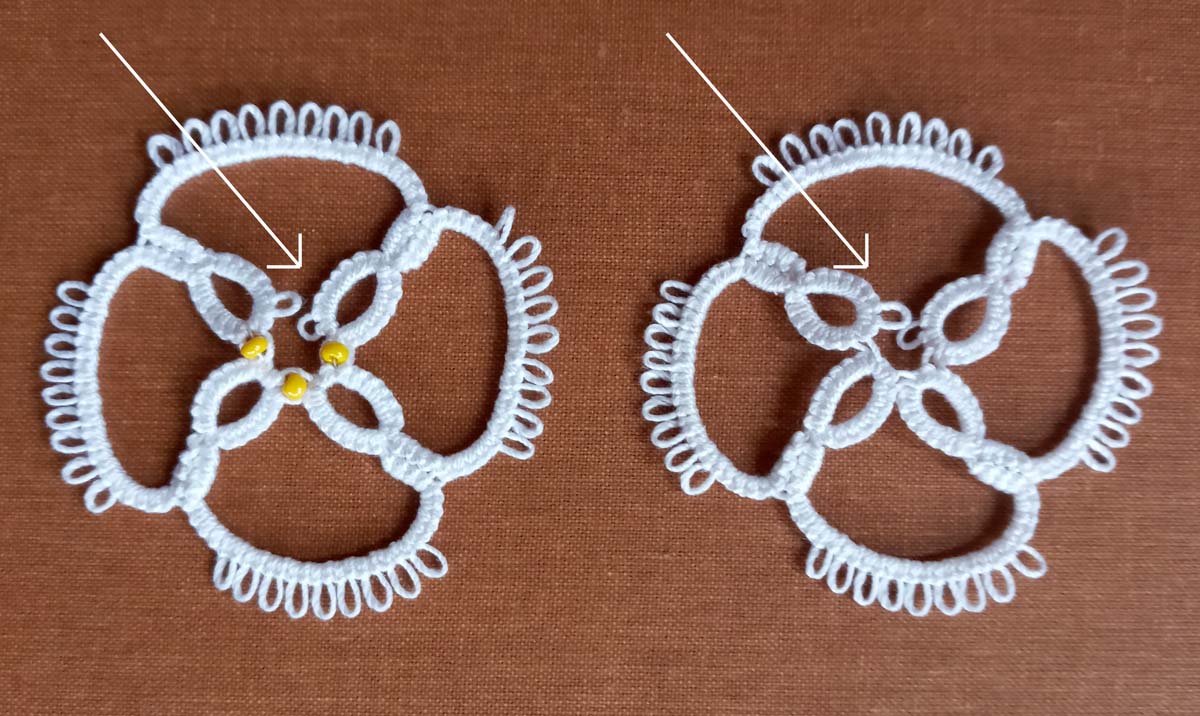
This step is the most exciting, I think. Here you can show all your imagination. Place fabric pieces on the non-woven rectangle as you like. No restrictions, no canons! You create a new fabric yourself. Remember you, I’m a fan of tatting? In the center I added a sample of one of my little lace projects. 🙂

Step three

Now gently “glue” the pieces of fabric to the interlining and synthetic winterizer with an iron.

Step four

Cover the resulting sample with a transparent cloth rectangle and secure with pins.

Step five

Put together all the layers of the prepared rectangles and quilt with a pattern that you like. It can be squares, circles, leaves, flowers. I chose a pattern that some craftsmen call “brains”. With the BSR foot, stitching becomes an absolute pleasure!

Step six

Forming the corners and borders. I plan to make a video on how to do it quickly, neatly and easily. So don’t forget to subscribe to my YouTube channel for updates. https://www.youtube.com/c/ElenaKozinenko

Step seven

Iron the finished placemats. And delight your family with a new dinner decor from the new DIY fabric! This way, your meals will be much tastier!

A set of such placemats can be bought in my store, welcome: https://fairylace.kozinenko.com/product/four-patchwork-placemats-surprise/?removed_item=1

Posted on Leave a comment

Cro-tatting Lesson 6

Cro-tatting light blue bracelet

Cro-tatting Lesson 6 , or the return to the beginning.

Hello everyone! This article is a continuation of Lesson 5. Therefore, follow the link if you have not read or watched the video of the previous lesson: https://fairylace.kozinenko.com/cro-tatting-lesson-5/

In the last lesson, we disposed of the remnants of the thread. Did you succeed? And I promised to tell you in detail how to connect elements of different colors correctly. Do not throw slippers at me, because I will again talk about the front and back of tatting! Of course, I do not in any way insist on my opinion. Because every artist is entitled to their own point of view. After all, every tatter is an artist! Do you agree? And who can tell the artist exactly how CORRECT? It is possible that you will like the product, which has specially made thin “stitches” of a different color on the front side of the work.

Cro-tatting Lesson 6 Front side

Front or back side?

In my classes for schoolchildren, I show the difference between the wrong side and the wrong side at the very beginning of lessons. Believe me, students perceive this very easily. By the way, it is in cro-tatting that the difference between both sides of the work is very clearly visible. Especially if you use double crochet in the pattern. How unexpectedly, I had an idea for the topic of a new lesson! If you are interested in getting a pattern using double crochet in the pattern , write me in the comments please.

Cro-tatting Lesson 6 Back side

But, it’s time to move from words to deeds, that is, to video! So video Cro-tatting Lesson 6 : https://www.youtube.com/watch?v=mGW4f-nMu1g&list=UULF3dn4_9pp7tIKA2k564wLBQ

By the way, I have a video on this subject for shuttle tatting. Maybe this will come in handy too: https://www.youtube.com/watch?v=98FYbzTfzZE&list=UULF3dn4_9pp7tIKA2k564wLBQ&index=26

I will be grateful for the support of my blog and YouTube channel. Subscribe, comment, share on social networks, please! This will help make my information more interesting and useful.

Posted on Leave a comment

Cro-tatting Lesson 4

Green lace round coasters in cro-tatting technique.

Cro-tatting Lesson 4 , or how to make a split chain in cro-tatting technique.

Hello everyone! This article is a continuation of Lesson 3 . Therefore, follow the link if you have not read or watched the video of the previous lesson: https://fairylace.kozinenko.com/cro-tatting-lesson-3/

Ah, I tried my best in the previous lesson! I sought to convince all my readers of the need to master the reception of the split ring. By the way, this is necessary not only for cro-tatting, but also for the tatting shuttle and for the tatting needle. I hope many tatters will “follow me” in this matter, haha! And today I want to suggest that you use a split chain too as often as possible as well. But alas, I have no new arguments. I’m just sure that we must develop, improve and look for new ways and methods. Do you agree with me? Then you will benefit from my new video, I hope.

I use two methods to perform a split chain.

First method

So, fhe first method is good when you move from row to row through chains. You hide the tail of the thread at the beginning of work and, as the second part of the split chain, perform a double crochet. The number of yarn overs should be 1 less than the number of loops in the first half of the split chain. In my video, this is 5sc and Triple Treble Crochet ( or Double Treble Crochet ). Here again I ask for your help. How is this element correctly indicated in English. Write to me in the comments, please.

Second method

But the second method is ideal if you are going to the next row through a split chain + split ring combination. So, in the video, you will see two threads after the split chain is completed. First thread – ball, and the second – long tail of the thread, which I left at the beginning of work. Therefore we can use these two threads to make a split ring.

Wow! I can imagine how tired you are of reading this! Of course, it’s better to watch the video. Don’t forget to leave a comment and subscribe to my YouTube channel! https://www.youtube.com/watch?v=OvR8NaB1-c4&list=UULF3dn4_9pp7tIKA2k564wLBQ

Posted on 2 Comments

Work on bugs

Illustrative video FairyLacefromElena how to fix a mistake in the picot connection

Work on bugs, or never fall into despair.

Hello everyone! Today I want to thank everyone who thinks of me, prays for my country and supports us in this terrible time. So I just can’t imagine how one can cope with depression or despair alone.

Yesterday I had a psychologically very difficult day. 400th day of open occupation, bombing and destruction of my country. Yes, my nerves can not stand it, alas. Although I try to do my favorite thing – tatting. But this is impossible. After all, creativity requires a special state of mind. Do you agree?

Ah, I had to reach out to FB tatting group members for support and prayers. My dears! I am extremely touched by your words and prayers. Also I low bow to everyone for not letting me fall into despair!

Fixing the bug connecting picots

Unfortunately, circumstances do not always give me the opportunity to be an active participant in social networks. But I’m trying! Recently I saw a post with a photo of an error in the finished tatting product and the question is whether it can be fixed. Of cource, all needleworkers know how much time, work, focus and diligence we put into each of our handmade products. And then, finally, when you can with delight say “tadaaam!” , you discover an unfortunate mistake. Ah, I forgot to connect the two elements with picots according to the scheme. What to do? How to fix? Throw everything away and start over? Well, how can you not fall into despair.

But my article today is titled: Work on bugs, or never fall into despair. So, the main thing is not to succumb to negative emotions. As you know, there are two ways out of any situation, one of which is correct, ha ha! So what can we do? First, you can throw away this work and do it all over again. But that would be just the wrong way out. Therefore, I suggest taking a sewing needle and a thin thread of the same color as our product. This way you simply sew each missing picot to the ring (or chain, if it fits the pattern). Of course, it is difficult to explain this process in words. However, we have an assistant – YouTube channel! My new video on this topic is ready to watch, welcome! https://www.youtube.com/watch?v=2waGQ_elnk8&list=UULF3dn4_9pp7tIKA2k564wLBQ

Please subscribe to my blog, comment and share on social networks. And also check my store: https://fairylace.kozinenko.com/

Thank you!

Posted on Leave a comment

Tatting lace collars

White tatting lace collar with beads.

Tatting lace collars, or 2023 fashion trends.

Tatting lace collars

Hello everyone! Today I found an interesting article about collars on Wikipedia. And I want to share with you for sure! So:

In clothing, a collar is the part of a shirt, dress, coat or blouse that fastens around or frames the neck.
A collar may be permanently attaced to the main body of the garment (e.g. by stitching) or detachable. Oh, I love detachable collars! Because by changing the collars, you can get several different outfits from one dress!

Collars shapes

I also found a table on Wikipedia with the names and descriptions of 66 types of collars, wow! For example, a Peter Pan collar. But I’m sure you all know that collars name. Or, zero collar. This is neckline of shirt without band and collar. Or, zero collar. This is neckline of shirt without band and collar. By the way, it is on such a zero neckline that detachable collars look best.

By the way, you can use a brooch to fasten the collar around the neck. This will add even more chic and elegance to your image.

There is also a type of collar worn as part of clerical clothing called Clerical collar. I may be wrong, but it seems to me that the shape of chokers is very similar to this type of collar.

Also I find collar Pussy Bow very interesting and unusually feminine. This collar tied in a large bow under the wearer’s chin. Particularly associated with Margaret Thatcher in the 1980s. I was very surprised to learn this fact today. Because about 10 years ago I created a little collar with a little bow and named it Pussycat! Haha!

Collars material

I’m afraid you won’t have the patience to read a list of all the materials from which the collars were made.

These are the golden collars-necklaces of the pharaohs of Ancient Egypt.

Or the finest handmade lace in the collars of French kings. It’s a Medici collar.

Also a combination of silk fabric and the finest lace is used.
Nowadays, cotton, denim, guipure, leather various threads are used for collars. Add embroidery, embossing, beads. Of course, the list is far from complete!

In 2023, lace is back in fashion. Probably, not all ladies will want to wear a lace dress. But everyone wants to be at the peak of fashion, I’m sure! So be sure to add some lace collars to your wardrobe. Including tatting collars. It is for the manufacture of tatting or bobbin lace that threads are used. Because they are light and extremely chic.

Tatting lace collars for the dress

You can buy ready-made collars for every taste or make your own according to my master classes. Welcome to my store: https://fairylace.kozinenko.com/?s=collar&post_type=product

Please write your wishes, feedback and comments in the comments. To do this, go to the BEGINNING of the article and click the “Leave a comment” button.

I hope you enjoy my video on YouTube. Like and subscribe! https://www.youtube.com/watch?v=kbPXyJwRHFw&list=UULF3dn4_9pp7tIKA2k564wLBQ&index=45

And in conclusion, a small gift – a tatting collar pattern from Project Gutenberg’s Beeton’s Book of Needlework, by Isabella Beeton.

Posted on 6 Comments

Prayer for Ukraine

Blue and yellow Ukrainian flag waving in the wind, symbol of freedom and prayer for Ukraine, free Pixabay photo, uploaded by FairyLacefromElena

Prayer for Ukraine. My tears and pain are the pain and tears of all the mothers of Ukraine.

Hello, everyone!

I apologize for the “unlace” post. But I can’t be silent.
On 2022 February 24, Russian troops occupied Ukraine. That’s what all the media say. It is not true! Russia invaded Ukraine in 2014, taking over the Crimean parliament and establishing its own dictatorship. The whole world remained silent, believing Putin’s statement that he was “saving” the Russians living in Crimea. Vile lies! He was preparing a military base for an attack on the rest of our country. For the transfer of military equipment, the Crimean bridge was built.

For 8 years, Russian troops have been shelling our Donbass and Lugansk, killing our civilians and depriving them of shelter over their heads. But Putin said – there are no Russian troops there. This is an outright deception! Why did the leaders of European states and America believe him? This silence and non-resistance to evil led to a huge disaster – Russian troops invaded Ukraine. This is a real war. The whole world sees this, but Putin says – I was forced to attack Ukraine so that NATO would not attack Russia. It’s not just a lie, it’s nonsense!

NO WAR

And now the decisive moment has come when every inhabitant of the Earth must make a choice – choose his side. I choose truth, independence and freedom! I choose Ukraine!

Every inhabitant of my country helps the fight against the invaders. Not everyone has to take up arms. It can be a medical bag, a post on the Internet with the TRUTH, and financial assistance.

I will be immensely grateful to everyone who comments on my post, shares a link on social networks or makes a purchase of pattern in my store. Because I send part of the money I earn to support the Ukrainian army.

Welcome: https://fairylace.kozinenko.com/product/earrings-glory-to-ukraine-pattern/

Prayer for Ukraine! Glory to Ukraine!

Posted on Leave a comment

To do or not to do, that is the question

Red tatting bracelet with white beads

To do or not to do, that is the question! Or again about the front and back sides of tatting.

Hello, everyone! Today I want to touch again on the topic of front and back side of tatting. Ah, don’t get angry and don’t throw slippers at me! This dispute reminded me of the dispute between midgets from the novel by Jonathan Swift. On which side should the egg be cracked? I don’t think it matters. Because it is important to get to the delicious middle! Of course, every tatter is free to do as you like. But how I always want to get a “delicious”, beautiful, tender and perfect result!

I personally prefer to always distinguish between the front and back of my work. It’s probably a habit. This is especially true when you need to connect rows of different colors. I am sure you will agree with me, because if the connection is wrong, the product may not look very beautiful. But we strive for perfection, don’t we?

By the way, I was inspired to write this post by my new pattern, in which I connect the rows of white and red: https://fairylace.kozinenko.com/product/fish-heart-tatting-pattern/

To do or not to do the front and back sides of tatting

So, look closely at the photo.

In the first case, the connection is correct. Light threads do not peek out between the green ones.

And in the second case, the light thread is a small strip between the green ones.

But sometimes, you may need just such “wrong” strokes. After all, the fantasy of tatters is limitless and who knows what else we can come up with! So, decide for yourself, to do or not to do the front or back side of tatting! And as another argument, watch my video, please. Subscribe to my YouTube channel and follow my blog, welcome! https://www.youtube.com/watch?v=98FYbzTfzZE&list=UU3dn4_9pp7tIKA2k564wLBQ

Posted on 6 Comments

Outgoing year results

Small decorated Christmas tree in a Ukrainian home, festive holiday corner with handmade ornaments, photo by FairyLacefromElena

Outgoing year results, or how to fulfill your creative plans.

Hello, everyone! First, I want to congratulate all of you with the upcoming new year 2022! And with all my heart I wish you health, prosperity, success, peace and love! As well as new creative plans and their implementation.

By the way, a little about the plans. At the beginning of the year, I set myself a difficult task – to create 70 patterns, tutorials or master classes. Yes! I did it, hurray! 2 hours before the new year, I finished and posted the 70th pattern in my store! This cute pattern is called ” Waves of Music”: https://fairylace.kozinenko.com/product/edging-pattern-wave-of-music/

my personal best in the past year

Of course, among my works there were patterns of varying complexity. For example, I created some works in 4-5 days, “in one breath”, I hope you understand me! And some required many changes and alterations. This makes me sad, but I always try to keep the pattern concise and “perfect”.

Please write your opinion in the comments. 70 patterns per year, is that a lot or a little? How long does it take you to create a pattern? Is this process always fast and smooth? It is very important for me to hear your opinion, please.

Oh, I almost forgot! There were 2 more free patterns available on my blog! I overfulfilled the plan, so I’ll allow myself an extra piece of New Year’s cake!

So, my personal outgoing year results made me happy! Of course, this happened thanks to your support, kind words and attention to my work. You always inspire me. And this is priceless, of course.

I will be glad to meet you on my blog, on the YouTube channel, or in social networks! Happy New Year! https://www.youtube.com/ElenaKozinenko

https://www.facebook.com/kozinenkoelena

https://www.pinterest.com/elenakozinenko/_created/

Posted on Leave a comment

Christmas greetings for tatters!

Four handmade embroidered Christmas stockings, festive holiday tradition for children, made by FairyLacefromElena

Christmas greetings for tatters and my best wishes for all my readers, followers and friends!

My dear talented tatters!
Today is a very short post.
But very sincere and sincere!
I sincerely congratulate all the masters, beginners and just connoisseurs tatting Merry Christmas!
May Guardian Angel Wing always rustles over you and let a bright guiding star will illuminate your path!
Health, peace, love and happy creativity!

My Christmas greetings to tatters and my best wishes for all my readers, followers and friends!
Elena

Free patterns on my blog, welcome: https://fairylace.kozinenko.com/

Also I will be glad to meet you on my YouTube channel: https://www.youtube.com/ElenaKozinenko

Christmas greetings to tatters
Christmas greetings
Posted on 2 Comments

Tatting with netting needle

Round Mandala tatting lace doily, handmade with netting needle by FairyLacefromElena, showcasing original pattern and delicate craftsmanship

Tatting with netting needle, or how I use unusual tools.

Hello everyone! Thanks everyone for supporting my blog! Also, I thank you for the many answers to my question about the tatting tools you use. Today I want to tell you in detail about the wonderful netting needle tool.

So, first, a little story.
When I started tatting, I gradually mastered new tools and new techniques. Oh, this is very interesting! Besides, new knowledge does not allow our brain to “stop”, ha ha!
Once I saw amazing photos of Celtic patterns and decided I needed to do it. But how to do it? You will understand that the shuttle cannot be threaded through very small closed pieces. Therefore, another tool I needed. I used a weaving needle as a shuttle. I also tried long plastic celtic weave shuttles. It all works, of course. You will probably agree with me that the Internet is a super invention. How else would I see the mesh weaving kit? Unfortunately, then in our country there was not such a variety of accessories for needlework. And we have not even heard of online shopping!

So, I saw what I needed. I even found out the name of this instrument and told my sister about it. You cannot even imagine my delight and my gratitude to my little sister when I received a package from her with gifts. Oh, it was a real treasure! I unpacked and took out threads, stabilizers, scissors, tatting needles, templates for kumihimo and so on (the list is very long). And at the bottom of the box, I saw two netting needle kits!

Tatting with netting needle

I liked the set on the left better. because the ends of the tool are neater here and it is easy to wind the thread around them.

Tatting with netting needle

The needle has a small hole for tying the beginning of the thread.

Tatting with netting needle

But it turned out I can use this needle for tatting with beads too. This is very convenient because a huge amount of booster threads can be placed on this needle.

Tatting with netting needle

You can watch a small video of how I tat using this tool. https://youtu.be/3Fn-Urybu_A

Please note that when working with this tool, I use the second method for the shuttle. You can also see several tat methods on my channel. https://www.youtube.com/watch?v=ISTEQI1ud1k&list=UU3dn4_9pp7tIKA2k564wLBQ&index=6

Finally, I used igloo mesh to create my Summer Mood collection. By the way, all patterns are available in my store, welcome: https://fairylace.kozinenko.com/?s=summer+mood+pattern&post_type=product

In addition, you can get the perfect connection with long picots using a netting needle. https://www.youtube.com/watch?v=qWPPlAbps5I&list=UU3dn4_9pp7tIKA2k564wLBQ&index=21

Please subscribe to my blog, comment, ask questions. Trust me, your support is very important to me!