Posted on 2 Comments

No shaggy tails

No shaggy tailes

No shaggy tails, or carefully hide the ends of the threads at the end of the work.

Hello everyone! I recently learned that not all beginning taters hide the tails of the threads at the end of the work. They just weren’t taught! Ah, that’s a terrible omission. Yes, usually the instructions say: tie and cut. Where is the word “hide”? Gone, LOL! Therefore, today I invite you to go back to the beginning and talk in detail about this topic.

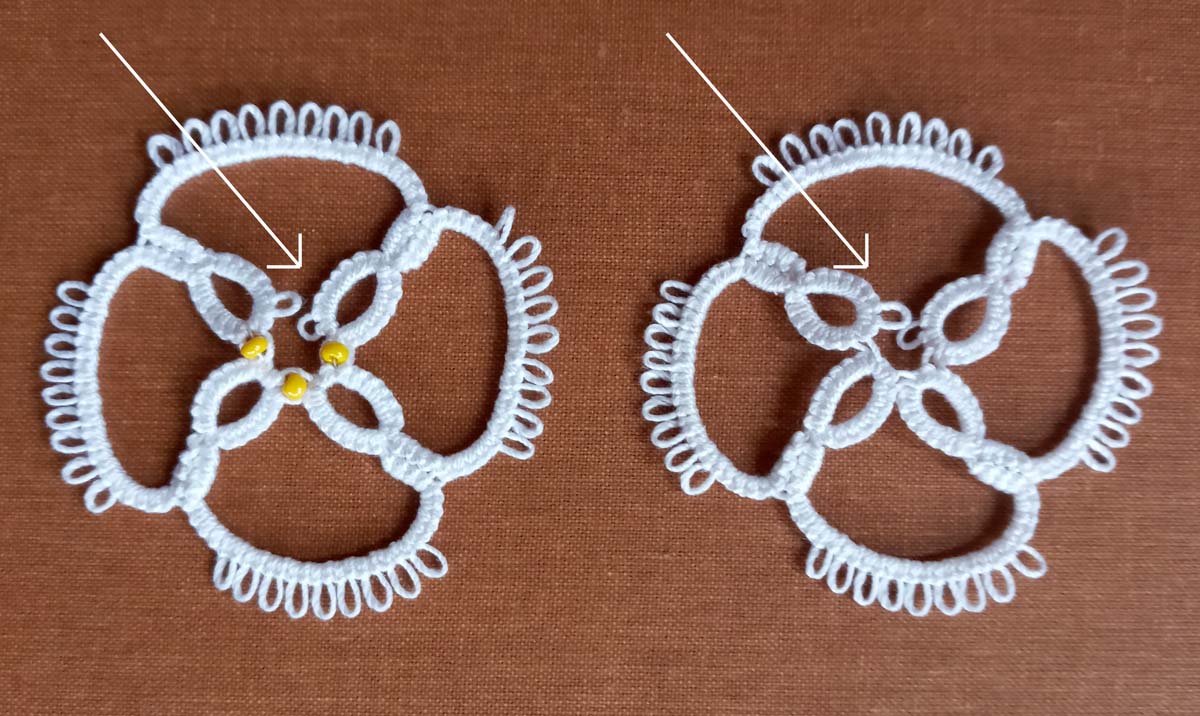
So, why do you need to hide the ends of the threads? Firstly, shaggy thread tails will look sloppy. And they will become shaggy very quickly, believe me! Secondly, by hiding the tails, we additionally secure the final knot. It is very important. After all, if the knot comes undone, we will get a disaster!

Try to hide your tails in different directions. For example, on different sides of the ring or in two different chains. This will help you avoid unnecessary thickening of the elements. It is also easier to pull one thread through the middle of double stitches rather than two.

I made a description of seven ways to hide the ends of threads. Some differ from each other only in the tool I use. But other options are possible, of course. Therefore, try, create and choose the method that is convenient for you. In addition to the instructions, I made an illustrative video. Hope this is helpful. https://www.youtube.com/watch?v=D8kVsN70EF4&list=UULF3dn4_9pp7tIKA2k564wLBQ

Method 1

You hide the ends of the threads with a sewing needle, sewing a seam over each double stitch. This method is the simplest, but not very reliable. It can be used if you do not need to wash the product. And, in addition, strong fixation will be required so that the tails do not “crawl out of the seam”. For example, for earrings or bracelets made of thin threads.

Method 2

Here we also use a sewing needle. But we don’t sew stitches, but hide the thread with a needle in the middle of the double stitches. It is enough to insert the needle into 3-4 double stitches. This method is fast. But if your knots are too tight, you will have to use small pliers to pull the needle out of the double stitches.

Method 3

Absolutely identical to the previous one. But we pull the thread with the needle into each double stitch separately (or even half a stitch). If the weaving is very dense, then this method is ideal, although not as fast as the previous one. By the way, don’t forget to protect your fingers with a thimble when handling the needle.

Method 4

For this method, I suggest using a thin wire bent in half. I call this wire the “magic tool”. Using wire, you hide one tail of the thread into the chain. And you “sew up” the second tail using a needle using method 2 or 3. And you can read about additional tools for tatting in my article here: https://fairylace.kozinenko.com/additional-tools-for-tatting/

Method 5

You can do the same thing by using an additional piece of thread instead of wire. In the video you will see how you can quickly and easily hide additional thread inside double stitches using a shuttle.

Method 6

This method is convenient to use if the pattern ends in a ring. In this case, at the beginning of the pattern (if it starts with a chain), you can use a small piece of additional thread or a paper clip. This will make it easier to connect the last chain before starting work. In the first 4-5 double stitches of the ring, hide the first tail (if the tail is long enough, you can tie it to the shuttle, it will be more convenient). Weave wire into the last 4-5 double stitches (as in Method 4). Form a ring and secure the second tail with a knot. And pull this tail through with wire.

Method 7

You hide both tails in one chain (or ring) at the same time. I only recommend using this method if you have weak double stitches. Because it is very difficult to pull two tails through double stitches at once (after all, the tails will be folded in half). And besides, such a chain will look noticeably thicker than the other elements.

I hope my long article did not bore or frighten you. Comments, questions, advice are welcome! Careful tatting and no shaggy tails!

Posted on 6 Comments

Magic simple knot

12 blue-yellow tatting hearts

Magic simple knot, or how to make life easier for yourself.

Hello everyone! First, I want to address my subscribers – participants in the competition for the best name for a doily (posts dated September 11 and 15). The validity period of the discount coupon for the Galaxy Flower doily tatting pattern has been extended until October 30. I sent the coupon code to ALL members. Please check all your email folders.

Now let’s get back to the topic of today’s post. Have you noticed how simple actions sometimes help us make our lives easier? I won’t get too philosophical, LOL! I just suggest that you check whether the SIMPLE knot is truly magical. Yes, yes, I’m talking about the very knot with which we tie our shoelaces. You will be surprised, but it really works!

Shuttle and ball threads

I have already written in previous posts how tatting elements have different names in different languages. One such example is the name of shuttle and ball threads. You might be very surprised. But in my language there are NO such names. The shuttle thread is called the leading thread. Because she seems to direct all the nodes of the work, leading the pattern along with her. And the ball thread is called working thread. Apparently because she forms knots, that is, she works hard!

I do not at all pretend to be a “HISTORIAN OF TATTING”, but I have a theory. At the beginning of the emergence of tatting, the patterns were simple and were made with one shuttle, or a shuttle and a ball. And by the time tatting spread to Eastern Europe, the patterns became more complex. There was a need for two or even three shuttles. In order not to confuse tatters, Europe and America left the same terminology. But the Slavic countries introduced new names, which in my opinion are logical if we use two shuttles.

Just in case, I want to remind new taters, shuttle thread is always on the right (if you are right-handed, of course!).

And now we come to the most interesting part!

You can make many patterns with one shuttle and ball. The trick is this. For example, you need to make a pattern like in the picture. As you can see, this is a pattern for two shuttles. Because the Rings here are made with the second shuttle (this is the shuttle with ball thread).

Try taking one shuttle and a ball! You can swap the threads of the ball and the shuttle using “magic” simple knot! I made a short video to demonstrate this simple but absolutely magical technique! https://www.youtube.com/watch?v=q9c7uiCt3jE&list=UULF3dn4_9pp7tIKA2k564wLBQ

Multicolor patterns

This works if you are making a single color pattern. What if I want to use two colors? I’m sure you remember a simple rule: the color of ball thread determines the color of the Ring or Chain (Wow, I definitely need to write philosophical treatises!). In this case, I take two shuttles with two different colors of thread and make simple knots however I want, LOL! Yes, I received 12 heart options where the color was NOT REPEATED. But I have 12 more options in my head! I liked the result so much that I decided to use this technique to create bookmarks. Of course, you can take threads of any other colors and create as many of your own color options as you like! Experiment, creativity is welcome. The pattern is available in my store. https://fairylace.kozinenko.com/product/pattern-bookmarks-tenderness/

Thank you for reading to the end. I hope I didn’t bore you too much!

Posted on 4 Comments

Cro-tatting Lesson 7

Free tatting pattern

Cro-tatting Lesson 7 , or translation difficulties.

Hello everyone! This article is a continuation of Lesson 6. Therefore, follow the link if you have not read or watched the video of the previous lesson: https://fairylace.kozinenko.com/cro-tatting-lesson-6/

Lesson 7

At first I wanted to start this article with the story of the Tower of Babel. Well, you remember how God gave people different languages so that they would not understand each other. But then I thought that this is not entirely true. The question is philosophical. Because very often, speaking the same language, people cannot understand each other. Probably, this happens because many people have forgotten how to listen, empathize and understand others. And the notation in English for crocheting terms me to such reflections. How can I figure this out, I have no idea! LOL

But I’m pretty creative, you know. Therefore, I decided to write an abbreviation for UK and for US. Hope you don’t get confused!

So, today I invite you to make a small round motif with two rows. We will make the second row with single crochets. Yep, that’s where we got it! Don’t worry, we’ll fix it. UK terms – dc ( double crochet ), US terms – sc ( single crochet ).

Row 1

The first row consists of Rings and Chains. The chains in cro-tatting are crocheted and form an “arc” of air loops (in the abbreviation сh).

Row 2

In the second row, I used rings and single crochets ( or double crochet ) . Please note that before performing the Ring, you need to turn the work. And since you are getting the wrong side, it is better to start a double stitch from the second half. You will clearly see in the photo how the front side (pink ring) differs from the wrong side (yellow ring).

For clarity, of course, I made a detailed video. Don’t forget to subscribe, comment and share my video on social media please. https://www.youtube.com/watch?v=KpE8dFoOJtM&list=UULF3dn4_9pp7tIKA2k564wLBQ

FREE PATTERN LESSON 7

You can download the pattern Cro-tatting Lesson 7 by clicking on the link. Or just take a screenshot. https://drive.google.com/file/d/16VtiI2bIQy7RqmpuMJIhbx29agpDibpD/view?usp=sharing

If my articles are interesting and useful to you, subscribe to my blog, comment, share on social networks. Your feedbacks is very interesting and important to me. Don’t forget to check my store, welcome: https://fairylace.kozinenko.com/

Posted on 6 Comments

How to use fabric scraps

Stool pad from fabric scraps

How to use fabric scraps, or what I can do.

How to use fabric scraps

Hello everyone! If you follow me on social networks, you have seen my new work tatting. These are the seven bookmarks of the Chakras. Ah, making two orders in two weeks was not easy! Eyes and hands are a little tired. So I decided to take a break from lace and clean up my craftroom.

Fabric

I’m sure many of my subscribers own several types of needlework. Therefore, you know that it is impossible to put things in order in the workshop without destroying the “stocks”. But throwing away even a small piece of fabric is IMPOSSIBLE! Do you agree? So, I started with a big box of scraps. I had an idea and it took two days to implement it.

Ironed

First, I ironed all the pieces of fabric. Moreover, I did not select fabrics by texture or color, so as not to waste time.

How to use fabric scraps

Then I cut a lot of squares and rectangles. To speed up and facilitate the process, I used a patchwork ruler as a template. And I got the same width of all the pieces – 2.5 inches. By the way, the roller knife helped me to cope with this work wonderfully!

How to use fabric scraps

Then I sewed small pieces into long strips. Of course, all the seams must be ironed out. I thought that the connection of small pieces would be too colorful, so I prepared long strips of “zebra” fabric.

How to use fabric scraps

Now the fun begins! I sewed all the strips diagonally onto a base of light dense fabric and synthetic winterizer. I also stitched each strip, pinning the layers together. To adjust the fabric while sewing, I use an interstitial fixture. If you liked my special “thimble”, write in the comments!

How to use fabric scraps

And at the end of the work, I sewed strips of black dense fabric along the edges of the “variegated disgrace”. The result of my cleaning in the workshop: minus two bags of fabric scraps, minus two sheets of PVC, minus one old tablecloth, minus a bag of sintepon scraps and plus two empty boxes. You see the result in the photo!

So, I showed how to use fabric scraps. In addition to tatting and sewing, I own many other types of needlework. What kind of needlework do you do? Write about it in the comments, I’m very interested. Support my blog, subscribe and share on social networks, thanks!

Also visit my YouTube channel. Subscribe, comments and likes are welcome! https://www.youtube.com/c/ElenaKozinenko

Posted on 2 Comments

Cro-tatting Lesson 3

Green round lace coasters in cro-tatting technique

Cro-tatting Lesson 3 , or why master the split ring.

Hello everyone! This article is a continuation of Lesson 2 . Please check the link: https://fairylace.kozinenko.com/cro-tatting-lesson-2/

My regular readers know I’m lazy! Haha! Because I don’t like to hide the ends of the threads. Oh, it’s almost as terrible as unraveling the threads in a finished tatting. I’m sure a lot of tatters understand me. If you agree, please write in the comments. After all, each of your comments helps to make my blog more interesting and useful. In addition, in this way you will raise this article higher in the search and give more readers the opportunity to get acquainted with useful material. (Oh, I hope this is helpful!)

Why you need a split ring

Firstly, the use of a split ring helps us to move from one row to another WITHOUT cutting the thread. I like to use this trick. In this way, I get much less tails of threads, which have to be hidden with great pain. By the way, you can not hide polyester threads. You can cut them short and melt them with a lighter. But be careful, otherwise you can ruin the product!

Secondly, the split ring helps in creating very original patterns. By the way, the split rings bookmark looks pretty cute, doesn’t it!

Cro tatting lesson 3

Thirdly, the split ring can be made with a shuttle, needle or crochet. For all these three tatting tools, I have already published videos on my You Tube channel. Thank you in advance for all the likes, comments and subscriptions! Today I added a separate video for cro-tatting. I hope Cro-tatting Lesson 3 was interesting and useful for you. You can watch all the videos on Split Ring by clicking on the link: https://www.youtube.com/watch?v=ZM5ONjnKNOI&list=UULF3dn4_9pp7tIKA2k564wLBQ

The topic of my next lesson is a split chain for cro-tatting. I’m sure you’ll like it! Also you will enjoy visiting my store, please check! https://fairylace.kozinenko.com/

Posted on 2 Comments

Work on bugs

Illustrative video FairyLacefromElena how to fix a mistake in the picot connection

Work on bugs, or never fall into despair.

Hello everyone! Today I want to thank everyone who thinks of me, prays for my country and supports us in this terrible time. So I just can’t imagine how one can cope with depression or despair alone.

Yesterday I had a psychologically very difficult day. 400th day of open occupation, bombing and destruction of my country. Yes, my nerves can not stand it, alas. Although I try to do my favorite thing – tatting. But this is impossible. After all, creativity requires a special state of mind. Do you agree?

Ah, I had to reach out to FB tatting group members for support and prayers. My dears! I am extremely touched by your words and prayers. Also I low bow to everyone for not letting me fall into despair!

Fixing the bug connecting picots

Unfortunately, circumstances do not always give me the opportunity to be an active participant in social networks. But I’m trying! Recently I saw a post with a photo of an error in the finished tatting product and the question is whether it can be fixed. Of cource, all needleworkers know how much time, work, focus and diligence we put into each of our handmade products. And then, finally, when you can with delight say “tadaaam!” , you discover an unfortunate mistake. Ah, I forgot to connect the two elements with picots according to the scheme. What to do? How to fix? Throw everything away and start over? Well, how can you not fall into despair.

But my article today is titled: Work on bugs, or never fall into despair. So, the main thing is not to succumb to negative emotions. As you know, there are two ways out of any situation, one of which is correct, ha ha! So what can we do? First, you can throw away this work and do it all over again. But that would be just the wrong way out. Therefore, I suggest taking a sewing needle and a thin thread of the same color as our product. This way you simply sew each missing picot to the ring (or chain, if it fits the pattern). Of course, it is difficult to explain this process in words. However, we have an assistant – YouTube channel! My new video on this topic is ready to watch, welcome! https://www.youtube.com/watch?v=2waGQ_elnk8&list=UULF3dn4_9pp7tIKA2k564wLBQ

Please subscribe to my blog, comment and share on social networks. And also check my store: https://fairylace.kozinenko.com/

Thank you!

Posted on 2 Comments

Cro-tatting lesson 2

Cro-tatting. Lesson 2

Cro-tatting lesson 2, or how easy and simple it is to make a closed motive.

Hello everyone! This article is a continuation of Lesson 1. Please check the link: https://fairylace.kozinenko.com/cro-tatting-lesson-1/

Today I want to show you how to make a simple closed motif. After all, tatters are constantly faced with such elements! Of course, you use flowers, medallions, rosettes, small squares or triangles in your work. I know it’s not always easy to connect the last element to the first one in such fragments. Especially often this question worries novice needleworkers. By the way, I advise you to start mastering the closed motif with a piece that contains at least 5-6 Rings. You ask why? Becouse in this case It is more convenient to rotate the finished part of the work for joining.

Of course, I made a short video. Although I made this video using a tatting hook, the principle of connecting the rings into a closed motif will be interesting and useful for lovers of the shuttle and the needle also. I’m sure words can’t explain everything. It’s good that there is an opportunity to find a video on YouTube that you will like and be useful to you! The Internet has brought into our lives the opportunity to learn whatever your heart desires. But be careful! I urge everyone not to get completely dependent on the World Wide Web! Haha! Sorry, I digress.

So, today I suggest you make a small motif of eight rings and eight chains. For beginners, I advise choosing high-quality #10 threads. And it is better if you take threads of light shades. Oh, believe me, dark threads (especially black ones) are very tiring for the eyes.

This is a graphic diagram and instructions. You can easily copy this picture (this is JPG file).

And I will be glad for your comments, wishes and subscriptions here and on my YouTube channel. You can watch the video Cro-tatting lesson 2 here, welcome: https://www.youtube.com/watch?v=mmClyW-P0gM&list=UULF3dn4_9pp7tIKA2k564wLBQ

Posted on 6 Comments

Cro-tatting Lesson 1

Lavender cro-tatting lace sample showing basic double stitches, handmade by FairyLacefromElena

Cro-tatting Lesson 1. A bit of history and also basic knots.

Hello everyone!  My regular readers, you certainly know how much I love tatting. This is a hobby for me, a passion, an antidepressant and an opportunity to support my Ukraine in this difficult time. In addition, I try to popularize this amazing needlework technique. And today I’m starting a series of cro-tatting lessons.

What is cro-tatting

Crochet combines tatting needle with crochet. The cro-tatting tool is a needle with a hook on the end. I’m sure you can read the full article on tatting on wikipedia. Many people find cro-tatting more difficult than crocheting or tatting.

Some tatting instructors recommend using a tatting needle and a crochet hook. But I haven’t tried it. Perhaps because I have the perfect tool (in my opinion) – Toshiko Takashima hook.

Unfortunately, this type of tatting is quite rare. And completely undeserved, in my opinion. In addition, cro-tatting are easy to unravel if you make a mistake. You just need to pull the end of the thread, haha! I know, supporters of tatting by shuttle would certainly appreciate it!

Base knots

Cro-tatting lesson 1

This photo shows that all the rings are made using the classic tatting technique. That is, the rings are made up of double stitches (ds). And the chains are crocheted and consist of air loops (al). Perhaps because of the intricacies of the translation, I again confuse the terminology. So write me in the comments, please, if I’m wrong (to do this, click on the Leave a comment button at the BEGINNING of the article).

For cro-tatting lesson 1, I made a video demonstrating the base knots. Of course, if you know how to tat with a needle, it will be very easy for you to make a double stitches. The main difficulty lies in the formation of the ring. But with just a little practice, you’ll get the hang of it. I decided to show you two ways to form a ring. Personally, I prefer the first way. Because this way the ring turns out to be more symmetrical (it seems to me).

In the recording, cro-tatting Ring looks the same as a shuttle or needle tatting. For example, R: 16.
English term for the chain is “single crochet” and in abbreviation “C: 7 sc”. Although in Ukrainian this term is called “air loop” and is denoted, for example, as C: 7al.

https://www.youtube.com/watch?v=rdd7EHAM9lI&list=UULF3dn4_9pp7tIKA2k564wLBQ

And also subscribe to my YouTube channel and blog. I will try to make new video tutorials and detailed articles on the topic of cro-tatting in the near future. Thanks in advance for your comments, questions and suggestions!

📚 Continue learning with https://fairylace.kozinenko.com/cro-tatting-lesson-2/

🧵 Frequently Asked Questions

Q: What tool do I need for cro-tatting?
A: You’ll need a special cro-tatting hook — a hybrid of a crochet hook and a tatting needle. You can find it in my shop here: https://fairylace.kozinenko.com/product/set-of-3-cro-tatting-hooks/

Q: Is cro-tatting the same as tatting?
A: Not exactly! Cro-tatting combines crochet and tatting techniques. You use a small hook instead of a shuttle to form stitches.

Q: Can beginners try cro-tatting?
A: Absolutely! This first lesson will help you master the double stitch — the foundation of all tatting work.

Posted on 4 Comments

Tatting Josephine knot

Handmade tatting lace snowflake with Josephine knots

Tatting Josephine knot, or laziness is the engine of progress.

Hello, everyone! Let’s talk about laziness. Is it really true to say that laziness is the engine of progress? But what about creative impulses or bouts of vanity? As an unselfish desire to benefit humanity or a thirst for enrichment? Yes, no one has canceled human passions! But let’s briefly “go over” the history.

Once upon a time, primitive people climbed tall trees to pick fruits. But one “lazy person” did not want to climb up the hard bark. He picked up a stick, threw it up and – ta-daaaam! – knocked down a juicy sweet fruit. So the ancient man learned to use a stick as the first tool.

Years passed, humanity developed. Cities were built, trade arose. Oh, how difficult it is to deliver goods on your own shoulders. And again, some “lazy person” decided to attach round supports to the box and forced the donkey to drag this improvised cart. I imagine what a sensation this procession made at the old fair!

Well, I hope you get my point! And of course, they appreciated the sense of humor! Now I’m smoothly moving on to my own laziness, ha ha! My regular readers know that I really like to “complicate” my work. I’m too lazy to wind the thread on a small shuttle, so I try to take larger shuttles. By the way, this makes it possible not to increase the thread during operation. And this is my main goal, because I hate to hide the ends of the threads. I am horrified at the mere thought that by the end of the last knot I will have to hide 50 (or 150) tails of threads! This is especially true for multi-row patterns.

Of course, I didn’t “invent the wheel” when I started using false picot, split ring and split chain to go to the next row without cutting the thread. My subscribers must have watched the video tutorials on my YouTube channel. https://www.youtube.com/channel/UC3dn4_9pp7tIKA2k564wLBQ

But while creating a new snowflake, I thought, why not make the same transition using a combined ring of Josephine knots? This snowflake is part of a Christmas garland. https://fairylace.kozinenko.com/product/pattern-easy-twist/

I couldn’t find any links on the internet for this. Maybe I was looking bad, what do you think? It is also possible that this technique has the correct name. Write in the comments please. After all, the terminology in different languages has certain differences. Subscribe to my blog! And also watch the video of Josephine split ring, welcome:https://www.youtube.com/watch?v=MXjpLw9d4C4&list=UULF3dn4_9pp7tIKA2k564wLBQ&index=1

Posted on 2 Comments

Bracelet with cute story

Blue tatting lace bracelet with beads. Handmade by FairyLacefromElena

Bracelet with cute story, or how I was looking for a name for a new bracelet.

When I was picking threads for this bracelet, I imagined a cute Barbie doll. Barbie style suggests just such delicate, romantic and soft colors. But I can’t call my bracelet Barbie, because it could be copyright infringement. I always urge masters to treat copyrights of any artist reverently and honestly. So I went to the internet, haha! By the way, at the same time I learned some interesting facts. You probably know how I love to learn new interesting stories.

Bracelet with cute story

Some facts about Barbie

Barbie first appeared at the children’s goods fair in New York (1959). Ruth and Elliot Handler created this amazing doll. It is believed that the prototype of the famous doll was Bild Lilly, the heroine of erotic comics published in the newspaper “Bild Zeitung” (Germany). Barbie’s full fictional name is Barbara Millicent Roberts.

The first Barbie cost $3. Ah, I can’t even imagine how much a collectible Barbie can cost today!

Nowadays, there are many models of the famous doll and her family and friends. Also huge number of all kinds of accessories, computer games about Barbie are also sold. In 2004, the cartoon “Barbie and the Nutcracker” was filmed. In my opinion, few toys can compete in popularity with this blonde Barbara!

I think you will also like my new bracelet with this cute story. By the way, you can make such a bracelet according to my master class. https://fairylace.kozinenko.com/product/pattern-celtic-bracelet-ballerina/

I also invite you to visit and subscribe to my YouTube channel, welcome: https://www.youtube.com/watch?v=t8pA49htn9U&list=UU3dn4_9pp7tIKA2k564wLBQ

I have to admit that this post was not easy for me. It is hard not to think about grief and misfortune in my country. And I am deeply grateful to everyone who supports and prays for our free, strong and independent Ukraine! Thank you my dear friends!